Transfer Learning with Keras for Computer Vision Applications

บทความโดย ผศ.ดร.ณัฐโชติ พรหมฤทธิ์
ภาควิชาคอมพิวเตอร์
คณะวิทยาศาสตร์
มหาวิทยาลัยศิลปากร
Transfer Learning เป็นการนำ Weight ของ Model ที่ถูก Train ด้วย Dataset ในงานหนึ่ง (Pre-trained Model) กลับมาใช้ใหม่กับอีกงาน แทนที่จะต้อง Train ด้วยตัวเองตั้งแต่ต้น ซึ่งอาจจะใช้เวลาเป็นวันๆ หรือเป็นอาทิตย์ โดยนอกจากเป็นทางลัดที่ช่วยประหยัดเวลาแล้ว การทำ Transfer Learning ยังช่วยเพิ่มประสิทธิภาพการเรียนรู้ของ Model ในงานใหม่ด้วย
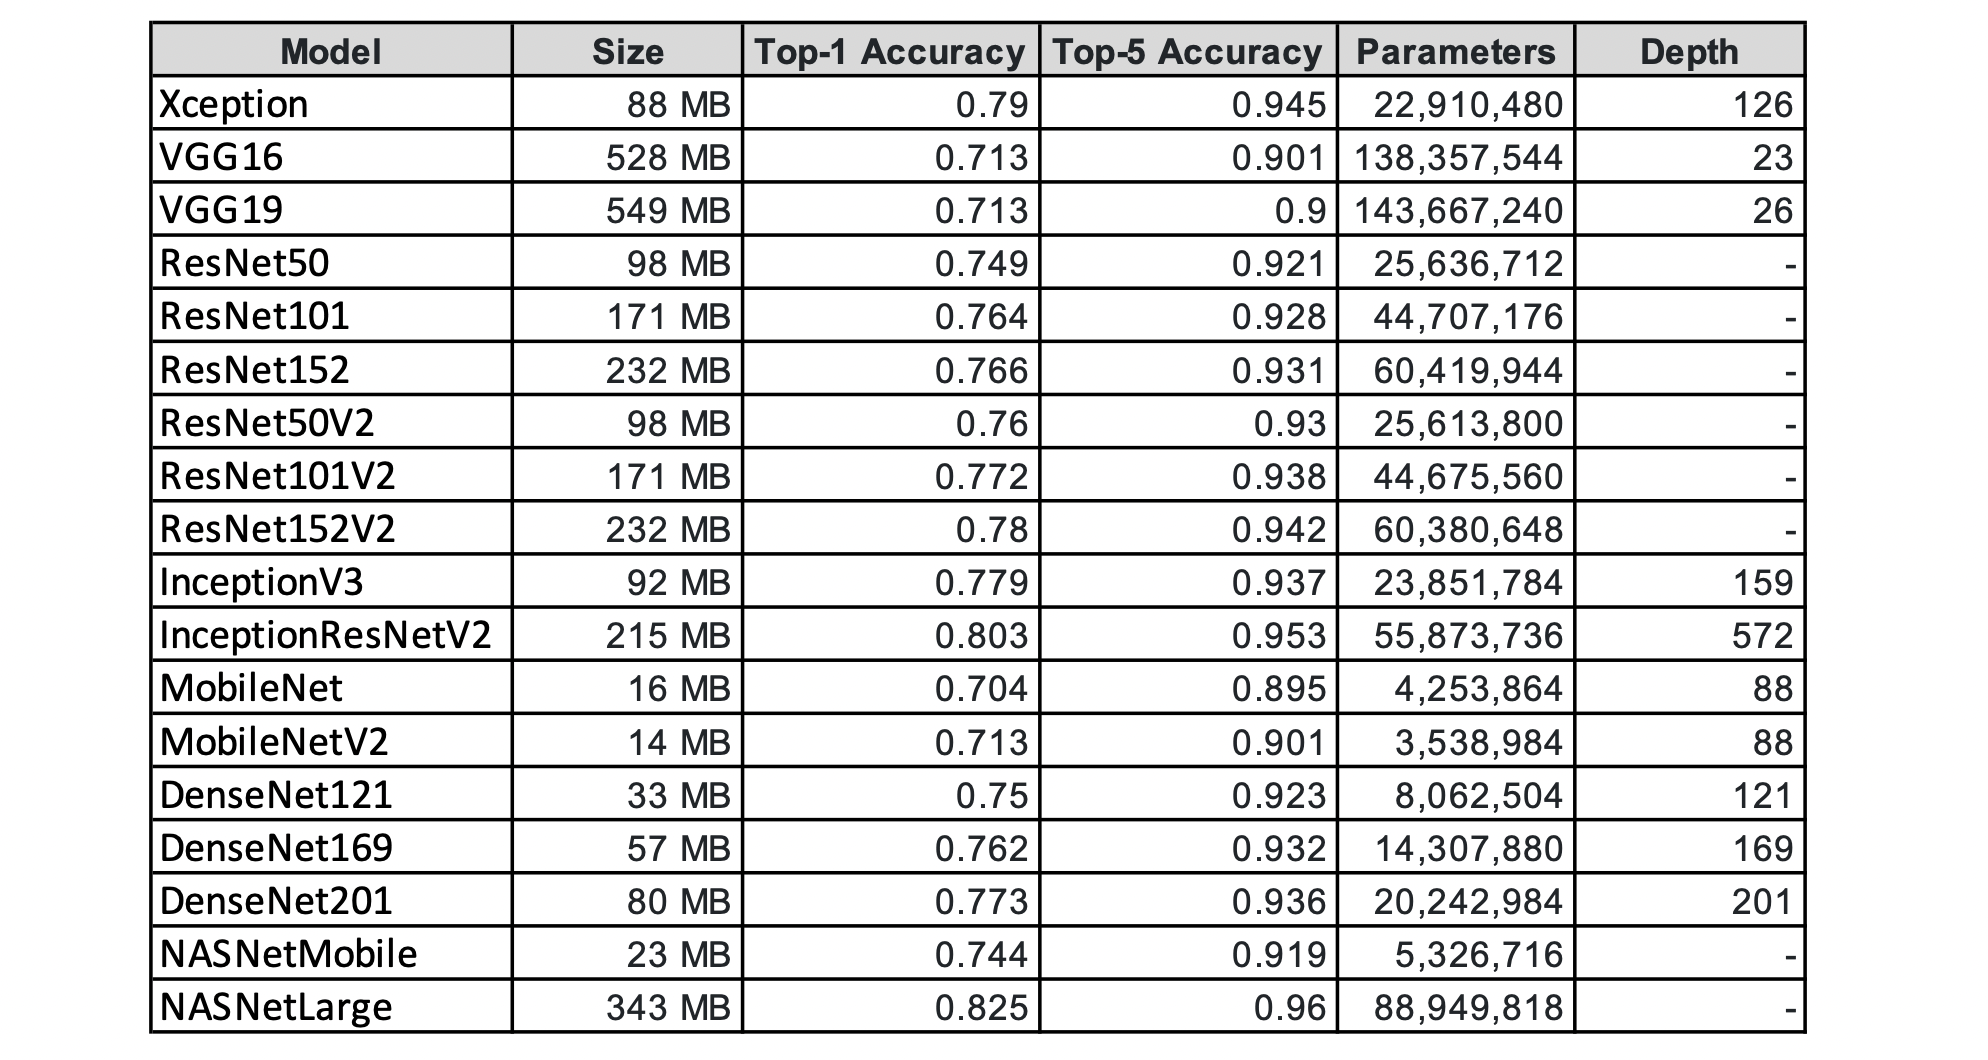
ในบทความนี้ เราจะนำ Weight ของ Top 20 Pre-trained CNN Models ได้แก่ Oxford VGG, Microsoft ResNet และ Google NASNetLarge ที่ถูก Train ด้วย ImageNet Dataset (Standard Computer Vision Benchmark Dataset) ไปประยุกต์ใช้กับงานด้านต่างๆ ด้วย Keras Library บน Google Colab ครับ
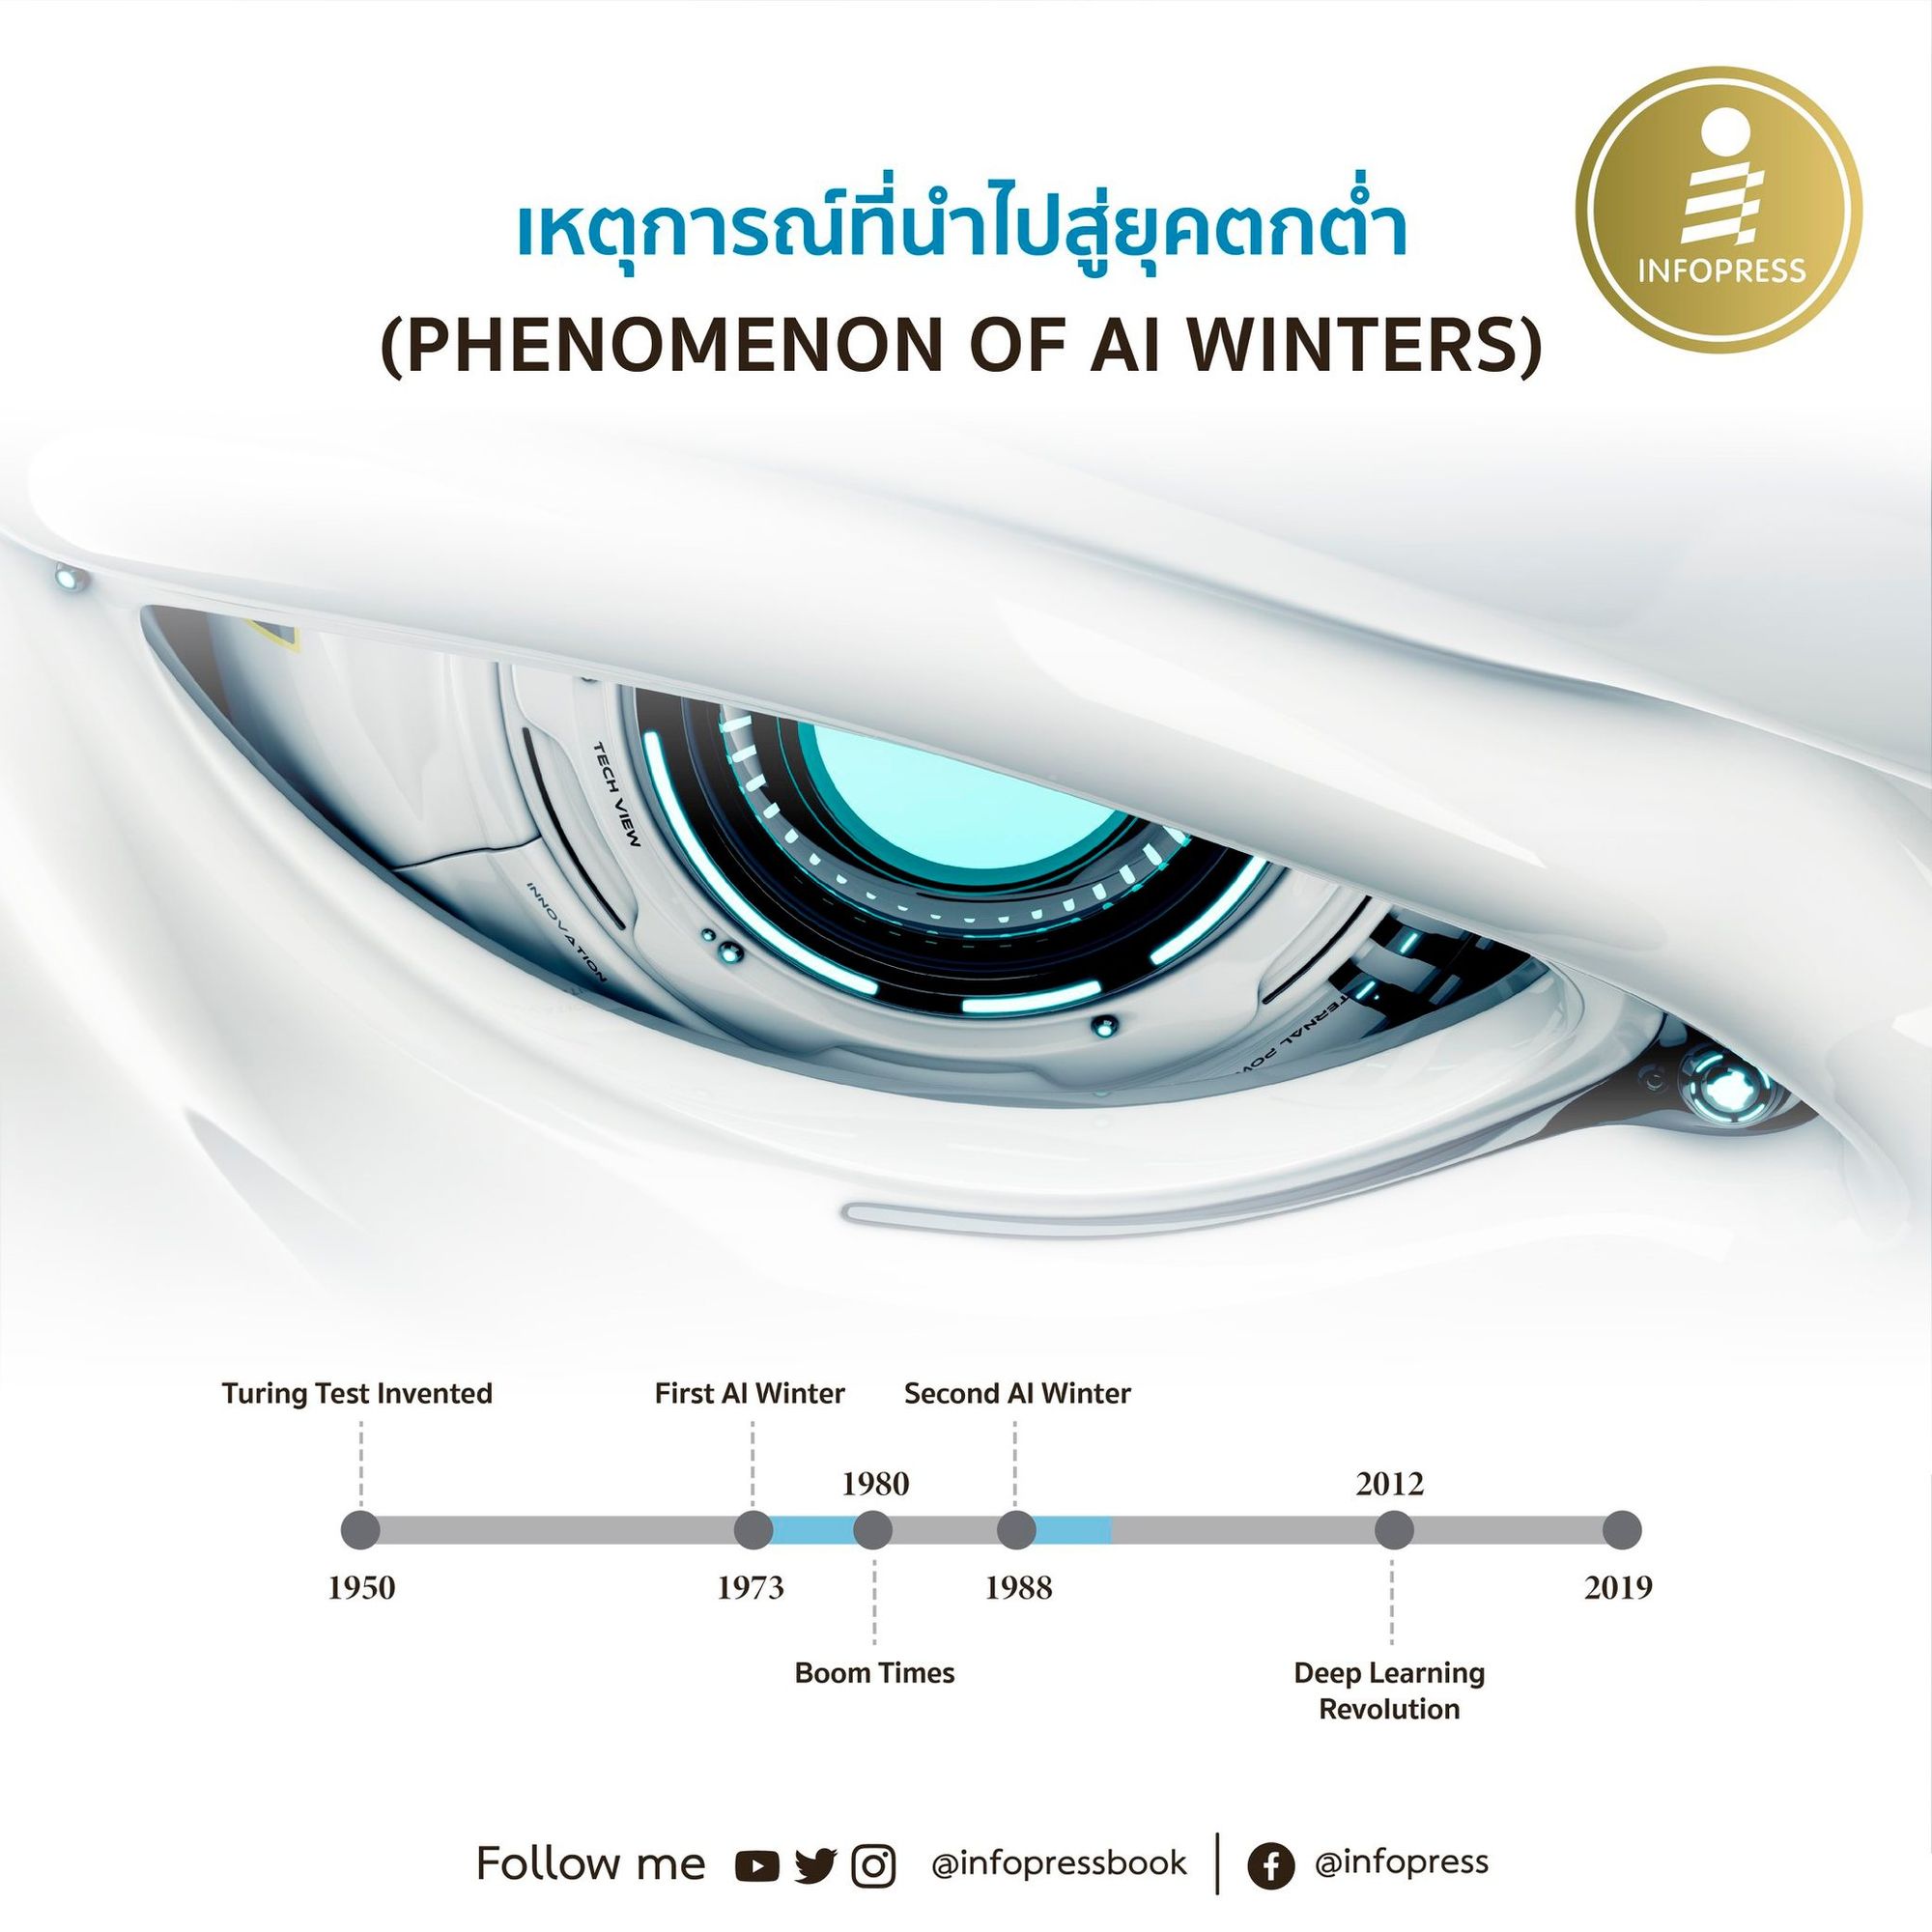
เมื่อพูดถึง ImageNet เราสามารถย้อนกลับไปถึงปี 2012 ซึ่งนักวิจัยกลุ่มหนึ่งได้นำเสนอรายงานการจำแนกประเภทภาพ ImageNet Dataset ด้วย CNN ที่มีความถูกต้องถึง 85% และในเวลาไม่เกิน 2 ปี ประสิทธิภาพในการจำแนกประเภทภาพก็สูงขึ้นเป็น 96% สูงกว่าการจำแนกโดยมนุษย์ที่ 95%
CNN Architecture
ปกติโครงสร้างของ CNN Model จะประกอบด้วย Convolutional Base Layer และ Classifier Layer
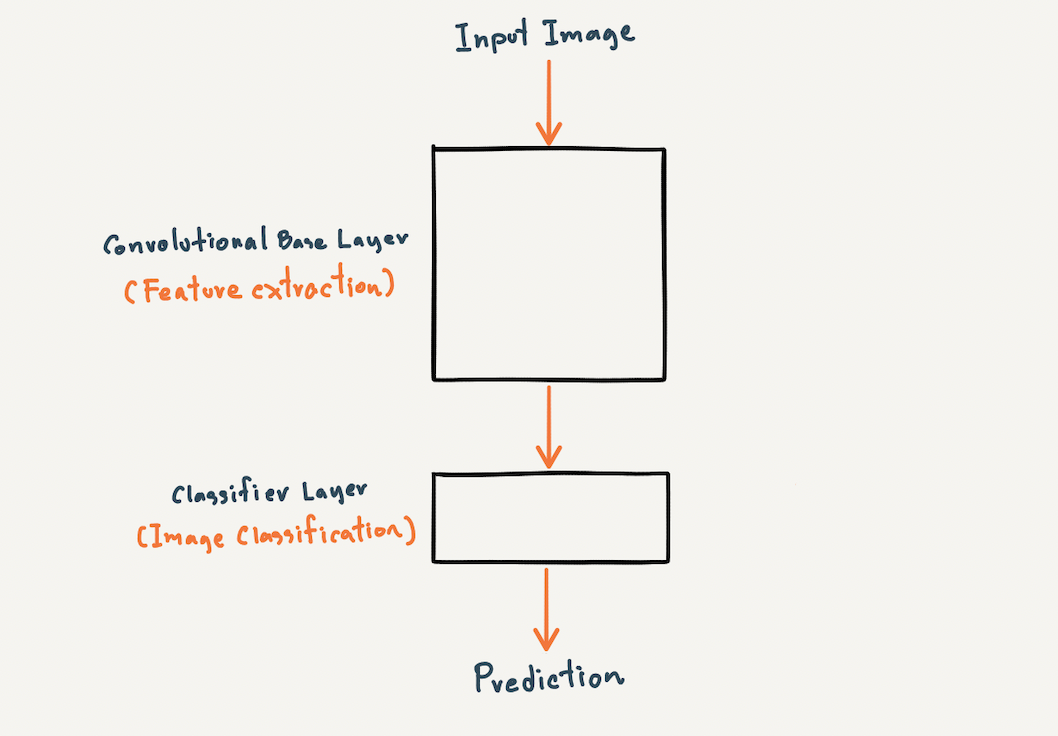
Convolutional Base Layer จะเป็นส่วนที่มีหน้าที่ในการสกัด Feature ของภาพ (Feature Extraction) และ Classifier Layer มีหน้าที่ในการแยกประเภทภาพ (Image Classification) โดยเราสามารถนิยาม Model ที่มีโครงสร้างทั้ง 2 ส่วน ด้วย Keras Library ได้ดังต่อไปนี้
import tensorflow as tf#Feature Extraction
img_shape = (28, 28, 1)
model = tf.keras.Sequential()
model.add(tf.keras.layers.Input(shape=img_shape))
model.add(tf.keras.layers.Conv2D(32, kernel_size=(3, 3), activation='relu'))
model.add(tf.keras.layers.Conv2D(64, (3, 3), activation='relu'))
model.add(tf.keras.layers.MaxPooling2D(pool_size=(2, 2)))
#Image Classification
model.add(tf.keras.layers.Flatten())
model.add(tf.keras.layers.Dense(128, activation='relu'))
model.add(tf.keras.layers.Dense(10, activation='softmax'))model.summary()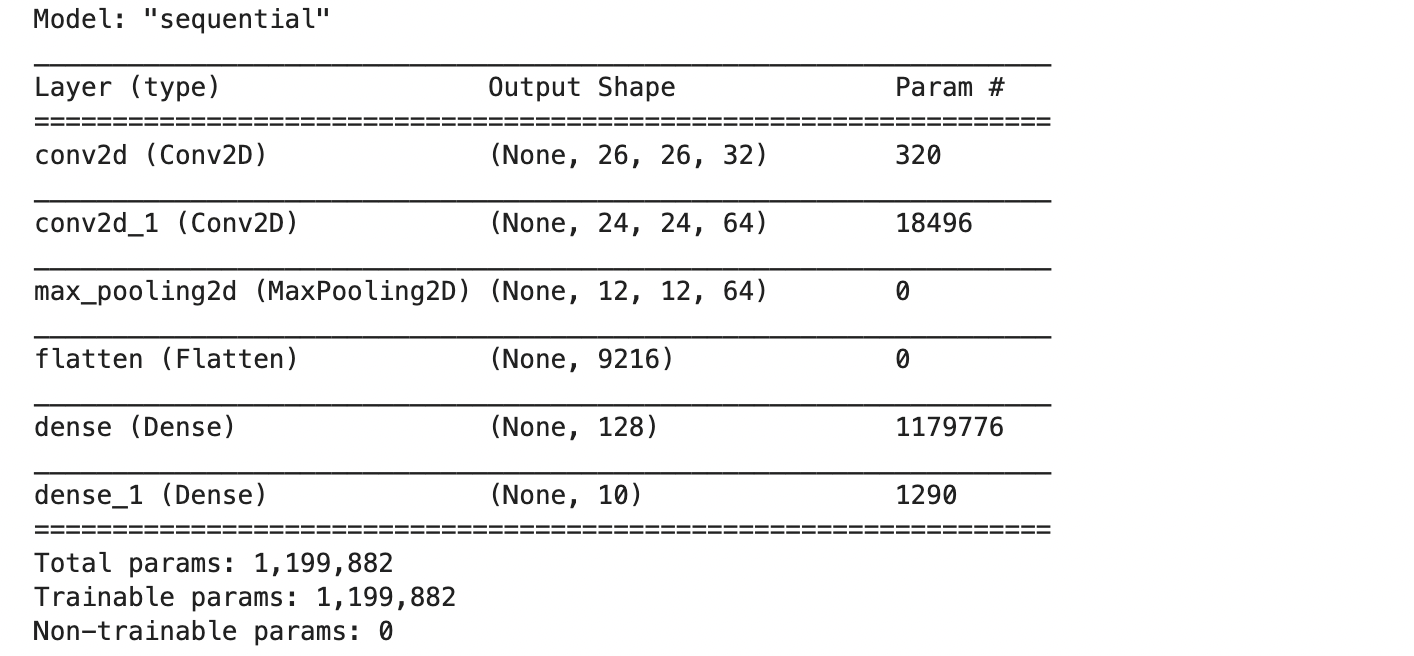
ซึ่งทั้ง VGG, ResNet และ NASNetLarge ต่างก็มีโครงสร้าง 2 ส่วน คือ Convolutional Base Layer และ Classifier Layer ที่สามารถปรับแต่งให้เหมาะสมกับการใช้งานในกรณีต่างๆ
Transfer Learning Strategies
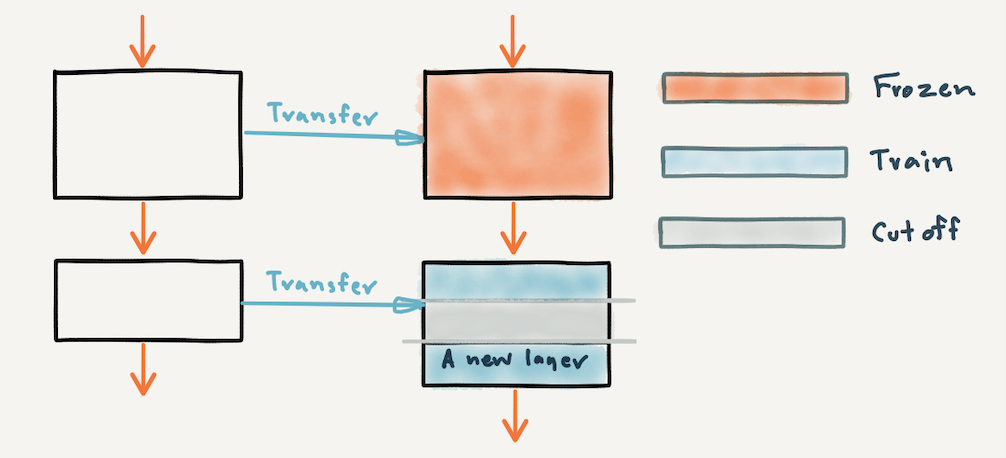
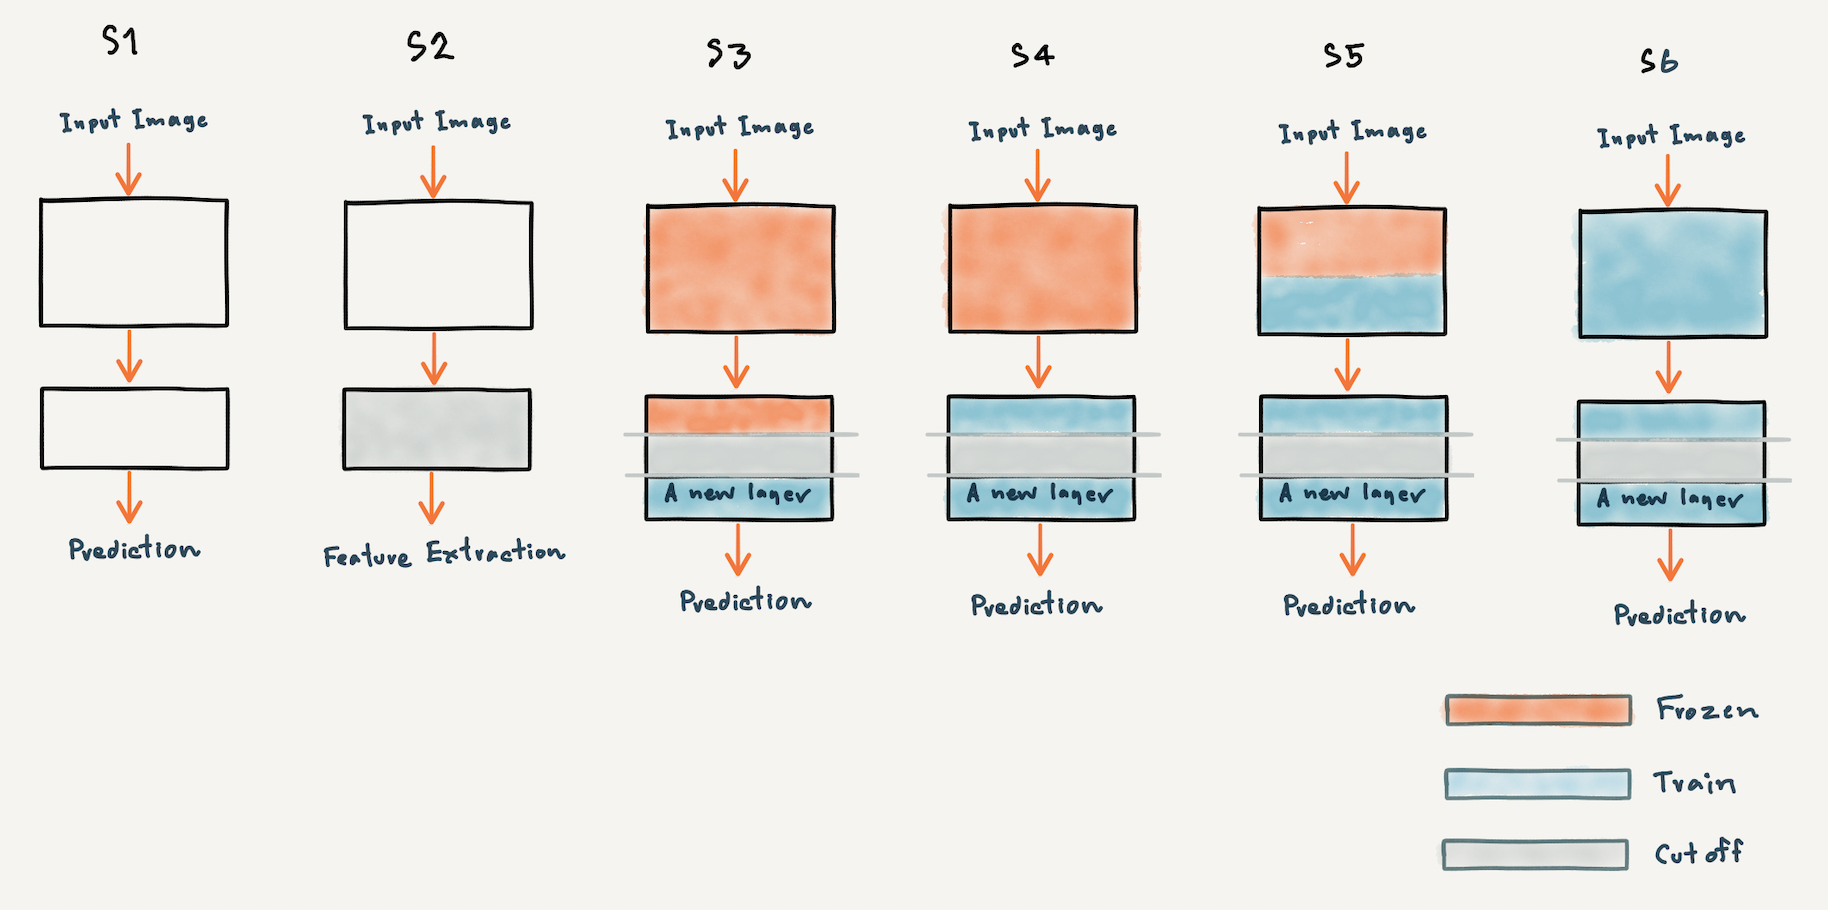
เพื่อให้เข้าใจว่าเราสามารถนำ Pre-trained Model ไปใช้อย่างไรได้บ้าง ผมจะขอแสดงภาพประกอบด้านล่างซึ่งมีรูปแบบการนำไปใช้ คือ Classify ภาพโดยตรงโดยไม่ปรับแต่งอะไร (S1) ตัด Top Layer (Classification Layer) เพื่อเอา Feature ไปใช้งาน (S2) เพิ่ม Layer ใหม่หลังจากตัดส่วนปลายแล้ว แช่แข็งบาง Layer (Frozen) และ Train ใหม่บาง Layer (S3, S4 และ S5) หรือแม้แต่ Train ใหม่ทุก Layer (S6) เป็นต้น
Computer Vision Applications
ในงานด้าน Computer Vision เราสามารถประยุกต์ใช้งาน Pre-trained Model ได้หลากหลายวิธี บทความนี้จะยกตัวอย่างการนำไปใช้งานแค่ 3 วิธี ได้แก่
Classifier นำ Pre-trained Model ไป Classify ภาพใหม่โดยตรง (Strategy S1)
Image Search ค้นหาภาพด้วย Feature ที่ได้จาก Pre-trained Model (Strategy S2)
Fine-tuning (Classifier) Classify ภาพในงานใหม่ โดยตัดส่วนปลายของ Pre-trained Model เพิ่ม Layer ใหม่ แล้วแช่แข็งบาง Layer หรือ Train ใหม่ทุก Layer (Strategy S3 S4 S5 และ S6)
Classifier
ความท้าทายหนึ่งของ ImageNet ที่นอกจากจะมีการรวบรวมภาพไว้มากกว่า 1 ล้านภาพ ซึ่งทำให้มันกลายเป็น Standard Benchmark Dataset แล้วนั้น ยังมีความท้าทายสำหรับการทดสอบประสิทธิภาพ Pre-trained Model คือ การที่มันมีจำนวน Class มากถึง 1,000 Class
ในตัวอย่างนี้เราจะนำ Top 20 Pre-trained CNN Models อย่างเช่น VGG, ResNet และ NASNetLarge ที่สามารถ Classify ภาพได้ทั้งหมด 1,000 Class ไป Classify ภาพใหม่ๆ โดยตรง ดังนี้
- ไปที่ Google Colab แล้วคลิ๊ก NEW NOTEBOOK
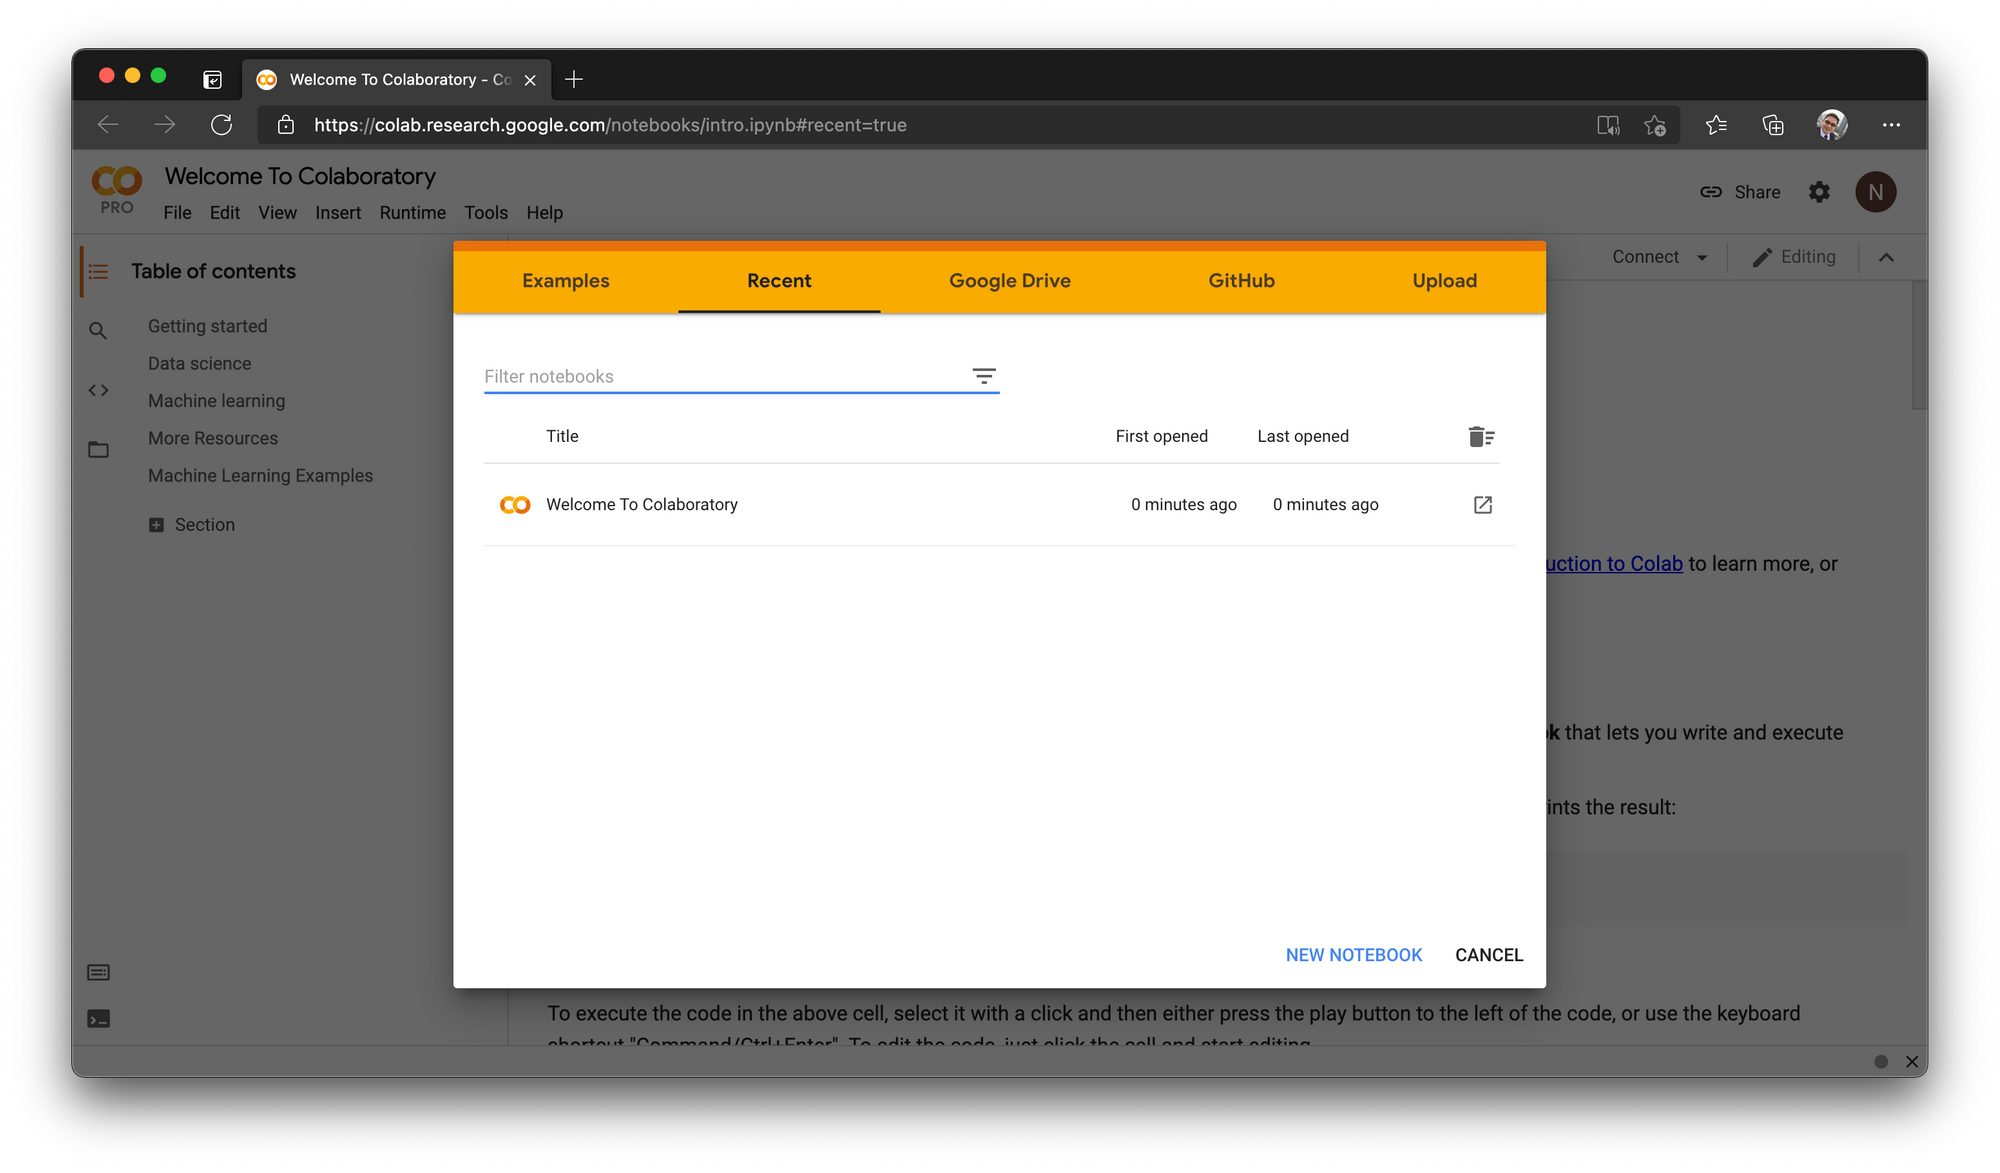
- คลิ๊กที่ Untitledx.ipynb ตั้งชื่อไฟล์เป็น tf101.ipynb แล้ว เลือกเมนู Runtime -> Change runtime type
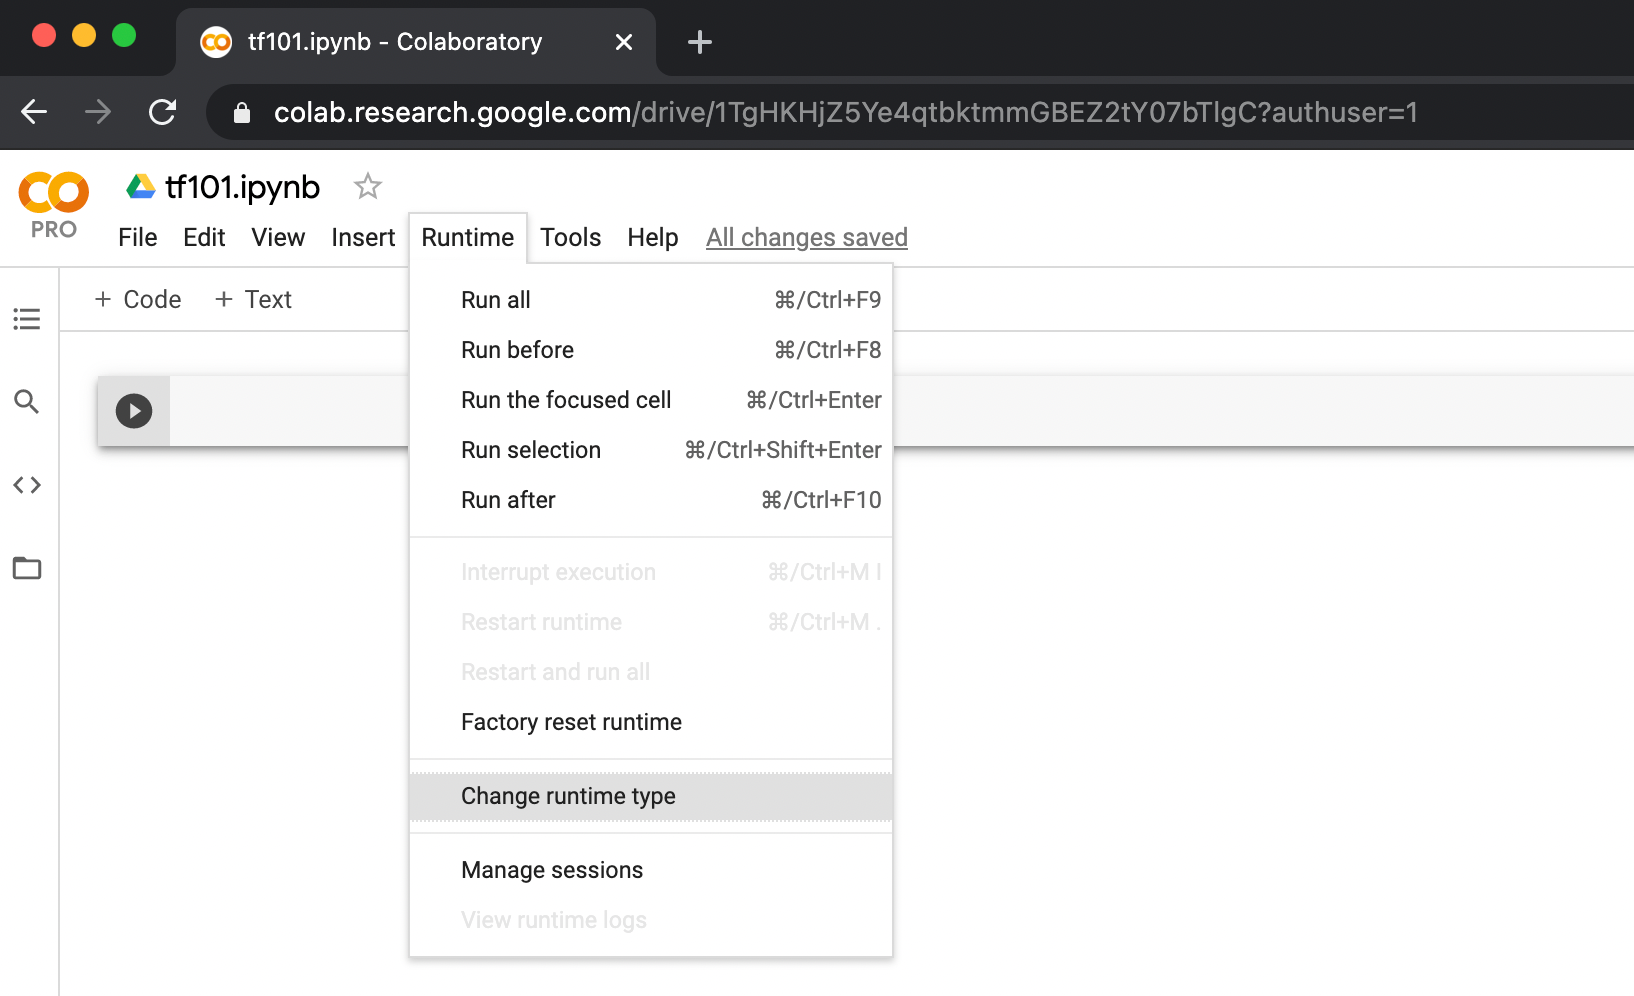
- เลือกชนิดของ Hardware accelerator เป็น GPU และ Runtime shape เป็น High-RAM แล้วคลิ๊ก SAVE

- ตรวจสอบการใช้งาน GPU ด้วยคำสั่งต่อไปนี้
!nvidia-smi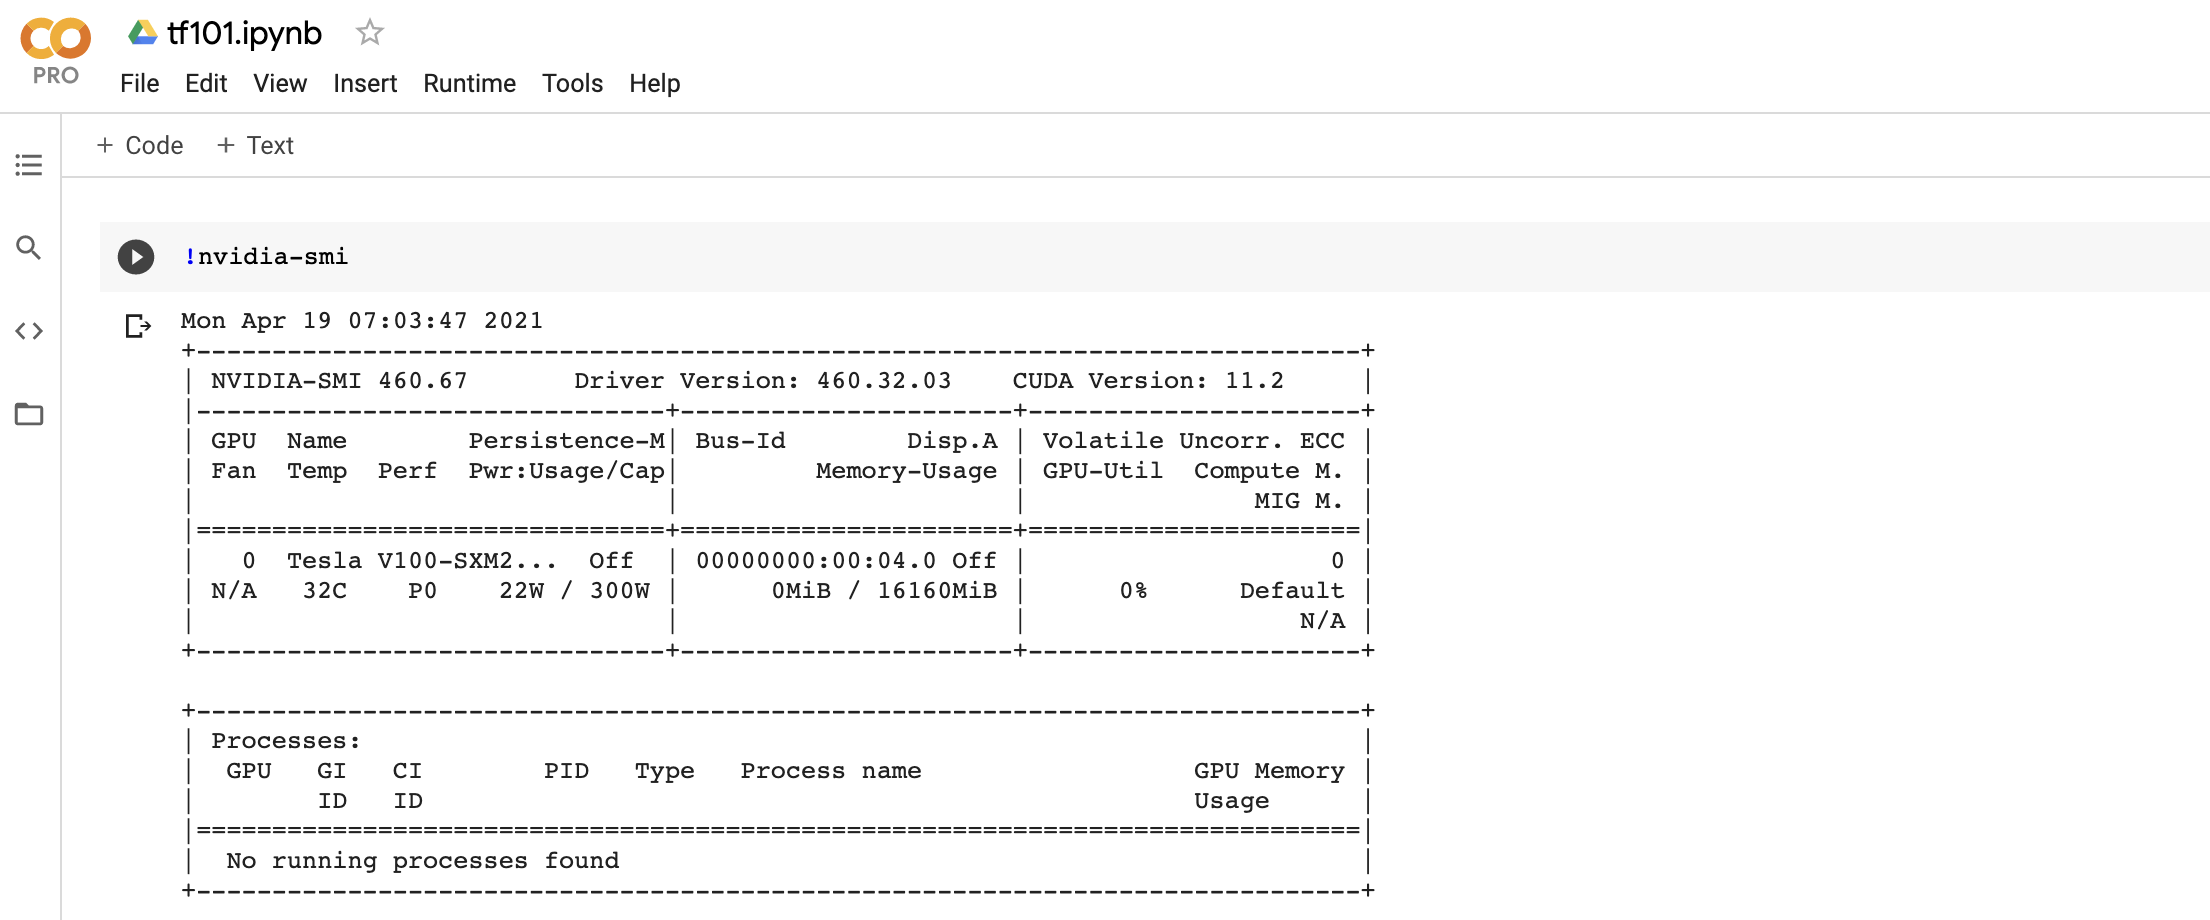
- Import Library ที่ต้องใช้งาน
import numpy as np
import tensorflow as tf

load_img = tf.keras.preprocessing.image.load_img
img_to_array = tf.keras.preprocessing.image.img_to_array
ImageDataGenerator = tf.keras.preprocessing.image.ImageDataGenerator

Adam = tf.keras.optimizers.Adam

import json
import copy
import glob
import pickle as pic
from sklearn.neighbors import NearestNeighbors
import matplotlib.pyplot as plt

import plotly
import plotly.graph_objs as go
from plotly import tools- ท่านสามารถ Download ภาพน้องตังค์ฟู แล้ว Upload ขึ้น Google Colab
- Load ภาพน้องตังค์ฟู โดยกำหนดขนาดเป็น 224x224 สำหรับ VGG และ ResNet Model
vgg16_input_image = load_img('cat.jpg', target_size=(224, 224))

vgg16_input_image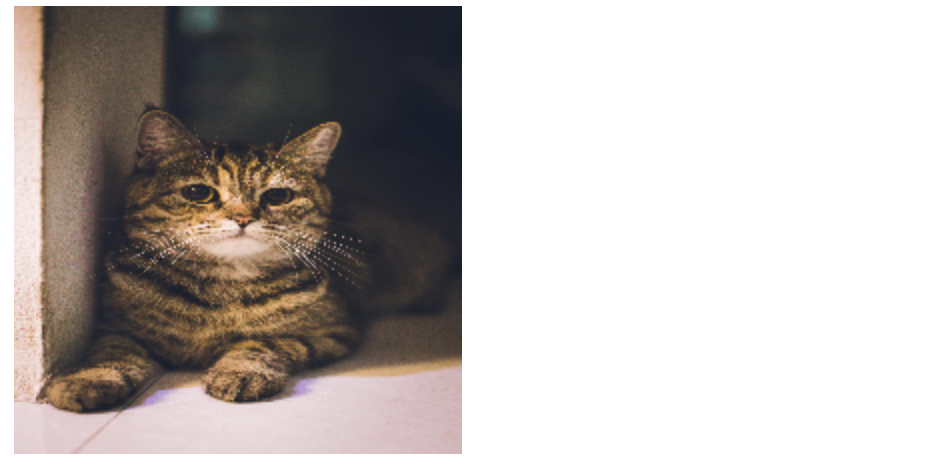
resnet_input_image = copy.deepcopy(vgg16_input_image)- Load ภาพน้องตังค์ฟู โดยกำหนดขนาดเป็น 331x331 สำหรับ NASNetLarge Model
nasnetlarge_input_image = load_img('cat.jpg', target_size=(331, 331))

nasnetlarge_input_image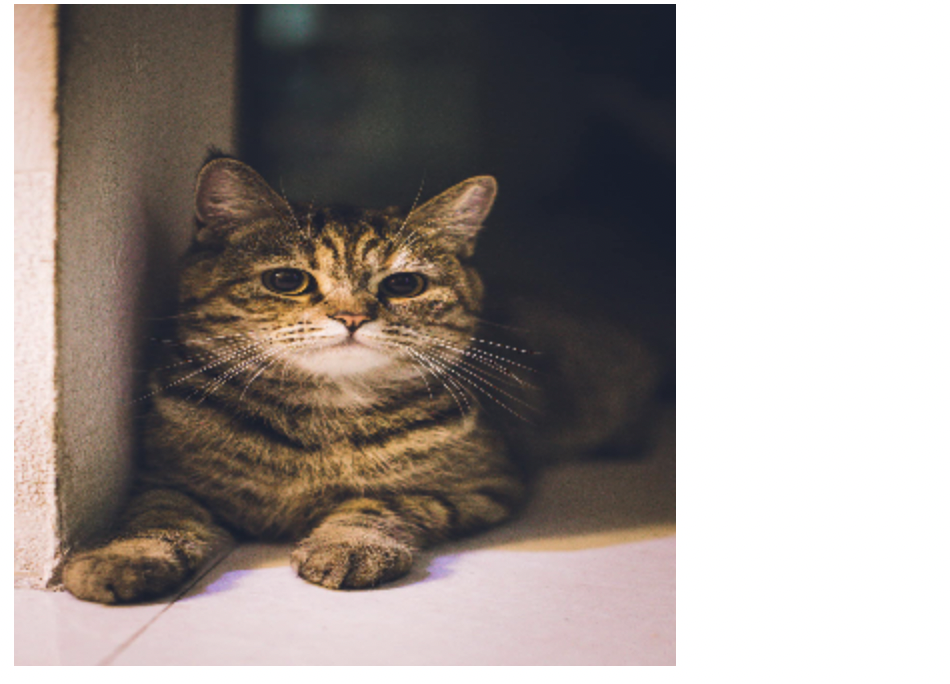
- แปลงเป็น Array
vgg16_input_image = img_to_array(vgg16_input_image)
resnet_input_image = img_to_array(resnet_input_image)
nasnetlarge_input_image = img_to_array(nasnetlarge_input_image)

vgg16_input_image.shape, resnet_input_image.shape, nasnetlarge_input_image.shape
((224, 224, 3), (224, 224, 3), (331, 331, 3))
- ขยายมิติของ Array เพื่อเตรียมนำเข้า Model
vgg16_input_image = np.expand_dims(vgg16_input_image, axis=0)
resnet_input_image = np.expand_dims(resnet_input_image, axis=0)
nasnetlarge_input_image = np.expand_dims(nasnetlarge_input_image, axis=0)

vgg16_input_image.shape, resnet_input_image.shape, nasnetlarge_input_image.shape
((1, 224, 224, 3), (1, 224, 224, 3), (1, 331, 331, 3))
- แสดงค่าต่ำสุด-สูงสดใน Array
vgg16_input_image.min(), vgg16_input_image.max(), resnet_input_image.min(), resnet_input_image.max(), nasnetlarge_input_image.min(), nasnetlarge_input_image.max()(5.0, 255.0, 5.0, 255.0, 0.0, 255.0)
- เตรียมข้อมูลให้พร้อมสำหรับแต่ละ Model
vgg16_input_image =  tf.keras.applications.vgg16.preprocess_input(vgg16_input_image)

vgg16_input_image.min(), vgg16_input_image.max()
(-104.68, 137.22101)
resnet_input_image =  tf.keras.applications.resnet_v2.preprocess_input(resnet_input_image)

resnet_input_image.min(), resnet_input_image.max()
(-0.9607843, 1.0)
nasnetlarge_input_image =  tf.keras.applications.nasnet.preprocess_input(nasnetlarge_input_image)

nasnetlarge_input_image.min(), nasnetlarge_input_image.max()
(-1.0, 1.0)
- Load Pre-trained Model
vgg16_model = tf.keras.applications.VGG16(weights='imagenet', include_top=True)

resnet_model = tf.keras.applications.ResNet152V2(weights='imagenet', include_top=True)

nasnetlarge_model = tf.keras.applications.NASNetLarge(weights='imagenet', include_top=True)
- Predict ด้วย VGG
result = vgg16_model.predict(vgg16_input_image)

result.shape
(1, 1000)
เราจะใช้ decode_predictions() ของ Tensorflow Keras ในการแสดง Class ที่ Model Predict ครับ
label = tf.keras.applications.vgg16.decode_predictions(result)

label
label = label[0][0]
print('%s (%.2f%%)' % (label[1], label[2]*100))
tabby (64.75%)
ImageNet Class ทั้งหมด 1000 Class จะเก็บอยู่ใน imagenet_class_index.json ที่ ~/.keras/models/
ls -l ~/.keras/models/
เราสามารถดึง Class Label ของ ImageNet มาเก็บในตัวแปรแบบ Dict ได้ดังต่อไปนี้
imagenet_class = !cat ~/.keras/models/imagenet_class_index.json

imagenet_class = json.loads(imagenet_class[0])
imagenet_class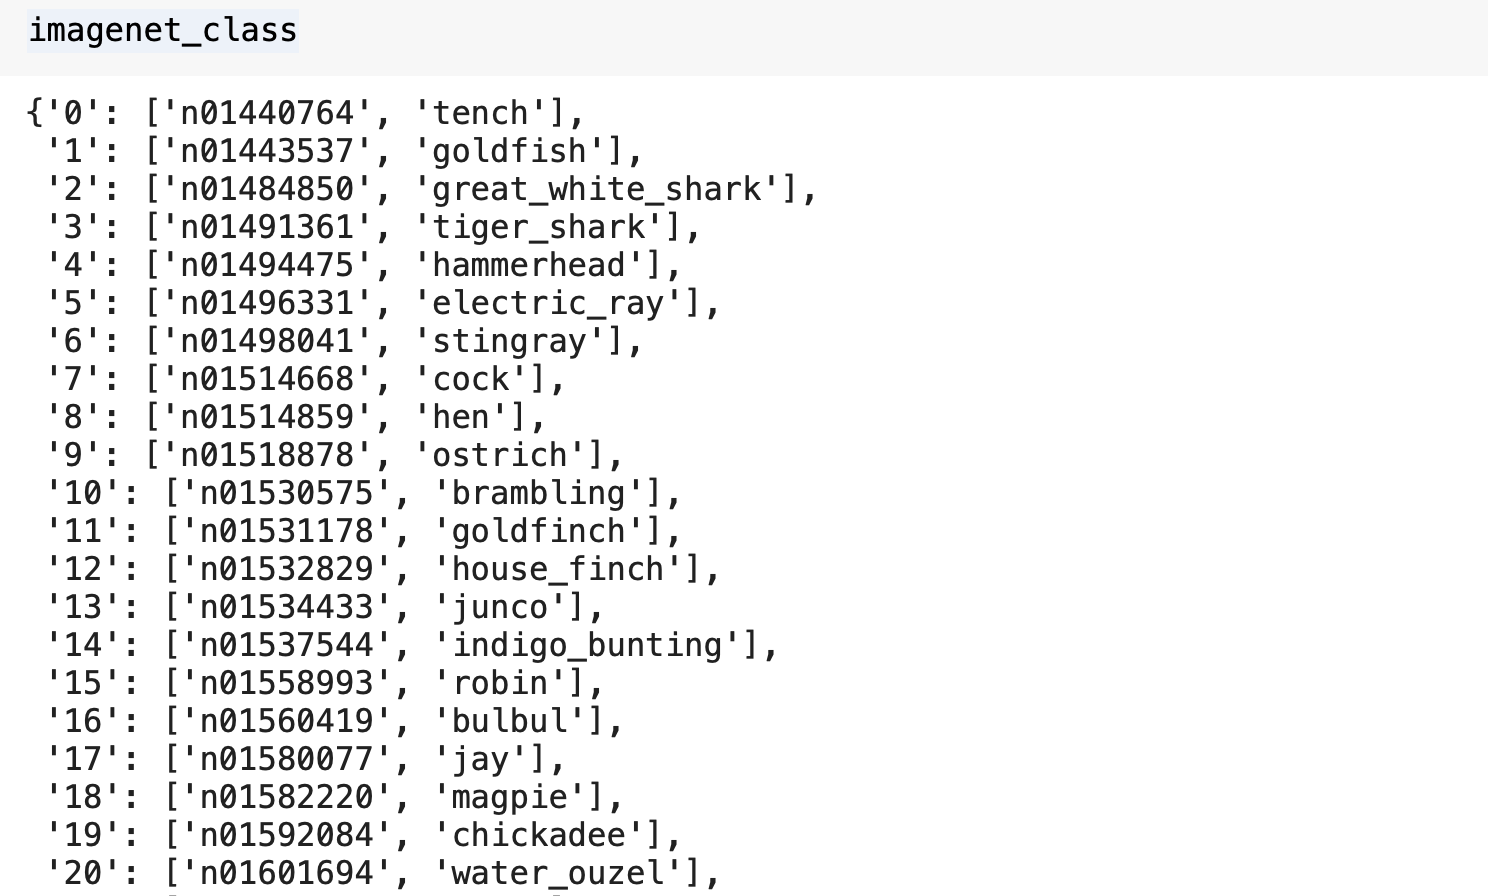
- Predict ด้วย ResNet
result = resnet_model.predict(resnet_input_image )

result.shape
(1, 1000)
label = tf.keras.applications.resnet_v2.decode_predictions(result)

label
label = label[0][0]
print('%s (%.2f%%)' % (label[1], label[2]*100))
tabby (98.12%)
- Predict ด้วย NASNetLarge
result = nasnetlarge_model.predict(nasnetlarge_input_image)

result.shape
(1, 1000)
label = tf.keras.applications.nasnet.decode_predictions(result)

label
label = label[0][0]
print('%s (%.2f%%)' % (label[1], label[2]*100))
tabby (85.90%)
จากการทดลอง Classify ด้วย Pre-trained Model ทั้ง 3 ตัว พบว่าน้องตังค์ฟูเป็นแมว Tabby โดยมีค่าความมั่นใจที่แตกต่างกันออกไป
Image Search
เราจะทดลองค้นหาภาพใน Best Artworks of All Time Dataset ด้วย Feature ที่ได้จาก VGG Model โดยการเลือกภาพที่มีค่า Cosine น้อยที่สุดทั้งหมด 10 ภาพ ดังต่อไปนี้
- Login ที่ www.kaggle.com คลิ๊กที่ Profile Image แล้วคลิ๊ก Settings

- Download ไฟล์ kaggle.json โดยคลิ๊กที่ Create New Token

- ติดตั้ง Library kaggle บน Google Colab
!pip install kaggle- รัน Code ต่อไปนี้แล้ว Upload kaggle.json โดยการคลิ๊กที่ Choose Files เลือกไฟล์ kaggle.json ใน Folder Download แล้วคลิ๊กปุ่ม Open
from google.colab import files

files.upload()


- สร้าง Folder kaggle เพื่อเก็บไฟล์ kaggle.json
!mkdir kaggle- ย้ายไฟล์ kaggle.json ไปยัง Folder kaggle
!mv kaggle.json kaggle- เปลี่ยน Permission ของไฟล์ kaggle.json
!chmod 600 /content/kaggle/kaggle.json- Config kaggle Environment
import os

os.environ['KAGGLE_CONFIG_DIR'] = "/content/kaggle"- ไปที่ Best Artworks of All Time Dataset คลิ๊กที่ icon 3 จุด (แนวตั้ง) แล้วเลือก Copy API command

- รันคำสั่งที่ได้ Copy บน Colab Notebook เพื่อ Download Best Artworks of All Time Dataset
!kaggle datasets download -d ikarus777/best-artworks-of-all-time
- สร้าง Folder artworks แล้ว Unzip Dataset
!mkdir artworks && unzip -q best-artworks-of-all-time.zip -d artworksซึ่งภายใน Folder artworks จะมีภาพที่วาดโดยศิลปินชื่อดังทั้งหมด 51 คน ดังต่อไปนี้
.
├── artists.csv
├── images
│   └── images
│       ├── Albrecht_Du?\210rer
│       ├── Albrecht_Du?\225?êrer
│       ├── Alfred_Sisley
│       ├── Amedeo_Modigliani
│       ├── Andrei_Rublev
│       ├── Andy_Warhol
│       ├── Camille_Pissarro
│       ├── Caravaggio
│       ├── Claude_Monet
│       ├── Diego_Rivera
│       ├── Diego_Velazquez
│       ├── Edgar_Degas
│       ├── Edouard_Manet
│       ├── Edvard_Munch
│       ├── El_Greco
│       ├── Eugene_Delacroix
│       ├── Francisco_Goya
│       ├── Frida_Kahlo
│       ├── Georges_Seurat
│       ├── Giotto_di_Bondone
│       ├── Gustav_Klimt
│       ├── Gustave_Courbet
│       ├── Henri_Matisse
│       ├── Henri_Rousseau
│       ├── Henri_de_Toulouse-Lautrec
│       ├── Hieronymus_Bosch
│       ├── Jackson_Pollock
│       ├── Jan_van_Eyck
│       ├── Joan_Miro
│       ├── Kazimir_Malevich
│       ├── Leonardo_da_Vinci
│       ├── Marc_Chagall
│       ├── Michelangelo
│       ├── Mikhail_Vrubel
│       ├── Pablo_Picasso
│       ├── Paul_Cezanne
│       ├── Paul_Gauguin
│       ├── Paul_Klee
│       ├── Peter_Paul_Rubens
│       ├── Pierre-Auguste_Renoir
│       ├── Piet_Mondrian
│       ├── Pieter_Bruegel
│       ├── Raphael
│       ├── Rembrandt
│       ├── Rene_Magritte
│       ├── Salvador_Dali
│       ├── Sandro_Botticelli
│       ├── Titian
│       ├── Vasiliy_Kandinskiy
│       ├── Vincent_van_Gogh
│       └── William_Turner
└── resized
    └── resized
- ค้นหาภาพทั้งหมดใน Folder artworks/images/images
image_path = glob.glob('artworks/images/images/*/*.jpg')

len(image_path)
8774
- Load VGG Model แบบไม่เอา Top Layer
vgg16_model = tf.keras.applications.VGG16(weights='imagenet', include_top=False)
- รวบรวม Feature ของภาพทั้งหมด 8,774 ภาพ ที่ได้จาก VGG Model
image_dataset = []

for path in image_path:
    image = load_img(path, target_size=(224, 224))
    image = img_to_array(image)
    image = np.expand_dims(image, axis=0)
    image =  tf.keras.applications.vgg16.preprocess_input(image)
    image_dataset.append(image)
feature_list = []
for image in image_dataset:
feature = vgg16_model.predict(image)
feature = feature.flatten()
feature_list.append(feature)- นิยาม save_feature Function และบันทึก feature เป็น Binary File ชื่อ "feature_list.pkl"
def save_feature(filename, feature):
    with open(filename, 'wb') as file:
       pic.dump(feature, file)
filename = 'feature_list.pkl'
save_feature(filename, feature_list)- ดูขนาดของไฟล์ feature_list.pkl
!ls feature_list.pkl -al-rw-r--r-- 1 root root 880996740 Sep 12 02:05 feature_list.pkl
ซึ่งพบว่ามีขนาดมากกว่า 880 MB
- นิยาม load_feature Function และ Load Feature ลง Memory
def load_feature(filename):
    with open(filename, 'rb') as file:
        feature = pic.load(file)
        return feature
feature_list_hdd = load_feature(filename)- Load ภาพที่ใช้ค้นหา (Query Image)
path = 'artworks/images/images/Vincent_van_Gogh/Vincent_van_Gogh_1.jpg'

query_image = load_img(path, target_size=(224, 224))
query_image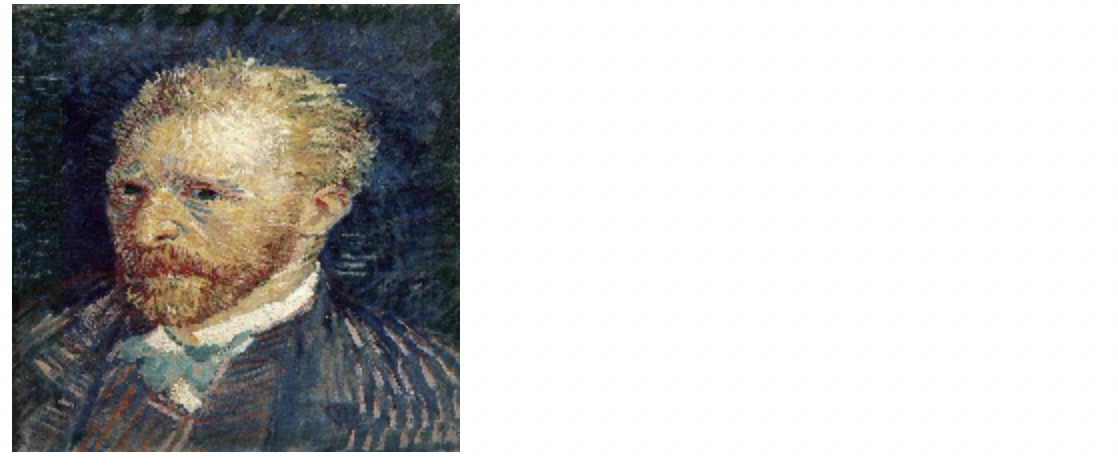
- สร้าง Feature ของ Query Image
query_image = img_to_array(query_image)
query_image = np.expand_dims(query_image, axis=0)
query_image =  tf.keras.applications.vgg16.preprocess_input(query_image)

query_feature = vgg16_model.predict(query_image)
query_feature = query_feature.flatten()- ค้นหาภาพ 10 ภาพที่มีค่า Cosine Distance น้อยที่สุด (ภาพที่คล้ายกัน)
nbrs = NearestNeighbors(n_neighbors=10, metric='cosine').fit(feature_list_hdd)distances, indices = nbrs.kneighbors([query_feature])- แสดงภาพที่มีลักษณะใกล้เคียง (ยกเว้น Query Image)
sub = 0
for i in indices[0]:
    if image_path[i] != path:
        ax = plt.subplot(3, 3, 1 + sub)
        sub+=1

        ax.set_xticks([])
        ax.set_yticks([])

        result_image = load_img(image_path[i], target_size=(224, 224))
        plt.imshow(result_image)

plt.savefig('result.png', dpi = 300)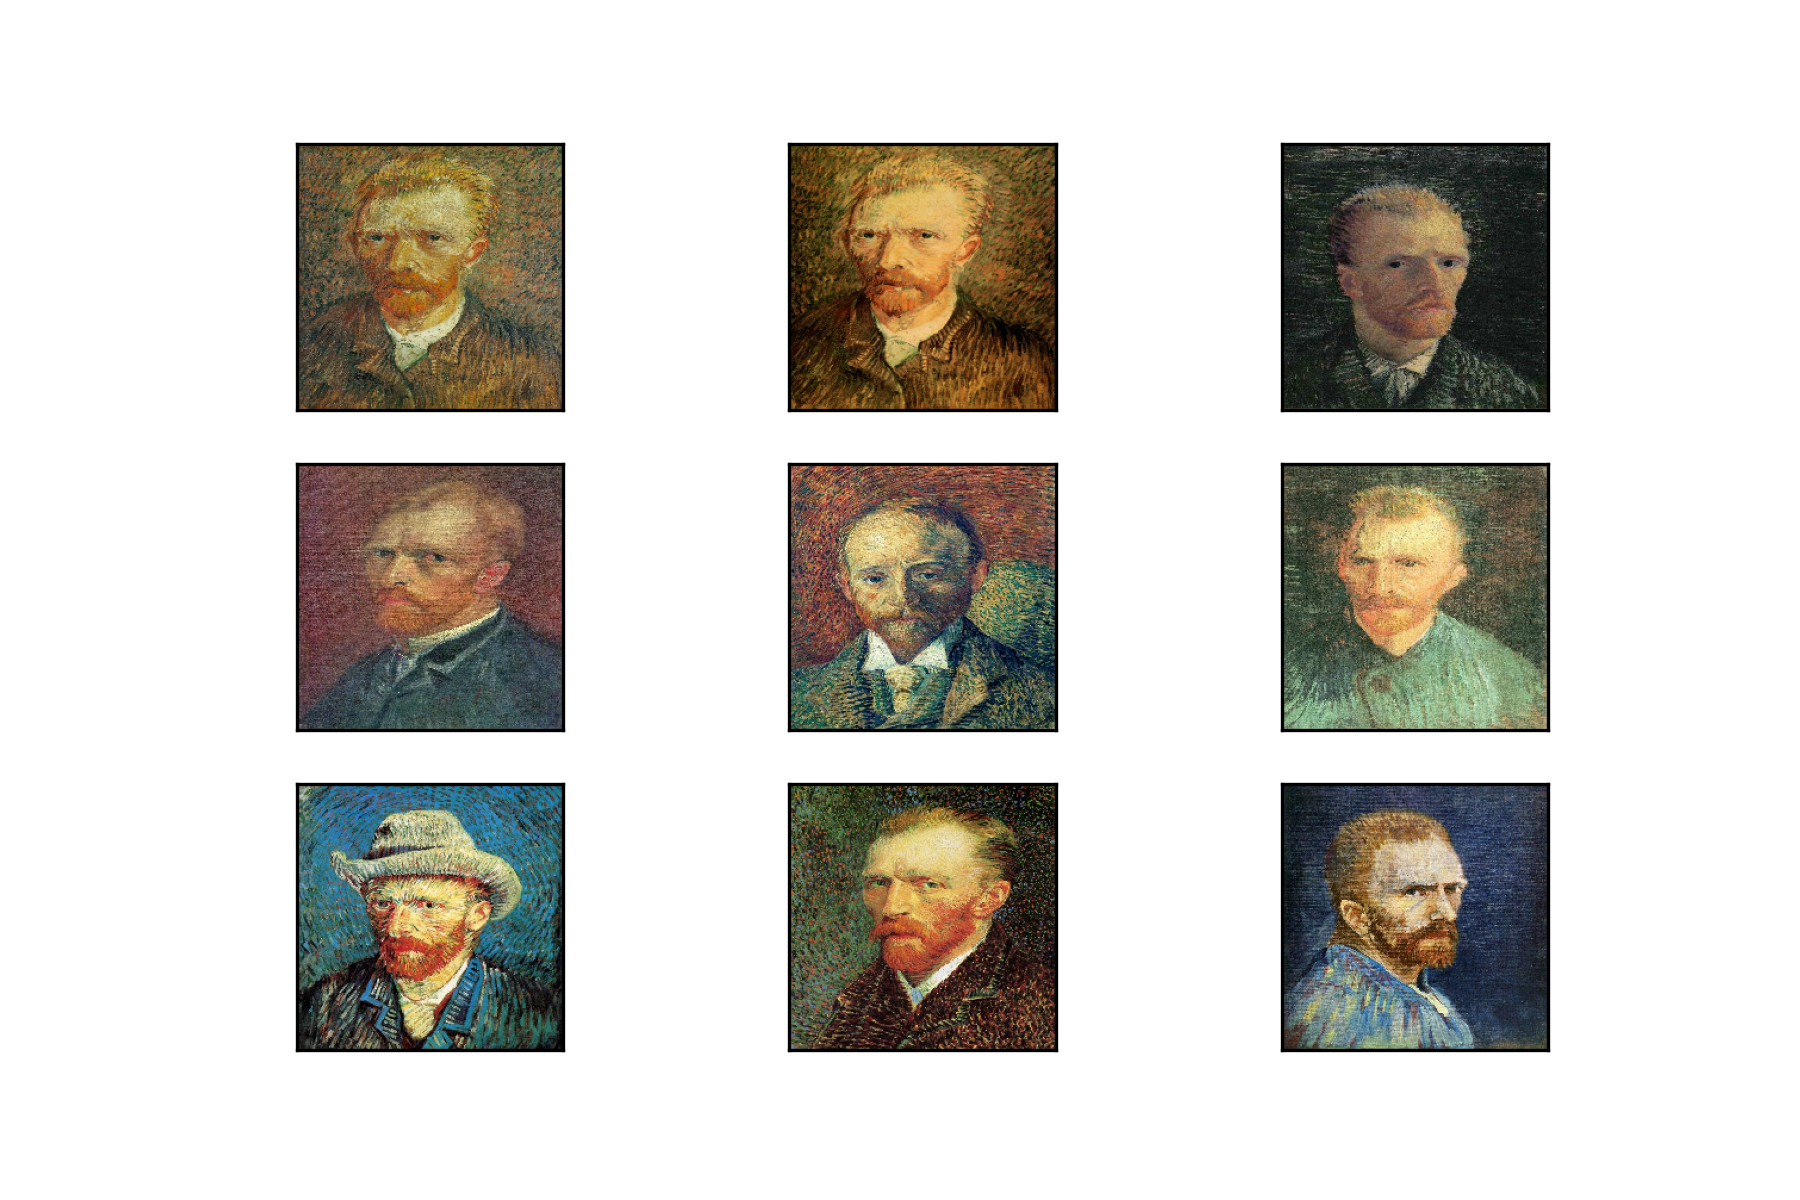
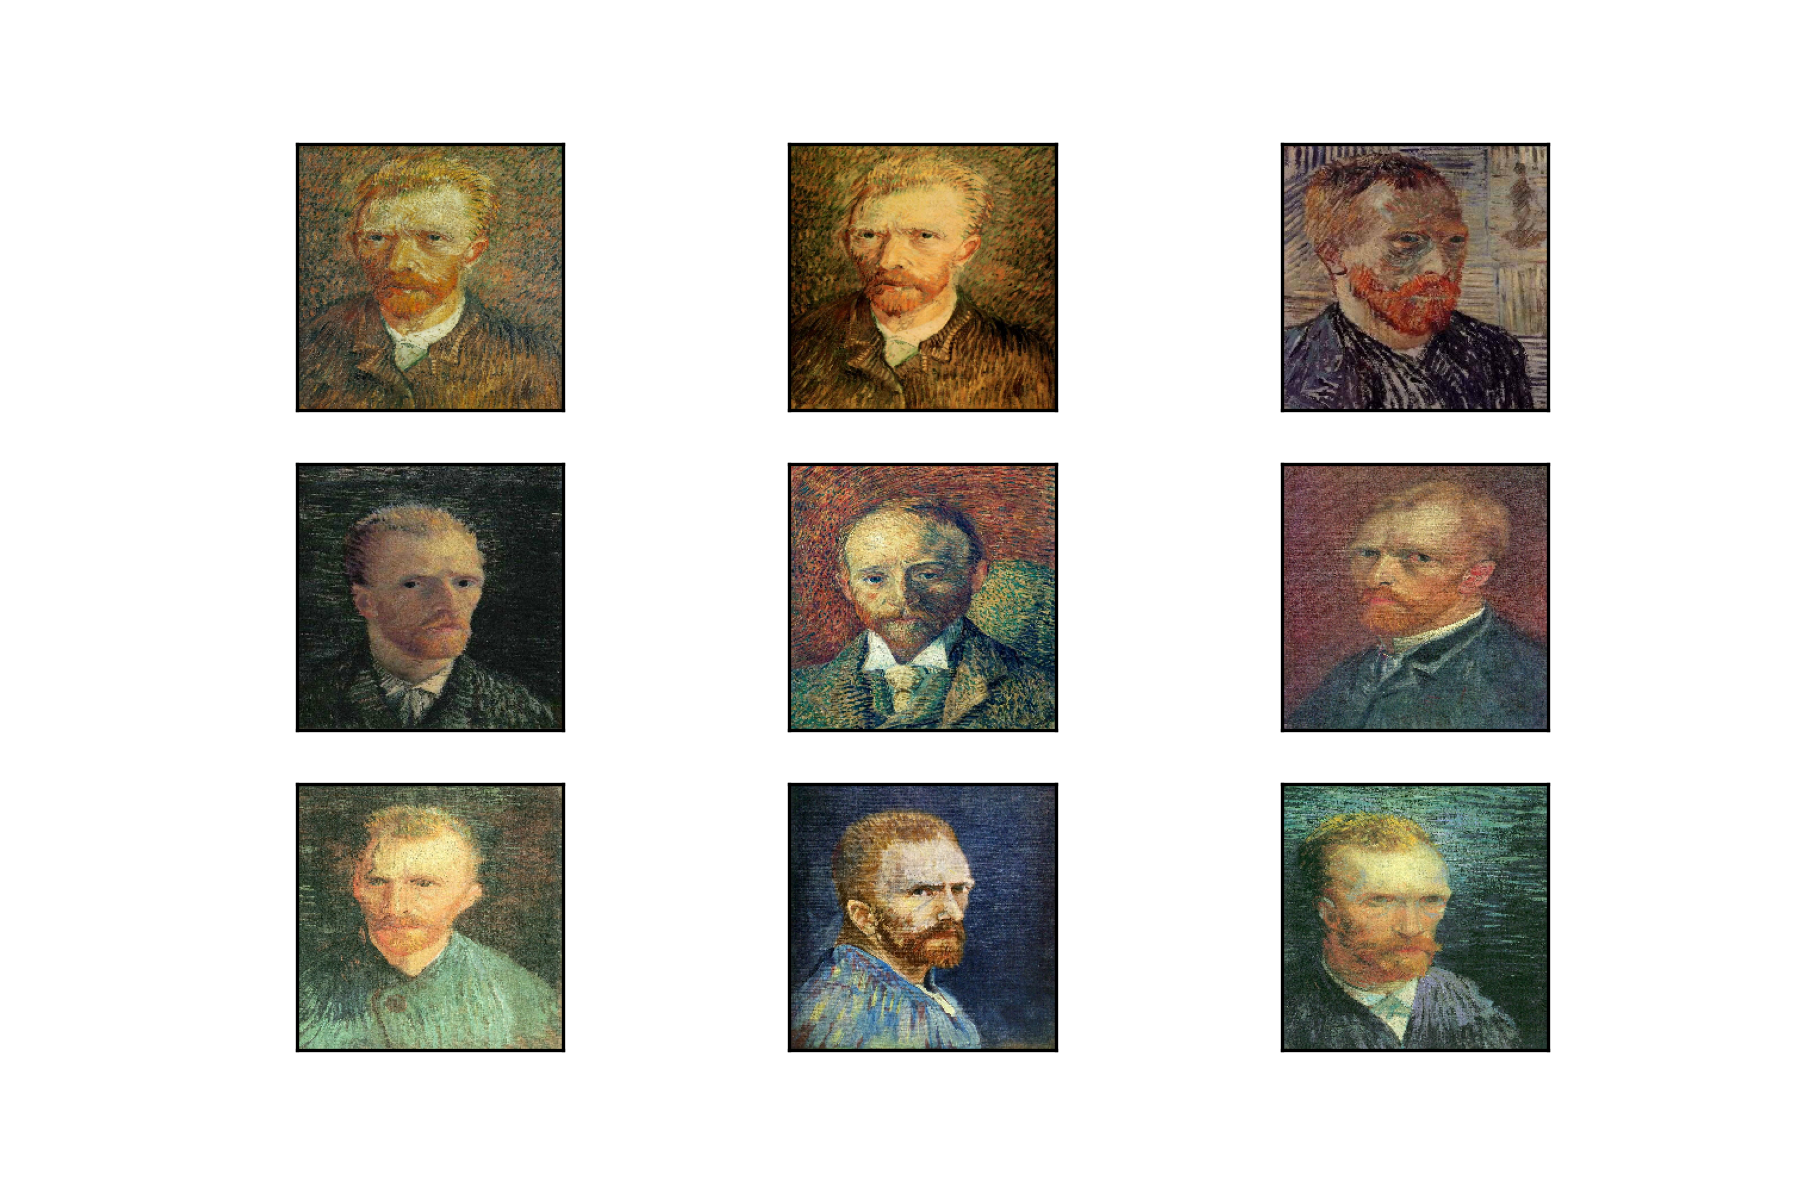
อย่างไรก็ตาม Feature ที่ได้จาก VGG Model ยังค่อนข้างมีขนาดใหญ่ ดังนั้นเราจึงมีการ ปรับปรุง Code โดยเพิ่ม Average Pooling Layer ที่ปลายของ Model ด้วยพารามิเตอร์ pooling='avg' ในขณะที่มีการ Load VGG Model แล้วรวบรวม Feature ของภาพทั้งหมด ใหม่
vgg16_model = tf.keras.applications.VGG16(weights='imagenet', include_top=False, pooling='avg')avg_feature_list = []
for image in image_dataset:
feature = vgg16_model.predict(image)
feature = feature.flatten()
avg_feature_list.append(feature)filename = 'avg_feature_list.pkl'
save_feature(filename, avg_feature_list)- ดูขนาดของไฟล์ avg_feature_list.pkl
!ls avg_feature_list.pkl -al-rw-r--r-- 1 root root 18477444 Sep 12 02:47 avg_feature_list.pkl
ซึ่งพบว่ามีขนาดลดลงเหลือเพียงประมาณ 18 MB เมื่อมีการเพิ่ม Average Pooling Layer
- Load Feature ลง Memory
avg_feature_list_hdd = load_feature(filename)- สร้าง Feature ของ Query Image ใหม่
query_feature = vgg16_model.predict(query_image)
query_feature = query_feature.flatten()- แล้วค้นหาภาพ 10 ภาพที่มีค่า Cosine Distance น้อยที่สุด
nbrs = NearestNeighbors(n_neighbors=10, metric='cosine').fit(avg_feature_list_hdd)distances, indices = nbrs.kneighbors([query_feature])sub = 0
for i in indices[0]:
if image_path[i] != path:
ax = plt.subplot(3, 3, 1 + sub)
sub+=1
ax.set_xticks([])
ax.set_yticks([])
result_image = load_img(image_path[i], target_size=(224, 224))
plt.imshow(result_image)
plt.savefig('result.png', dpi = 300)โดยเราจะได้ภาพที่มีลักษณะใกล้เคียง ดังนี้
Fine-tuning (Classifier)
เราจะ Fine-tuning VGG Model เพื่อ Classify ภาพใน Best Artworks of All Time Dataset ว่าเป็นของศิลปินคนไหนจากทั้งหมด 11 คน โดยการตัดส่วนปลายของ Model แล้วเพิ่ม Layer ใหม่ และทดลองแช่แข็งบาง Layer รวมทั้ง Train ใหม่ทุก Layer ตาม Strategy S3, S4, S5 และ S6 ดังต่อไปนี้
S3
- Import Library ที่ต้องใช้งาน
ReduceLROnPlateau = tf.keras.callbacks.ReduceLROnPlateau
ModelCheckpoint = tf.keras.callbacks.ModelCheckpoint
load_model = tf.keras.models.load_model

import pandas as pd- Load VGG Model ทั้งหมดรวม Top Layer และกำหนด input_shape = (224, 224, 3)
vgg16_model = tf.keras.applications.VGG16(weights='imagenet', include_top=True, input_shape=(224, 224, 3))- แช่แข็งทุก Layer ที่ได้ Load มา
vgg16_model.trainable = False- แสดงข้อมูลสรุปของ VGG Model
vgg16_model.summary()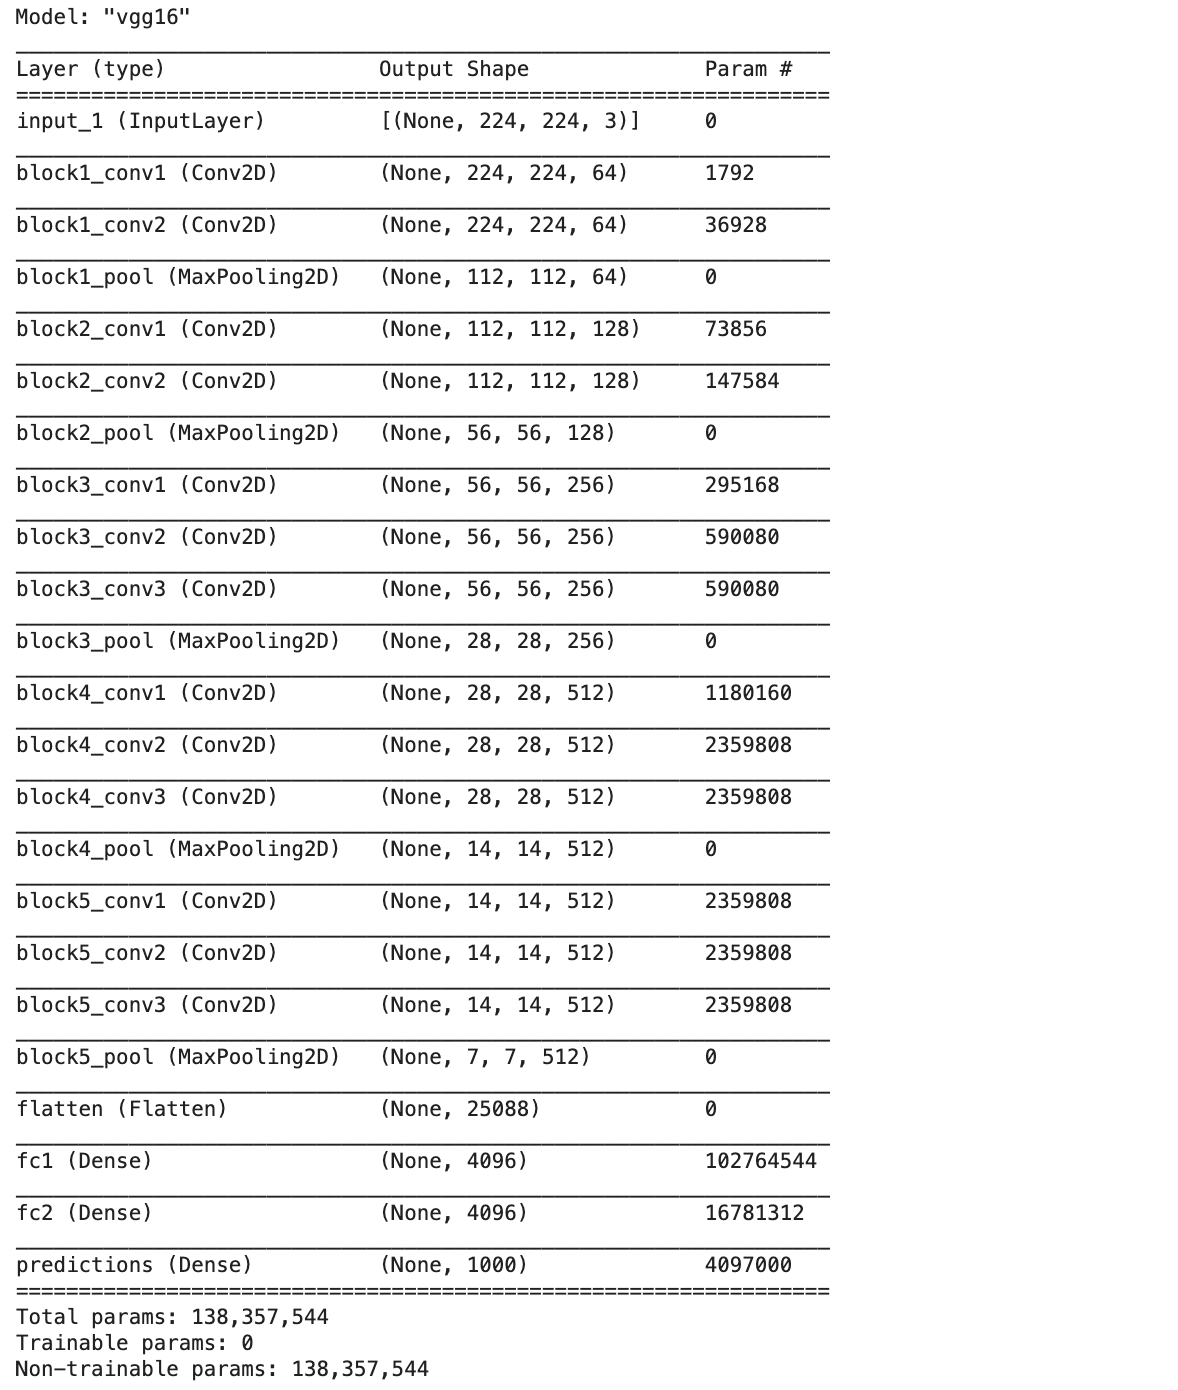
จะเห็นว่า VGG Model มีจำนวน Layer ในส่วน Classifier Layer ทั้งหมด 4 Layer ได้แก่ flatten, fc1, fc2 และ predictions รวมพารามิเตอร์ ที่ถูกแช่แข็ง 138,357,544 ตัว
- ตัดส่วนปลายออก 1 Layer
vgg16_model = tf.keras.models.Model(inputs=vgg16_model.inputs, outputs=vgg16_model.layers[-2].output)

vgg16_model.summary()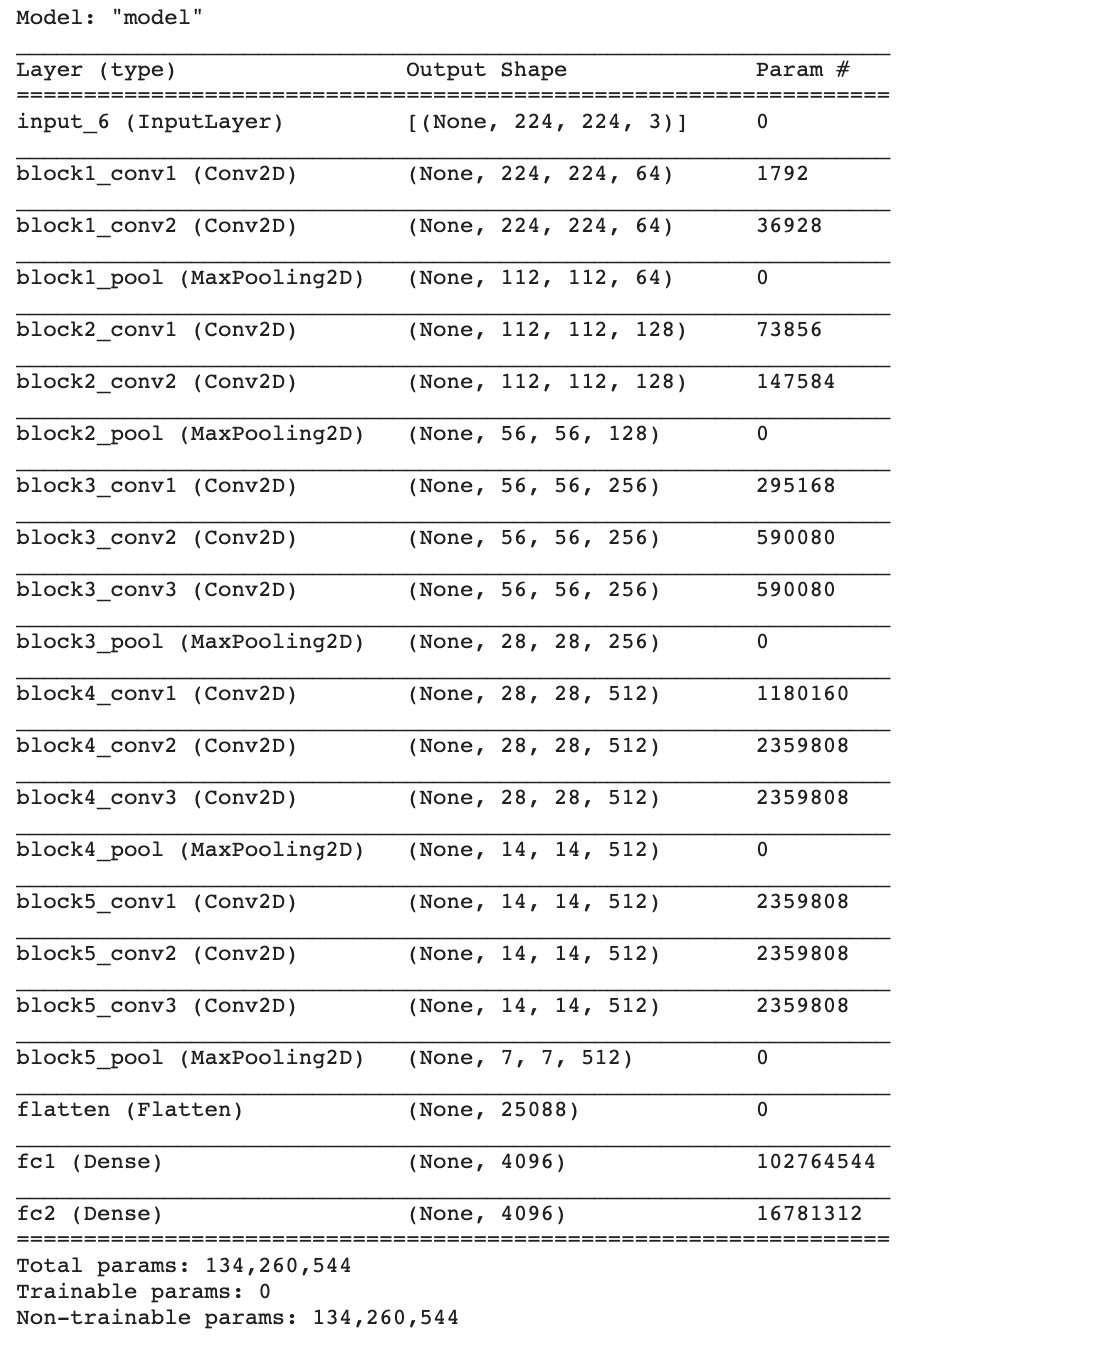
- เพิ่ม Dense Layer สำหรับการทำนายศิลปิน 11 Class
output = tf.keras.layers.Dense(11, activation='softmax')(vgg16_model.layers[-1].output)

model = tf.keras.Model(inputs=vgg16_model.inputs, outputs=output)- Compile Model โดยกำหนด Learning Rate เท่ากับ 0.0001 (ค่า Default 0.001)
adam_optimizer = Adam(learning_rate=0.0001)
model.compile(loss='categorical_crossentropy', optimizer=adam_optimizer, metrics=['accuracy'])

model.summary()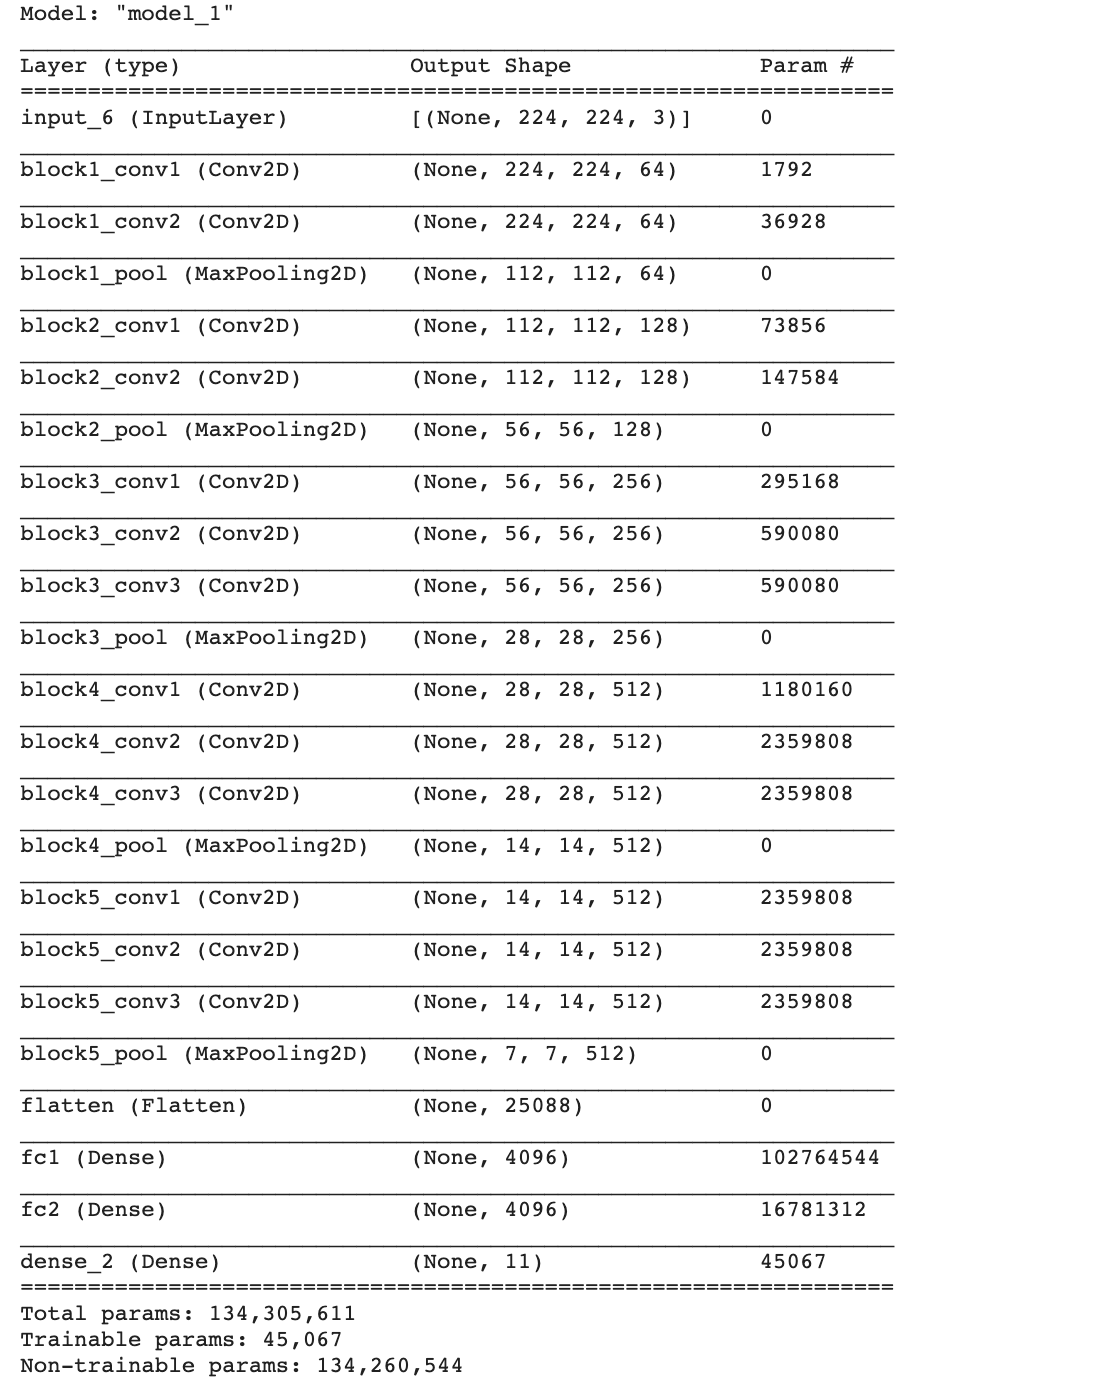
- อ่านไฟล์ artists.csv เพื่อกรองเอาเฉพาะภาพวาดของศิลปินที่มีจำนวนตั้งแต่ 200 ภาพขึ้นไป และคำนวนค่าน้ำหนักของคลาส (Class Weight) สำหรับแก้ปัญหา Imbalanced Dataset โดยการปรับเปลี่ยน Loss Function เพื่อให้โทษกับ Class ด้วยน้ำหนักที่ต่างกัน ซึ่งจะมีการเพิ่มอำนาจ Class ที่มีจำนวนข้อมูลน้อย และลดอำนาจ Class ที่มีจำนวนข้อมูลมาก
artists_df = pd.read_csv('artworks/artists.csv')

artists_df.head()
- เรียงลำดับข้อมูลจากมากไปน้อย จากจำนวนภาพวาดของศิลปิน
artists_df.sort_values(by=['paintings'], ascending=False, inplace=True)

artists_df.head(15)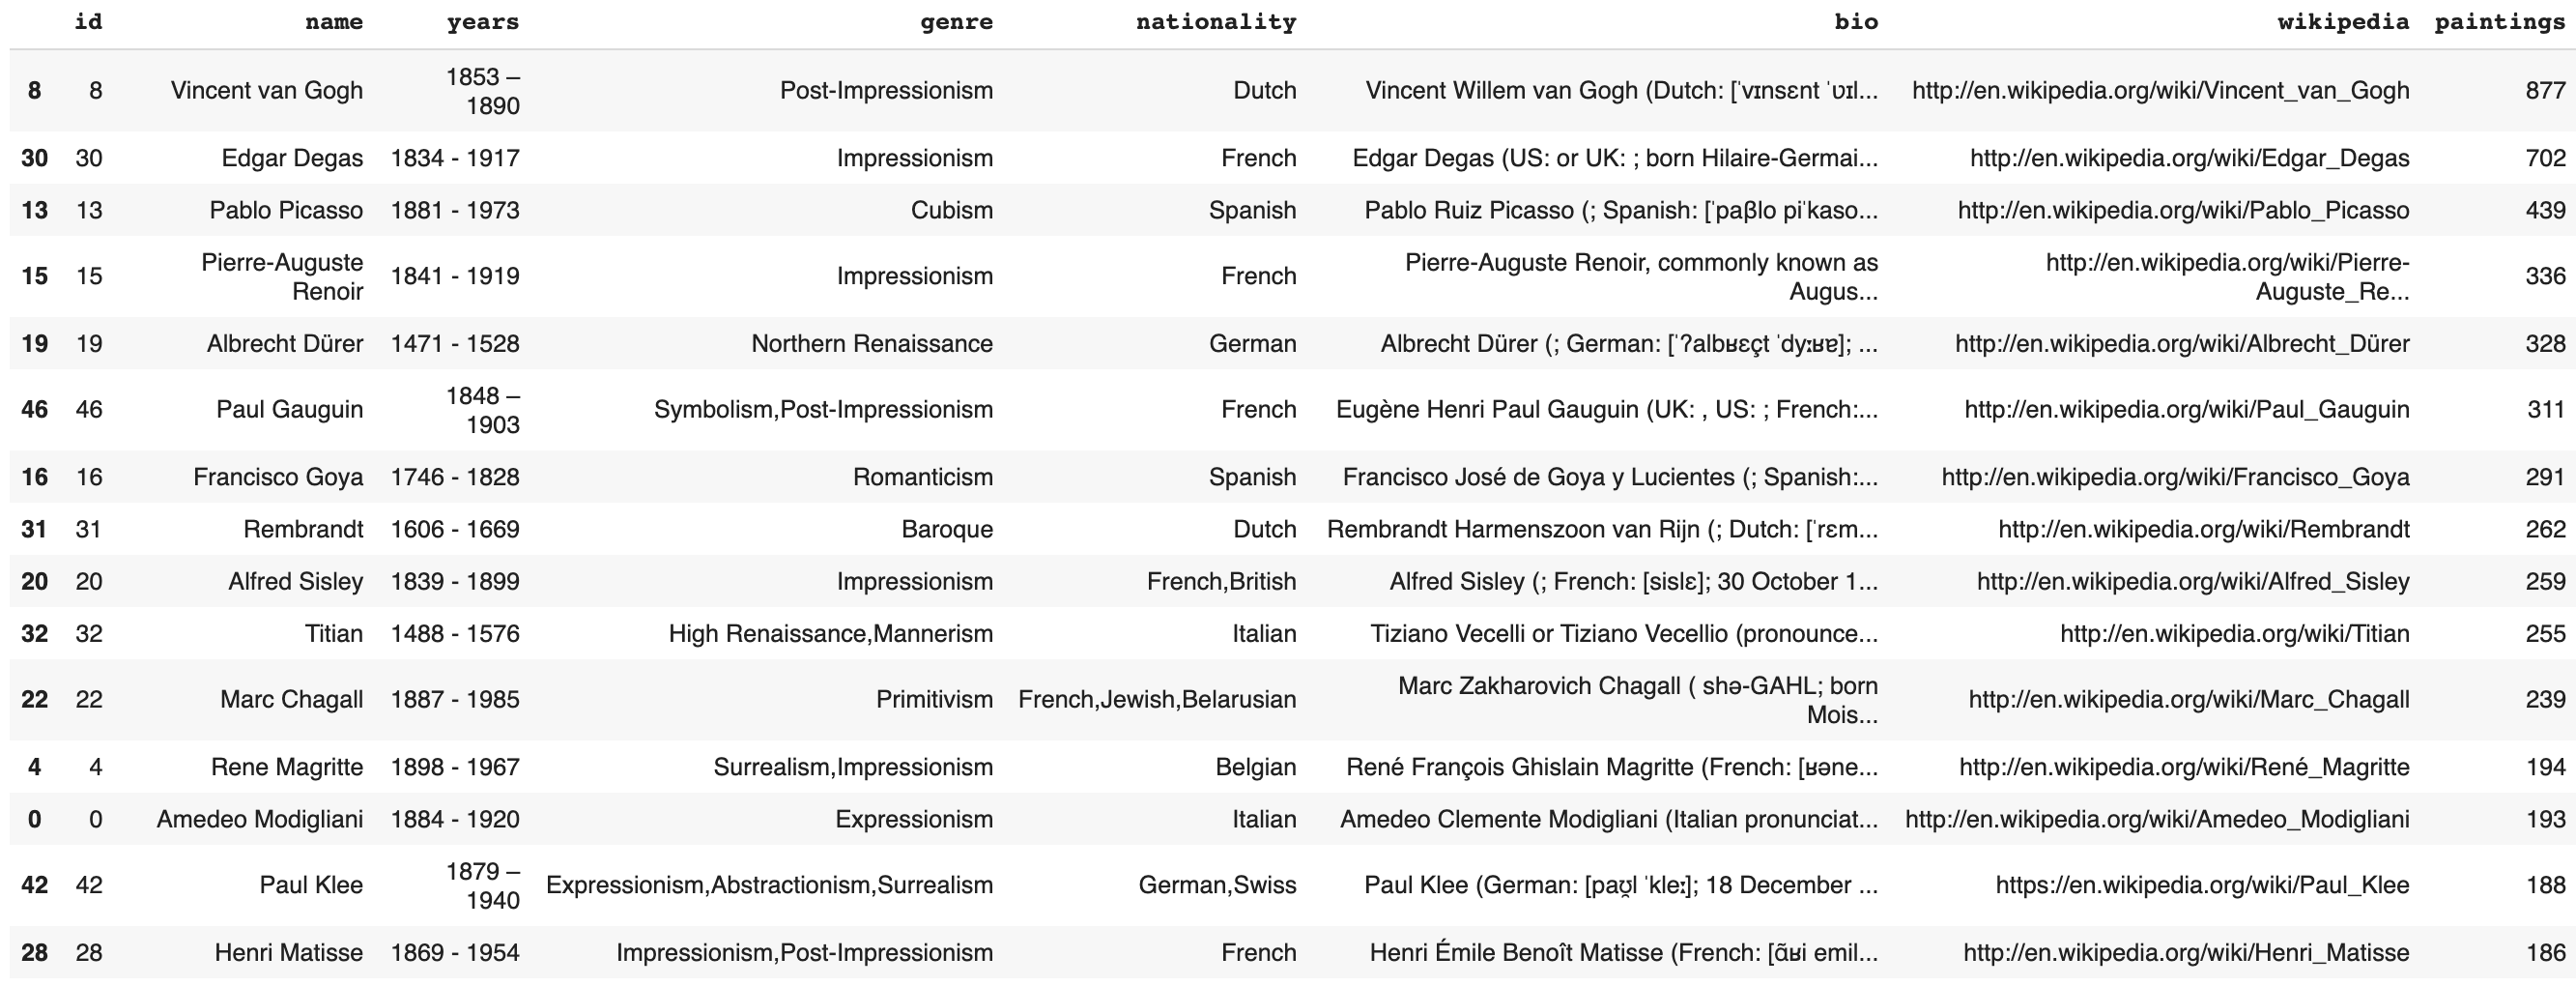
- กรองเอาเฉพาะภาพของศิลปินตั้งแต่ 200 ภาพขึ้นไป
artists_top = artists_df[artists_df['paintings'] >= 200].reset_index()

artists_top.shape
(11, 9)
- เลือกเฉพาะ Column name และ paintings
artists_top = artists_top[['name', 'paintings']]

artists_top.head()
- คำนวนค่า Class Weight โดยจะให้น้ำหนัก Class ที่มีจำนวนภาพน้อย มากกว่า Class ที่มีจำนวนภาพมากกว่า (Class ที่มีจำนวนภาพใกล้ค่าเฉลี่ย 4,299/11 = 390.82 ภาพ จะได้น้ำหนักใกล้ๆ 1.0)
artists_top['class_weight'] = artists_top.paintings.sum()/(artists_top.shape[0] * artists_top.paintings)

artists_top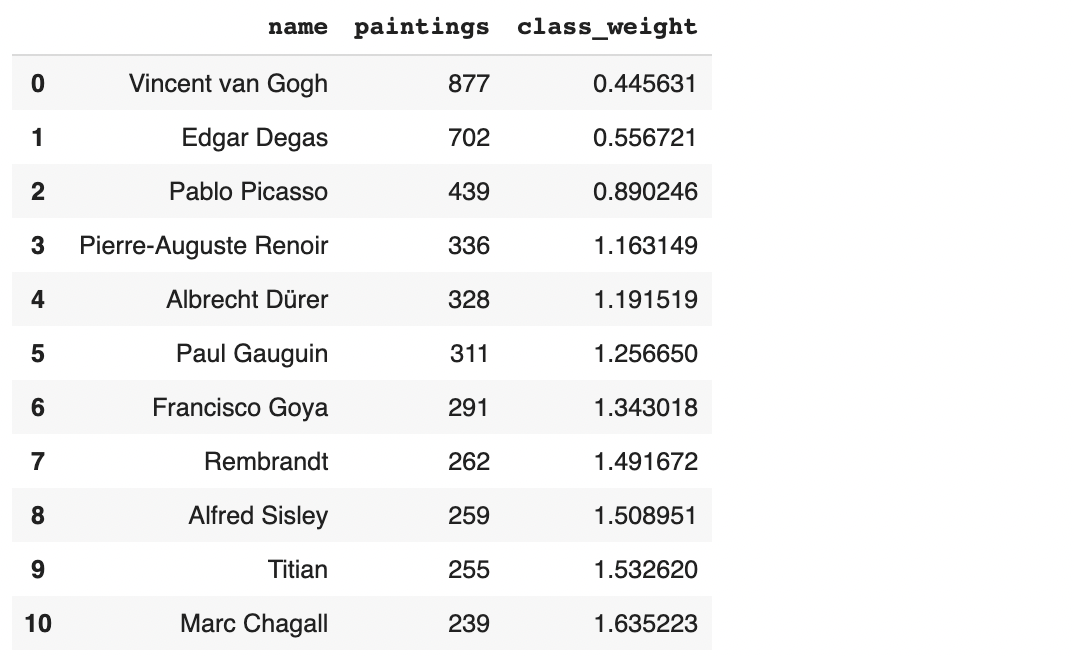
- แปลง Class Weight เป็น Dict สำหรับนำเข้า Function model.fit()
class_weights = artists_top['class_weight'].to_dict()

class_weights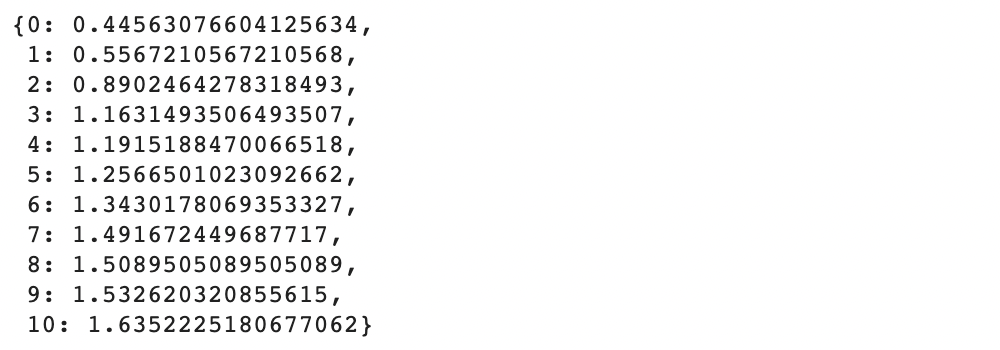
- แสดงชื่อศิลปินที่มีภาพผลงานตั้งแต่ 200 ภาพขึ้นไป
artists_top['name']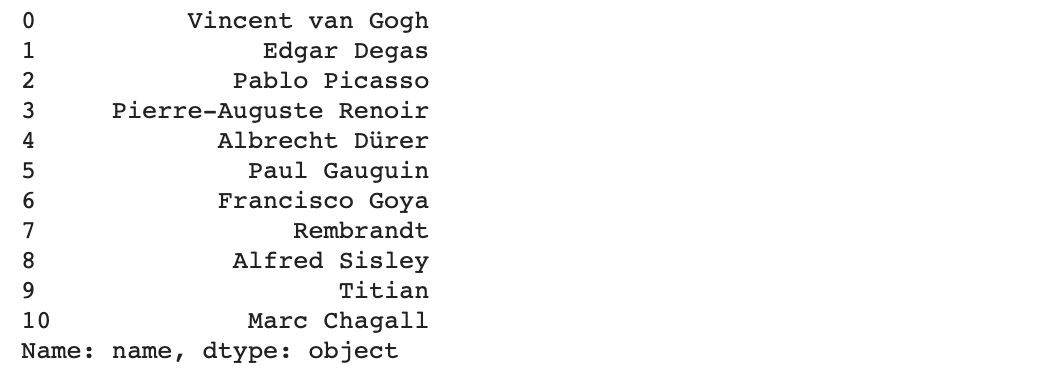
- แทนที่ช่องว่างด้วย _
artists_top_name = artists_top['name'].str.replace(' ', '_')

artists_top_name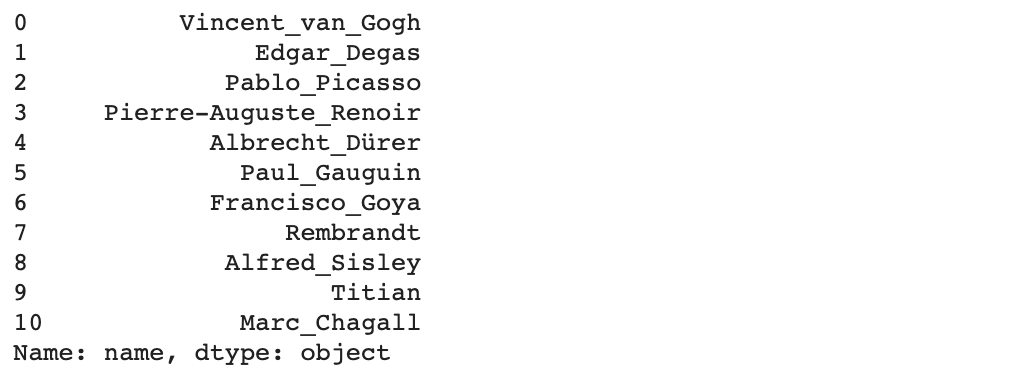
- แล้วแปลงเป็น List
artists_class = artists_top_name.tolist()

artists_class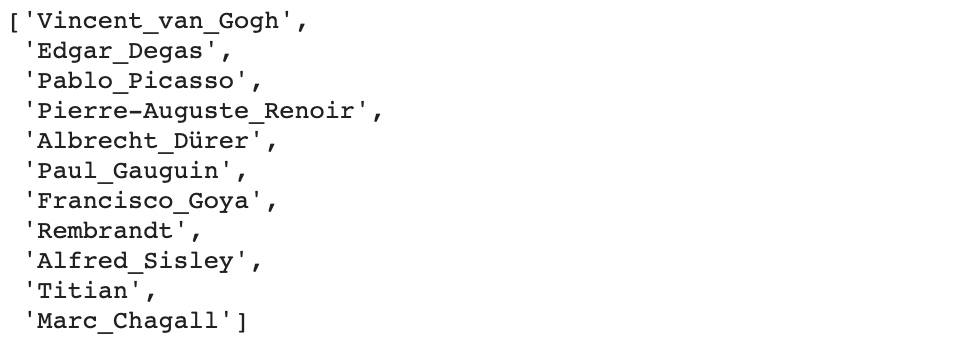
- สร้าง ImageDataGenerator 2 ตัว สำหรับ Train Dataset และ Validation Dataset โดยอ่านไฟล์ภาพ แล้วแบ่ง Dataset ในการ Train 80% และ Validate 20% ทำ Image Preprocessing รวมทั้ง Image Augmentation ด้วยการสุ่มพลิกภาพซ้าย-ขวา เฉพาะ Train Dataset ซึ่งจะต้องไม่มีการสุ่มเลือกภาพ (Default Shuffle = True) ขณะอ่านไฟล์ เพื่อที่ Dataset ทั้งสอง จะไม่มีโอกาสได้ภาพซ้ำกัน
datagen = ImageDataGenerator(validation_split=0.2,
                             preprocessing_function=tf.keras.applications.vgg16.preprocess_input,
                             horizontal_flip=True)

valid_datagen=ImageDataGenerator(validation_split=0.2,
preprocessing_function=tf.keras.applications.vgg16.preprocess_input)- Load ภาพสำหรับการ Train เฉพาะศิลปินที่มีภาพผลงานตั้งแต่ 200 ภาพขึ้นไป ด้วย Parameter classes=artists_class
train_artworks = datagen.flow_from_directory('artworks/images/images',
                                      subset='training',
                                      class_mode='categorical',
                                      target_size=(224, 224),
                                      color_mode='rgb',
                                      batch_size=64,
                                      shuffle=False,
                                      seed=99,
                                      classes=artists_class)
Found 3181 images belonging to 11 classes.
หมายเหตุ
เราสามารถเลือก class_mode เป็น 'sparse', 'categorical', 'binary' ฯลฯ ให้เหมาะสมกับ Classification Model แบบต่าง ๆ โดย
'binary' สำหรับ binary_crossentropy Loss
'categorical' สำหรับ categorical_crossentropy Loss
'sparse' สำหรับ sparse_categorical_crossentropy Loss
และสามารถเลือ color_mode เป็น 'grayscale', 'rgb' หรือ 'rgba' ตามความเหมาะสมของ Dataset
- สรุปข้อมูลของแต่ละ Batch
batch_x, batch_y = train_artworks.next()
print('Batch shape=%s, min=%.3f, max=%.3f' % (batch_x.shape, batch_x.min(), batch_x.max()))
Batch shape=(64, 224, 224, 3), min=-123.680, max=151.061
- Load ภาพสำหรับการ Validate เฉพาะศิลปินที่มีภาพผลงานตั้งแต่ 200 ภาพขึ้นไป ด้วย Parameter classes=artists_class
validate_artworks = valid_datagen.flow_from_directory('artworks/images/images',
                                      subset='validation',
                                      class_mode='categorical',
                                      target_size=(224, 224),
                                      color_mode='rgb',
                                      batch_size=64,
                                      shuffle=False,
                                      seed=99,
                                      classes=artists_class)
Found 790 images belonging to 11 classes.
- สรุปข้อมูลของแต่ละ Batch
batch_x, batch_y = validate_artworks.next()
print('Batch shape=%s, min=%.3f, max=%.3f' % (batch_x.shape, batch_x.min(), batch_x.max()))
Batch shape=(64, 224, 224, 3), min=-123.680, max=151.061
- ดู Shape ผลเฉลยของแต่ละ Batch
batch_y.shape(64, 11)
- ปรับลดค่า Learning Rate ด้วยการคูณกับค่า factor เมื่อเจอที่ราบสูง (Plateau) และทำ Checkpoint เพื่อ Save Model เฉพาะ Epoch ที่ให้ค่า val_loss ตำ่ที่สุด
rlrp = ReduceLROnPlateau(monitor='val_loss', factor=0.1, patience=3)

filepath="weights_best_s3.h5"
checkpoint = ModelCheckpoint(filepath, monitor='val_loss', verbose=1, save_best_only=True, mode='min')

callbacks_list = [checkpoint, rlrp]- Train Model และแก้ปัญหา Imbalanced Dataset ด้วย Class Weight
history = model.fit(train_artworks,
                    validation_data=validate_artworks,
                    epochs=20,
                    shuffle=True,
                    verbose = 1,
                    class_weight=class_weights,
                    callbacks=callbacks_list)
- Plot กราฟ Loss
h1 = go.Scatter(y=history.history['loss'],
                    mode="lines",
                    line=dict(
                      width=2,
                      color='blue'),
                      name="loss"
                   )
h2 = go.Scatter(y=history.history['val_loss'],
                    mode="lines",
                    line=dict(
                      width=2,
                      color='red'),
                      name="val_loss"
                   )

data = [h1, h2]
layout1 = go.Layout(title='Loss',
                   xaxis=dict(title='epochs'),
                   yaxis=dict(title=''))
fig1 = go.Figure(data = data, layout=layout1)
fig1.show()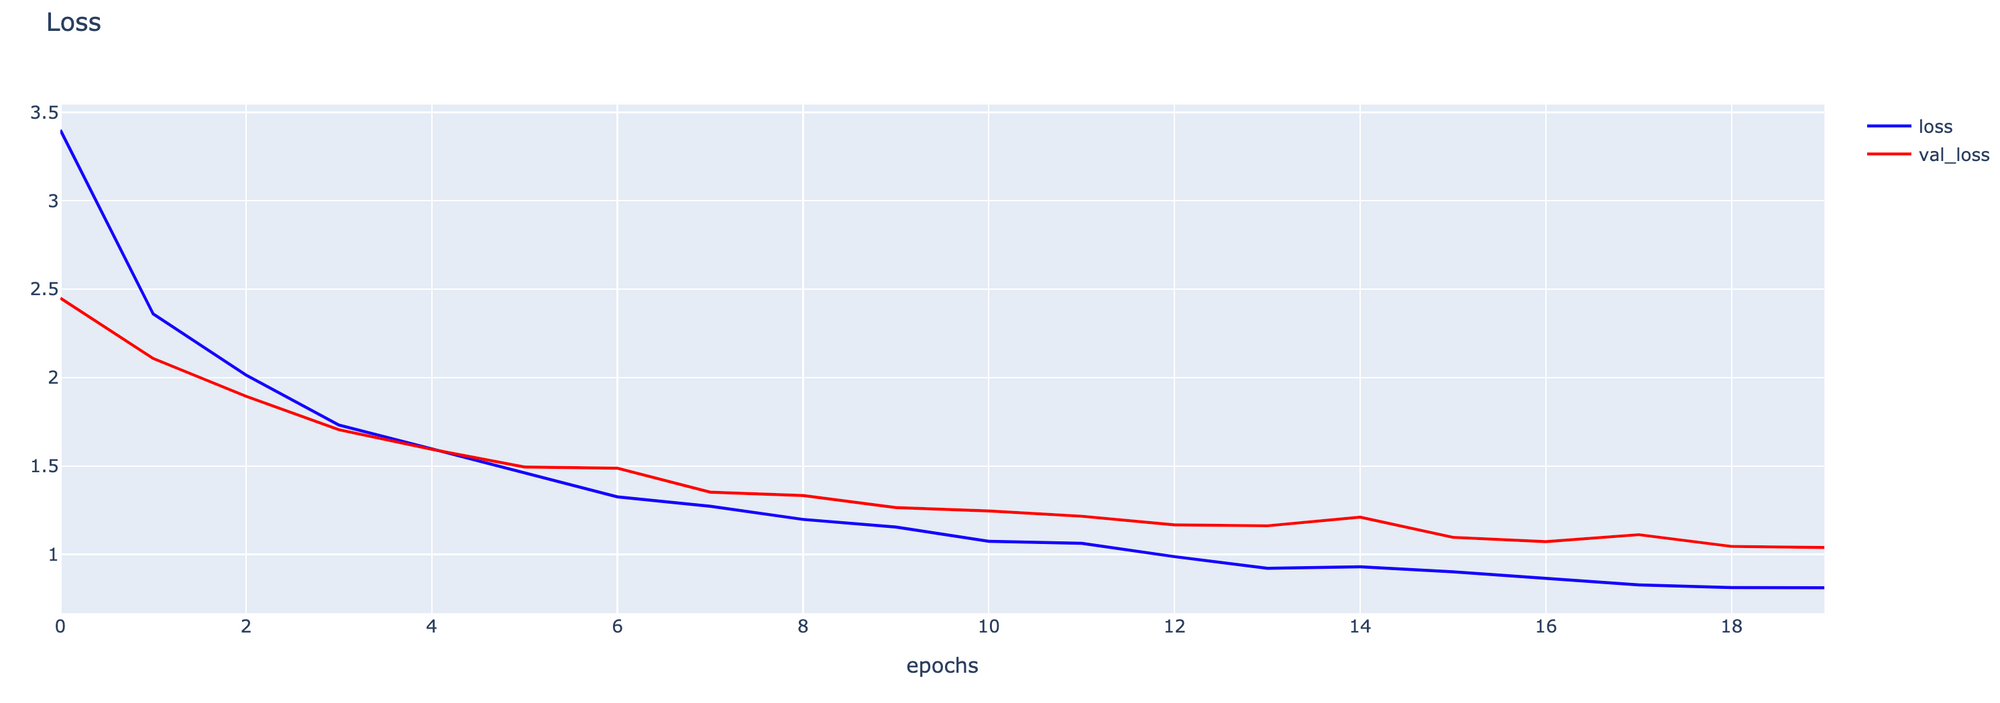
- Plot กราฟ Accuracy
h1 = go.Scatter(y=history.history['accuracy'],
                    mode="lines",
                    line=dict(
                      width=2,
                      color='blue'),
                      name="loss"
                   )
h2 = go.Scatter(y=history.history['val_accuracy'],
                    mode="lines",
                    line=dict(
                      width=2,
                      color='red'),
                      name="val_loss"
                   )

data = [h1, h2]
layout1 = go.Layout(title='Accuracy',
                   xaxis=dict(title='epochs'),
                   yaxis=dict(title=''))
fig1 = go.Figure(data = data, layout=layout1)
fig1.show()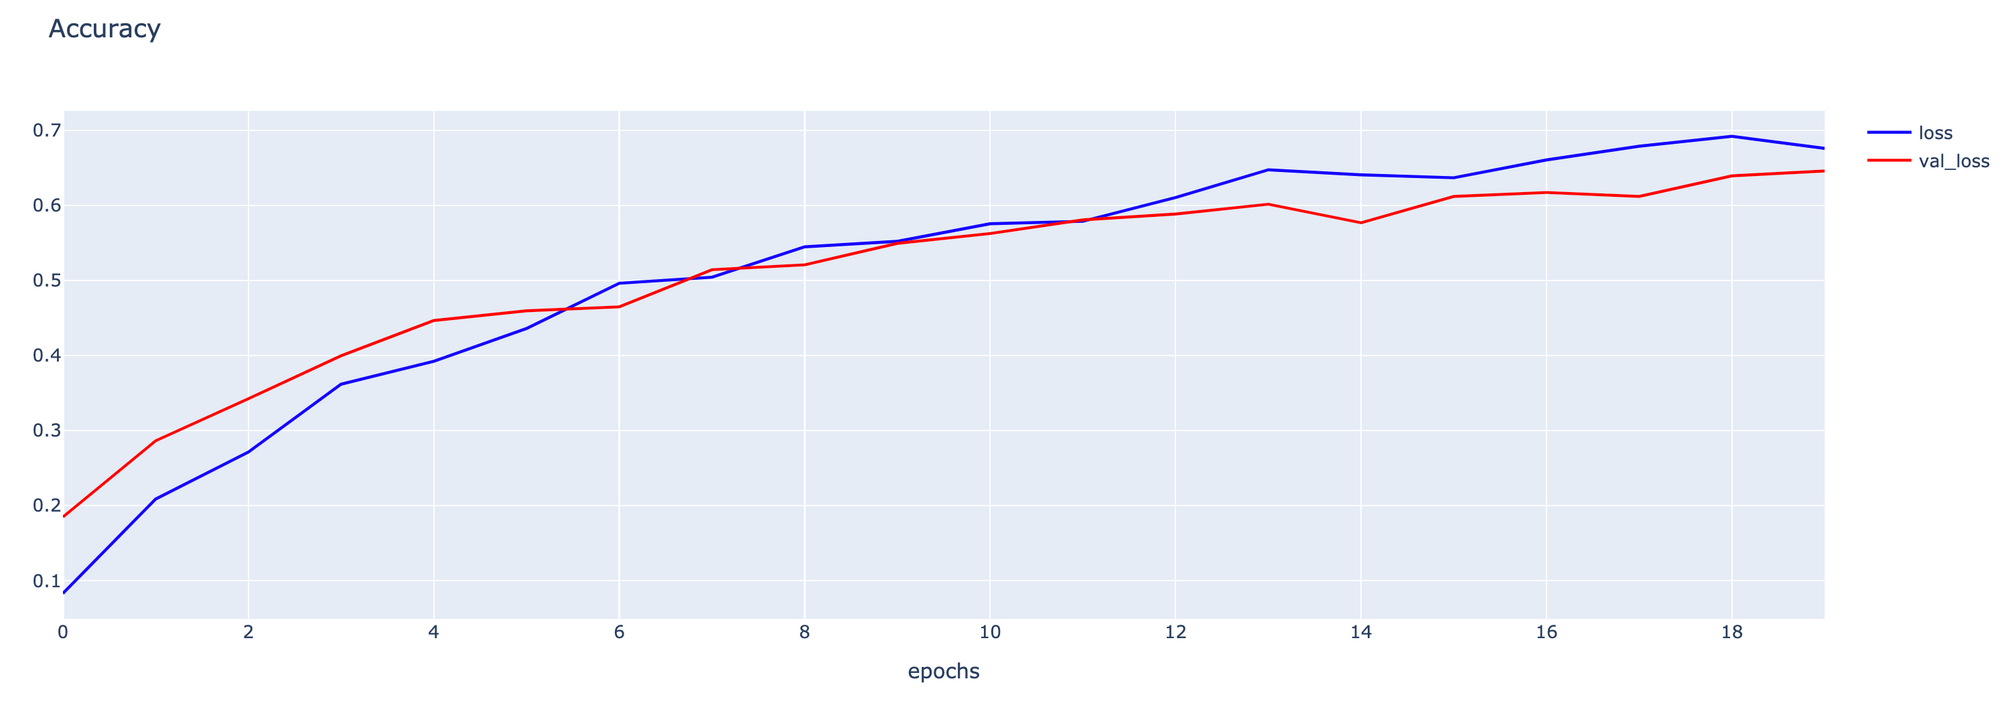
- Evaluate Model
model = load_model(filepath)
score = model.evaluate(validate_artworks, verbose=1)
13/13 [==============================] - 14s 1s/step - loss: 1.0295 - accuracy: 0.6494
S4
- Load VGG Model ทั้งหมดรวม Top Layer และกำหนด input_shape = (224, 224, 3)
vgg16_model = tf.keras.applications.VGG16(weights='imagenet', include_top=True, input_shape=(224, 224, 3))- แช่แข็งทุก Layer ที่ได้ Load มา
vgg16_model.trainable = False- ตัดส่วนปลายออก 1 Layer
vgg16_model = tf.keras.Model(inputs=vgg16_model.inputs, outputs=vgg16_model.layers[-2].output)- กำหนดให้ 2 Layer สุดท้ายสามารถ Train ใหม่ได้
vgg16_model.get_layer('fc2').trainable = True
vgg16_model.get_layer('fc1').trainable = True- เพิ่ม Dense Layer สำหรับ Classify ภาพศิลปิน 11 คน
output = tf.keras.layers.Dense(11, activation='softmax')(vgg16_model.layers[-1].output)

model = tf.keras.Model(inputs=vgg16_model.inputs, outputs=output)- Compile Model โดยลด Learning Rate เหลือ 0.00001 จากเดิม 0.0001 ใน S3 Model
adam_optimizer = Adam(learning_rate=0.00001)

model.compile(loss='categorical_crossentropy', optimizer=adam_optimizer, metrics=['accuracy'])

model.summary()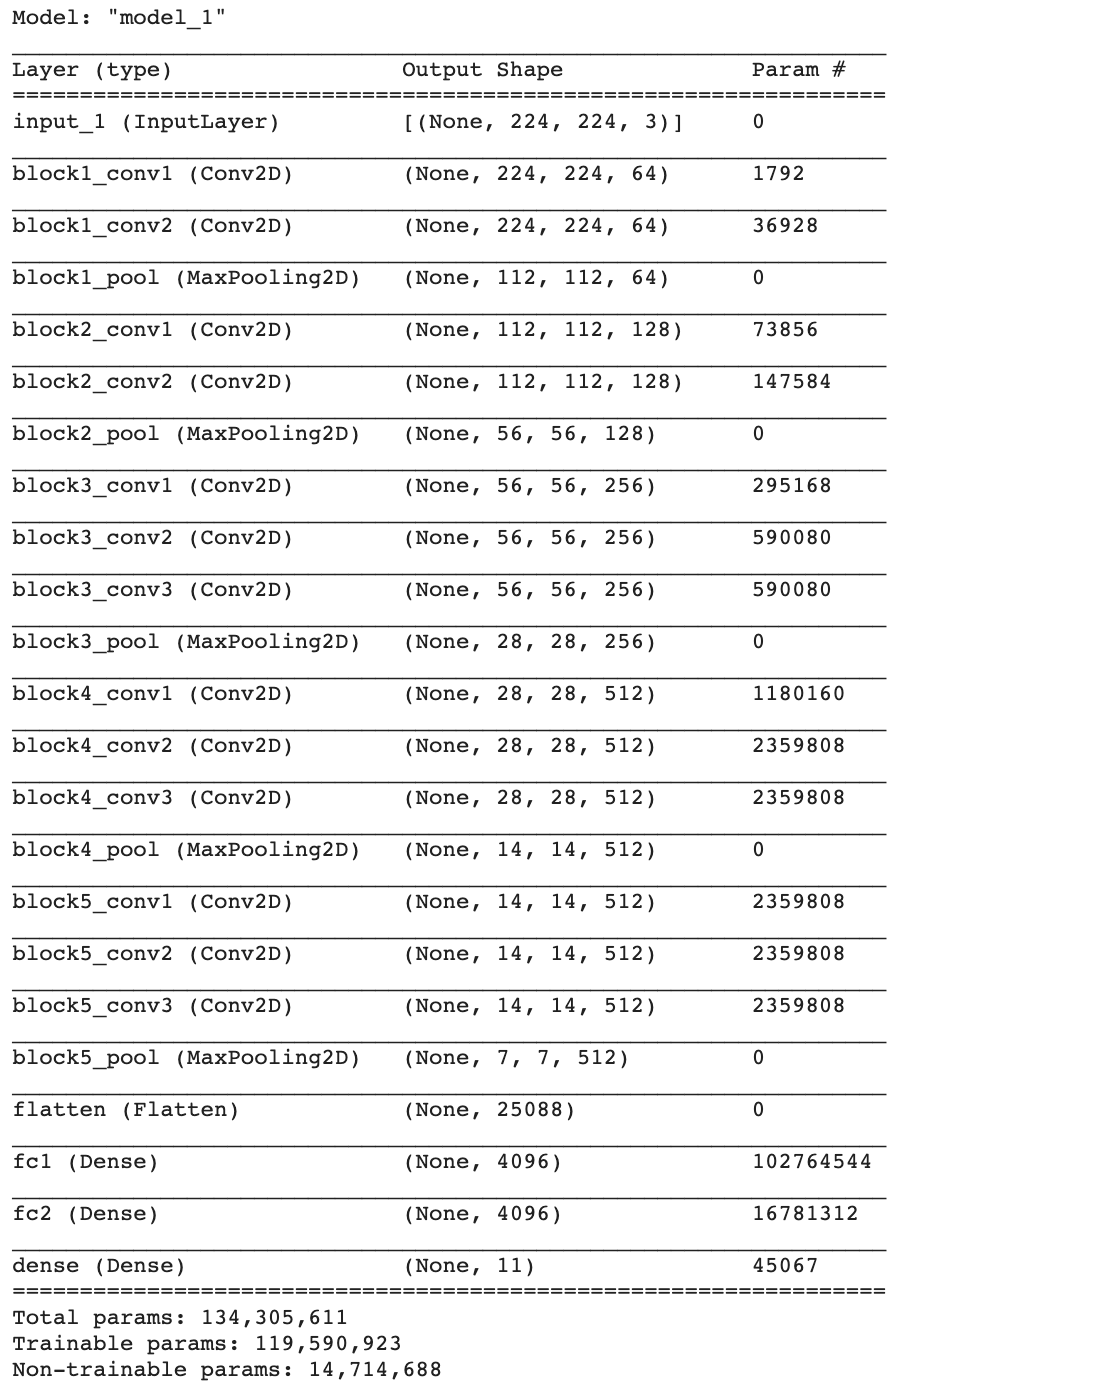
- ทำ Checkpoint เพื่อ Save Model เฉพาะ Epoch ที่ให้ค่า val_loss ตำ่ที่สุด
filepath="weights_best_s4.h5"
checkpoint = ModelCheckpoint(filepath, monitor='val_loss', verbose=1, save_best_only=True, mode='min')

callbacks_list = [checkpoint, rlrp]- Train Model และแก้ปัญหา Imbalanced Dataset ด้วย Class Weight
history2 = model.fit(train_artworks,
                    validation_data=validate_artworks,
                    epochs=20,
                    shuffle=True,
                    verbose = 1,
                    class_weight=class_weights,
                    callbacks=callbacks_list)
- Plot กราฟ Loss
h1 = go.Scatter(y=history2.history['loss'],
                    mode="lines",
                    line=dict(
                      width=2,
                      color='blue'),
                      name="loss"
                   )
h2 = go.Scatter(y=history2.history['val_loss'],
                    mode="lines",
                    line=dict(
                      width=2,
                      color='red'),
                      name="val_loss"
                   )

data = [h1, h2]
layout1 = go.Layout(title='Loss',
                   xaxis=dict(title='epochs'),
                   yaxis=dict(title=''))
fig1 = go.Figure(data = data, layout=layout1)
fig1.show()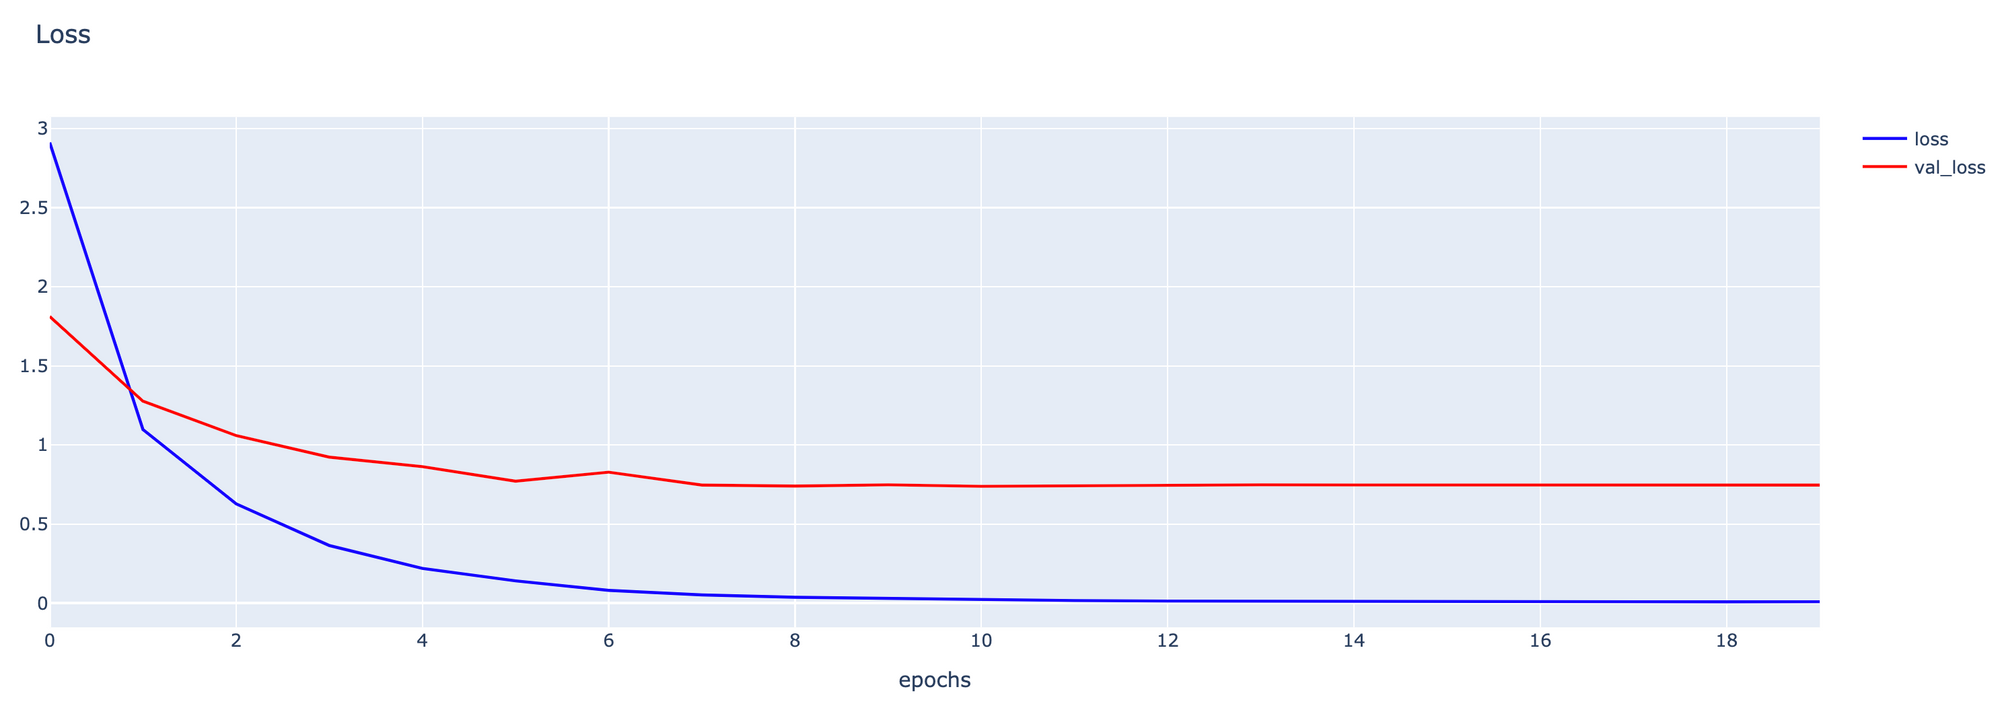
- Plot กราฟ Accuracy
h1 = go.Scatter(y=history2.history['accuracy'],
                    mode="lines",
                    line=dict(
                      width=2,
                      color='blue'),
                      name="loss"
                   )
h2 = go.Scatter(y=history2.history['val_accuracy'],
                    mode="lines",
                    line=dict(
                      width=2,
                      color='red'),
                      name="val_loss"
                   )

data = [h1, h2]
layout1 = go.Layout(title='Accuracy',
                   xaxis=dict(title='epochs'),
                   yaxis=dict(title=''))
fig1 = go.Figure(data = data, layout=layout1)
fig1.show()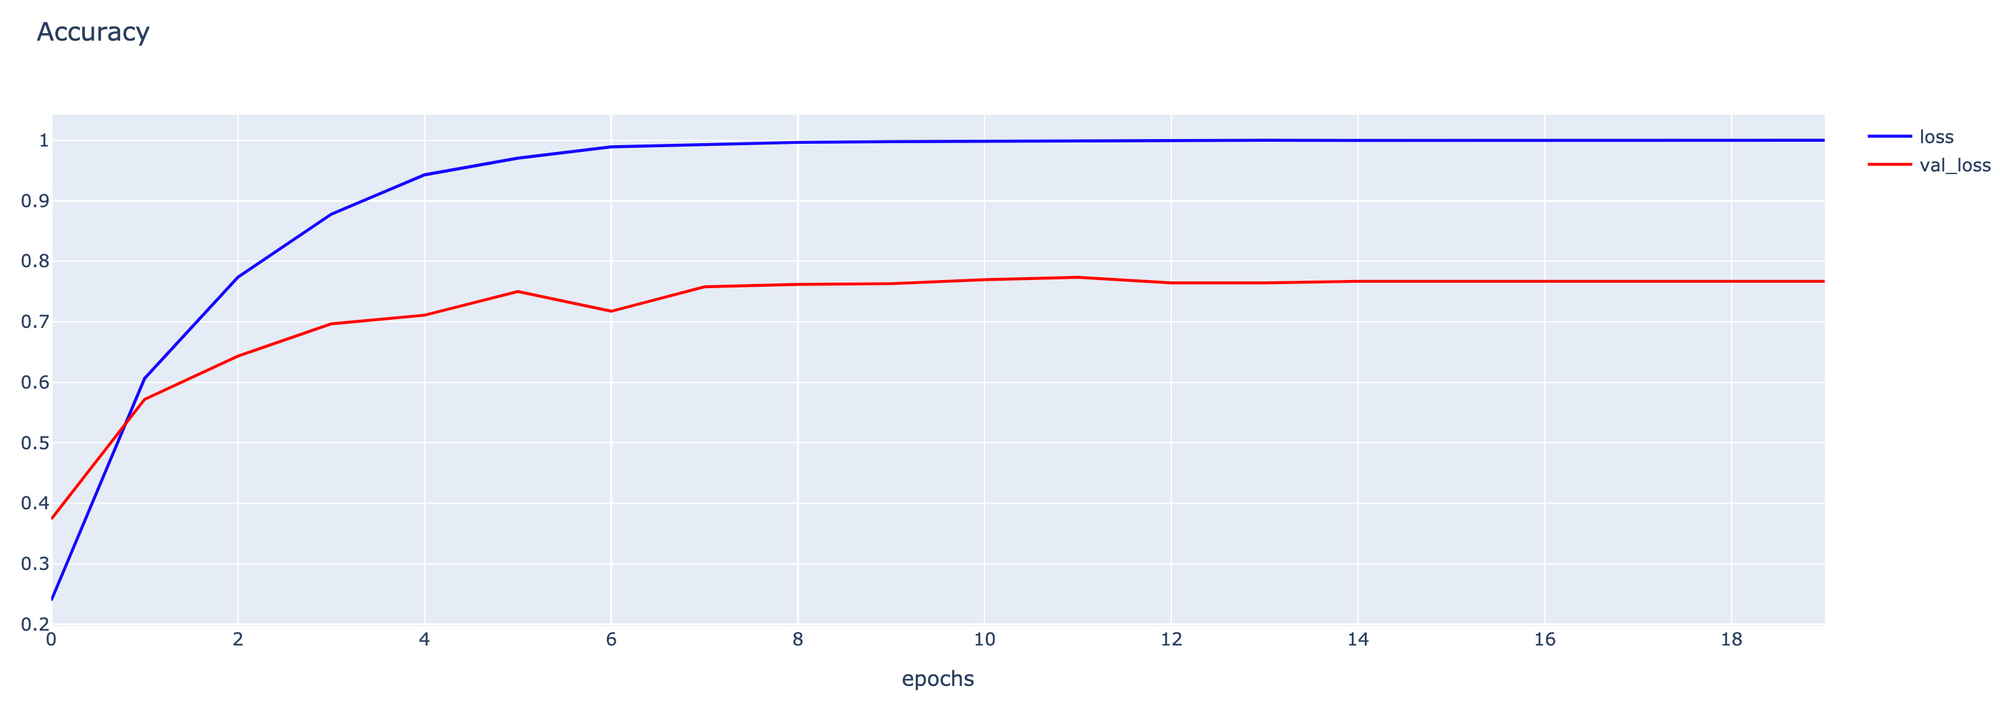
- Evaluate Model
model = load_model(filepath)
score = model.evaluate(validate_artworks, verbose=1)
13/13 [==============================] - 12s 857ms/step - loss: 0.7325 - accuracy: 0.7709
S5
- Load VGG Model ทั้งหมดรวม Top Layer และกำหนด input_shape = (224, 224, 3)
vgg16_model = tf.keras.applications.VGG16(weights='imagenet', include_top=True, input_shape=(224, 224, 3))- แช่แข็งทุก Layer ที่ได้ Load มา
vgg16_model.trainable = False- ตัดส่วนปลายออก 1 Layer
vgg16_model = tf.keras.Model(inputs=vgg16_model.inputs, outputs=vgg16_model.layers[-2].output)- เพิ่ม Dense Layer สำหรับ Classify ภาพที่วาดโดยศิลปิน 11 คน
output = tf.keras.layers.Dense(11, activation='softmax')(vgg16_model.layers[-1].output)

model = tf.keras.Model(inputs=vgg16_model.inputs, outputs=output)- กำหนดให้ตั้งแต่ Layer ที่ 10 (Layer 0 คือ Input Layer) จนถึง Layer สุดท้าย (Output Layer) สามารถ Train ใหม่ได้
for layer in model.layers[10:]:
layer.trainable = True- Compile Model
adam_optimizer = Adam(learning_rate=0.00001)

model.compile(loss='categorical_crossentropy', optimizer=adam_optimizer, metrics=['accuracy'])

model.summary()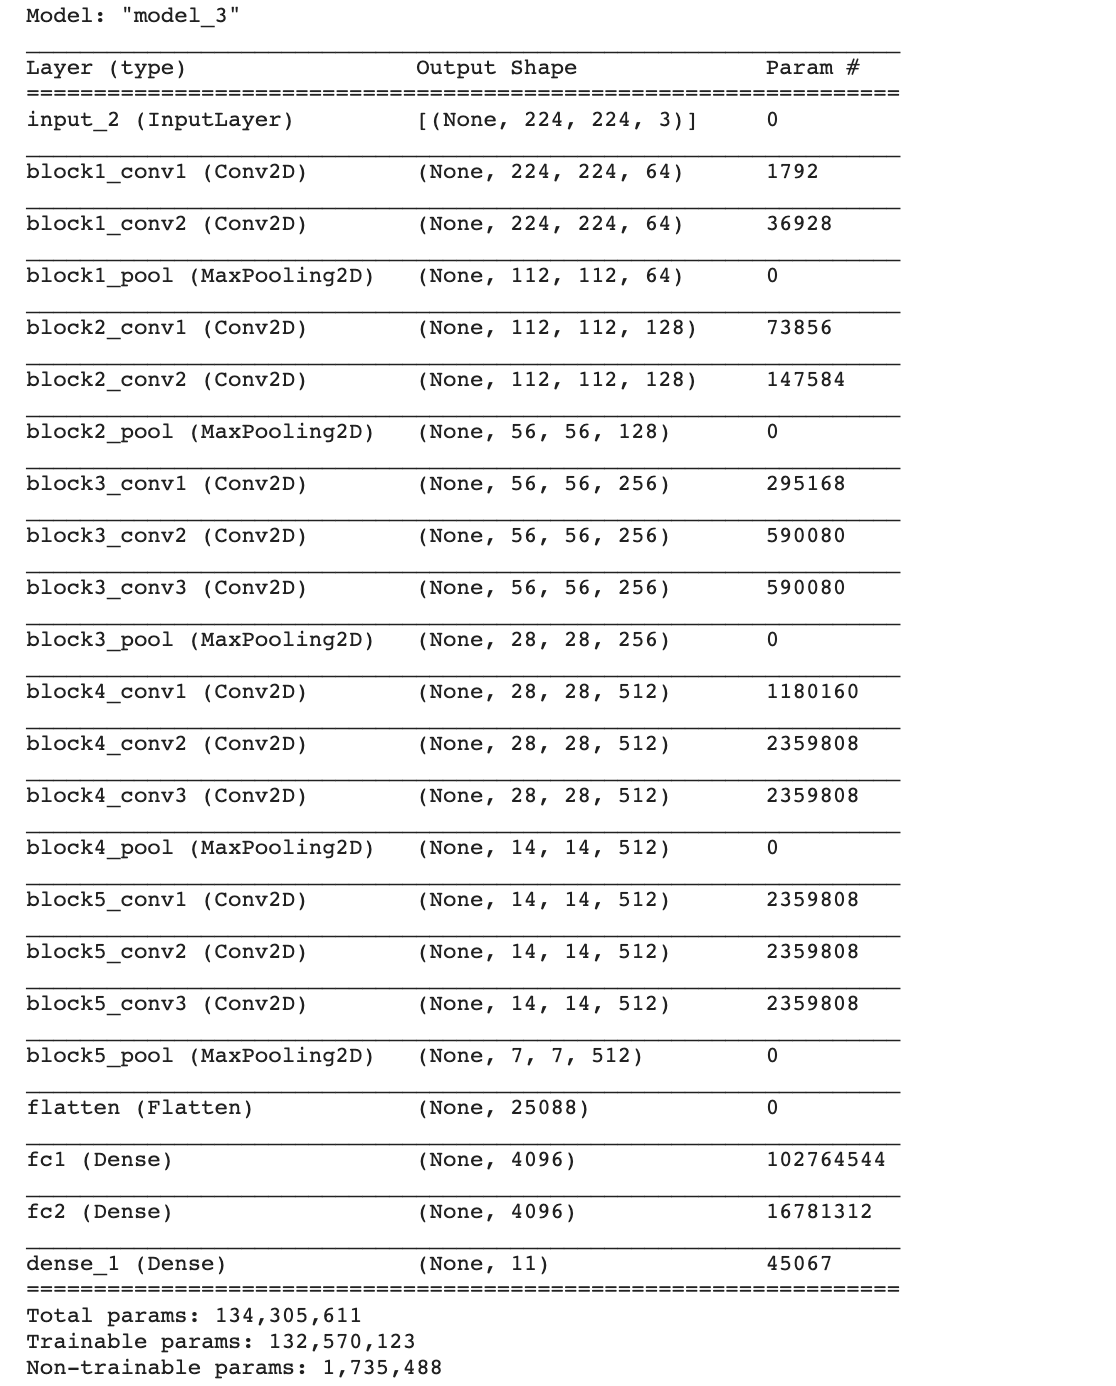
- ทำ Checkpoint เพื่อ Save Model เฉพาะ Epoch ที่ให้ค่า val_loss ตำ่ที่สุด
filepath="weights_best_s5.h5"
checkpoint = ModelCheckpoint(filepath, monitor='val_loss', verbose=1, save_best_only=True, mode='min')

callbacks_list = [checkpoint, rlrp]- Train Model และแก้ปัญหา Imbalanced Dataset ด้วย Class Weight
history3 = model.fit(train_artworks,
                    validation_data=validate_artworks,
                    epochs=20,
                    shuffle=True,
                    verbose = 1,
                    class_weight=class_weights,
                    callbacks=callbacks_list)
- Plot กราฟ Loss
h1 = go.Scatter(y=history3.history['loss'],
                    mode="lines",
                    line=dict(
                      width=2,
                      color='blue'),
                      name="loss"
                   )
h2 = go.Scatter(y=history3.history['val_loss'],
                    mode="lines",
                      line=dict(
                      width=2,
                      color='red'),
                      name="val_loss"
                   )

data = [h1, h2]
layout1 = go.Layout(title='Loss',
                   xaxis=dict(title='epochs'),
                   yaxis=dict(title=''))
fig1 = go.Figure(data = data, layout=layout1)
fig1.show()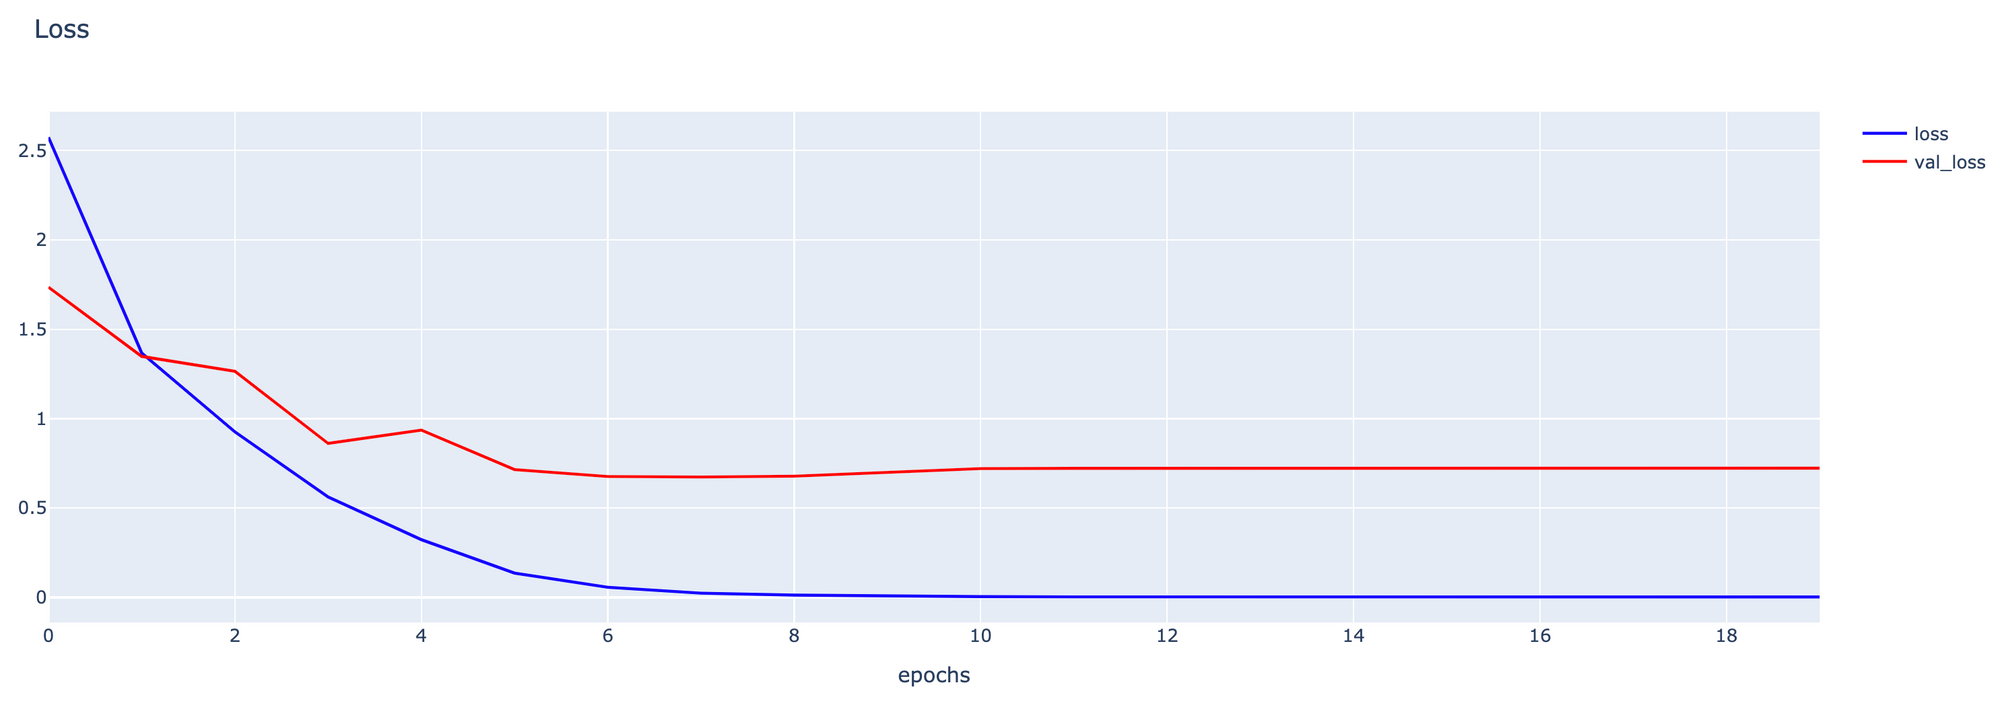
- Plot กราฟ Accuracy
h1 = go.Scatter(y=history3.history['accuracy'],
                    mode="lines",
                    line=dict(
                      width=2,
                      color='blue'),
                      name="loss"
                   )
h2 = go.Scatter(y=history3.history['val_accuracy'],
                    mode="lines",
                    line=dict(
                    width=2,
                    color='red'),
                    name="val_loss"
                   )

data = [h1, h2]
layout1 = go.Layout(title='Accuracy',
                   xaxis=dict(title='epochs'),
                   yaxis=dict(title=''))
fig1 = go.Figure(data = data, layout=layout1)
fig1.show()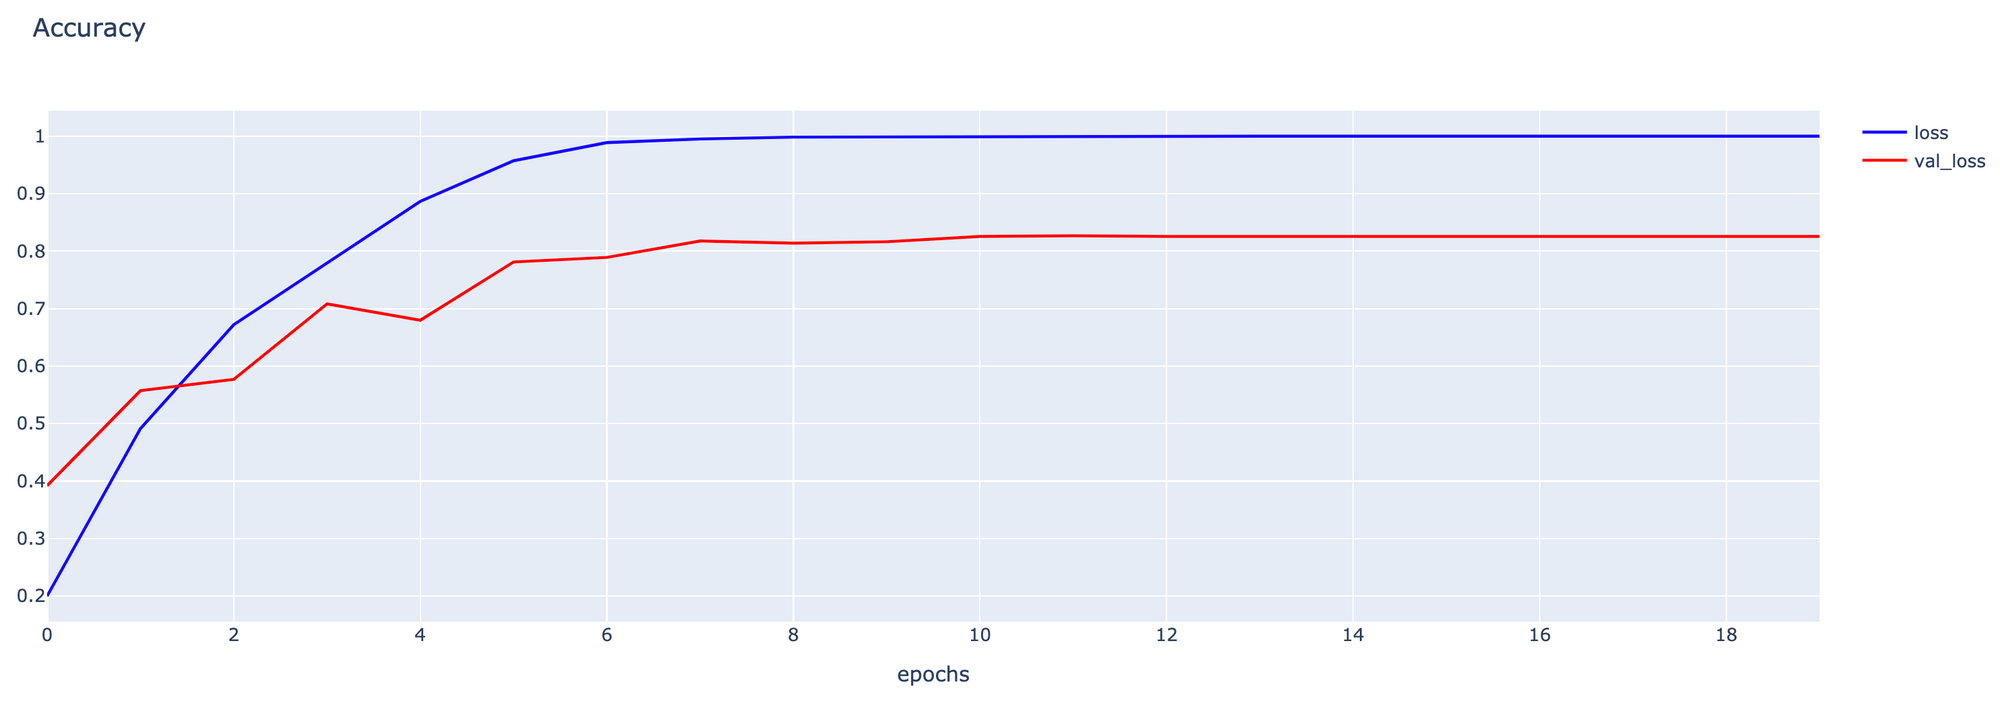
- Evaluate Model
model = load_model(filepath)
score = model.evaluate(validate_artworks, verbose=1)
13/13 [==============================] - 12s 866ms/step - loss: 0.6691 - accuracy: 0.8190
S6
- Load VGG Model ทั้งหมดรวม Top Layer และกำหนด input_shape = (224, 224, 3)
vgg16_model = tf.keras.applications.VGG16(weights='imagenet', include_top=True, input_shape=(224, 224, 3))- กำหนดให้สามารถ Train ใหม่ได้ทุก Layer
vgg16_model.trainable = True- ตัดส่วนปลายออก 1 Layer
vgg16_model = tf.keras.Model(inputs=vgg16_model.inputs, outputs=vgg16_model.layers[-2].output)- เพิ่ม Dense Layer สำหรับ Classify ภาพศิลปิน 11 คน
output = tf.keras.layers.Dense(11, activation='softmax')(vgg16_model.layers[-1].output)

model = tf.keras.Model(inputs=vgg16_model.inputs, outputs=output)- Compile Model
adam_optimizer = Adam(learning_rate=0.00001)

model.compile(loss='categorical_crossentropy', optimizer=adam_optimizer, metrics=['accuracy'])

model.summary()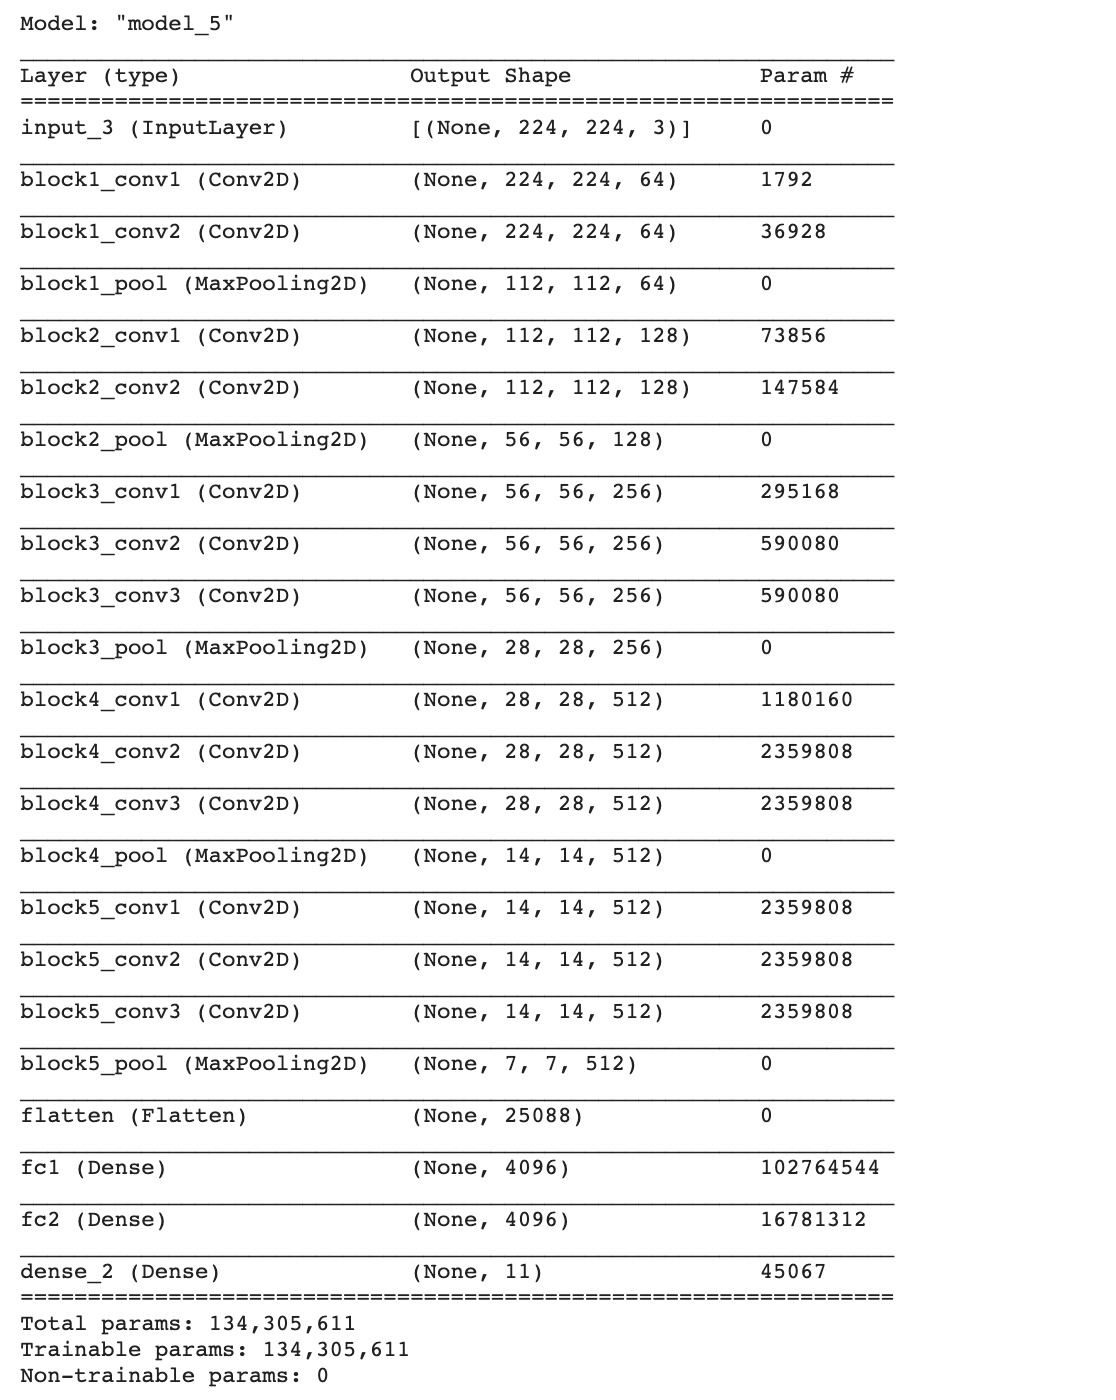
- ทำ Checkpoint เพื่อ Save Model เฉพาะ Epoch ที่ให้ค่า val_loss ตำ่ที่สุด
filepath="weights_best_s6.h5"
checkpoint = ModelCheckpoint(filepath, monitor='val_loss', verbose=1, save_best_only=True, mode='min')

callbacks_list = [checkpoint, rlrp]- Train Model และแก้ปัญหา Imbalanced Dataset ด้วย Class Weight
history4 = model.fit(train_artworks,
                    validation_data=validate_artworks,
                    epochs=20,
                    shuffle=True,
                    verbose = 1,
                    class_weight=class_weights,
                    callbacks=callbacks_list)
- Plot กราฟ Loss
h1 = go.Scatter(y=history4.history['loss'],
                    mode="lines",
                    line=dict(
                      width=2,
                      color='blue'),
                      name="loss"
                   )
h2 = go.Scatter(y=history4.history['val_loss'],
                    mode="lines",
                    line=dict(
                      width=2,
                      color='red'),
                      name="val_loss"
                   )

data = [h1, h2]
layout1 = go.Layout(title='Loss',
                   xaxis=dict(title='epochs'),
                   yaxis=dict(title=''))
fig1 = go.Figure(data = data, layout=layout1)
fig1.show()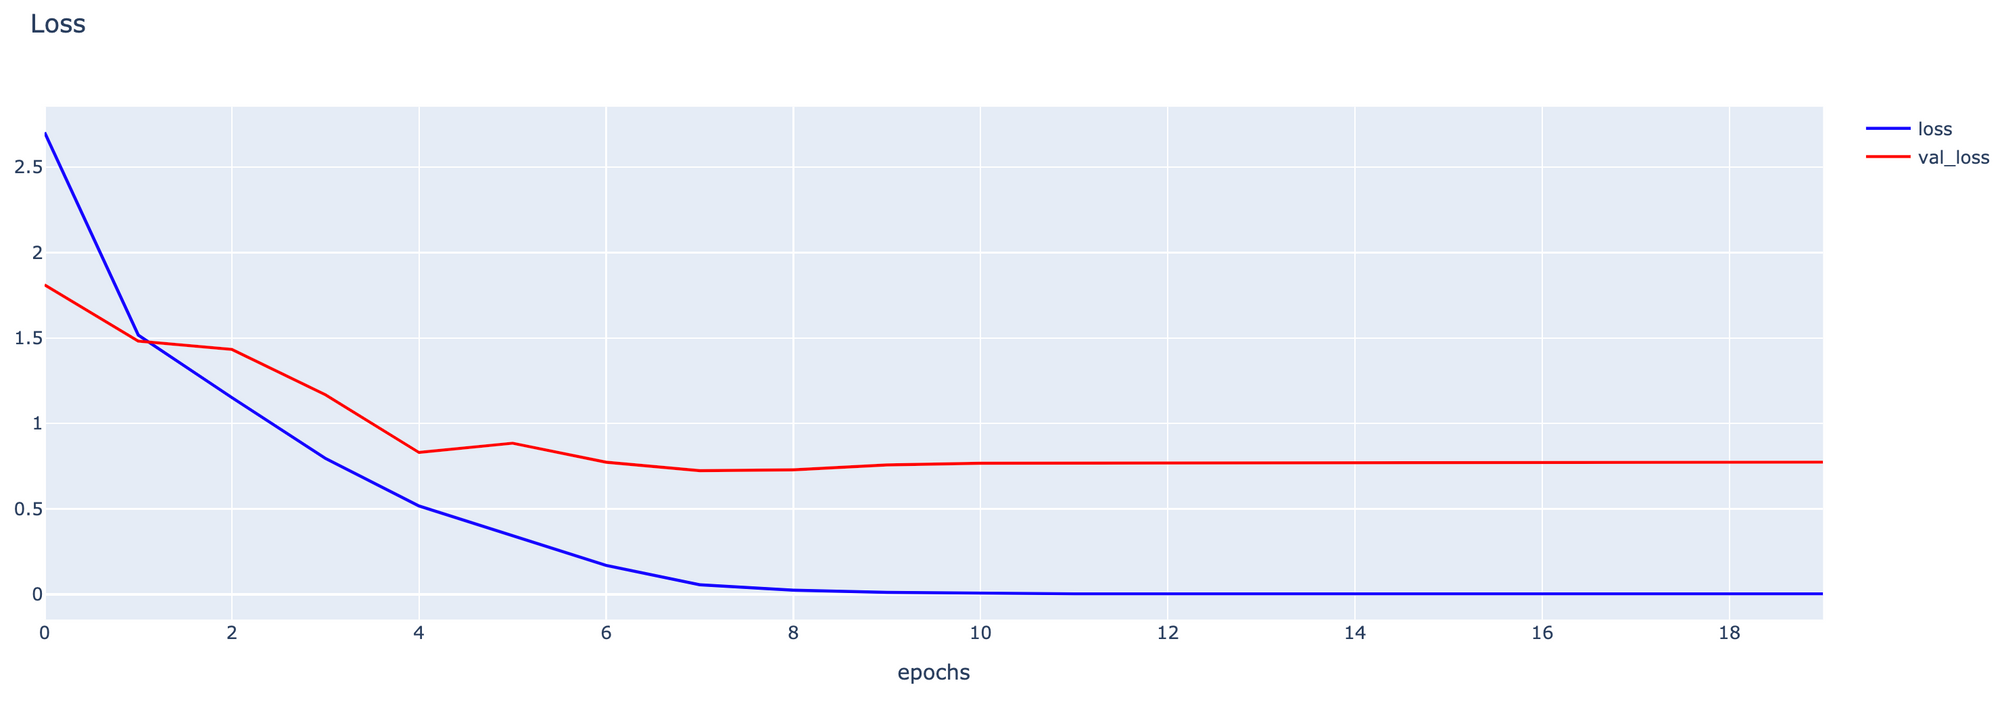
- Plot กราฟ Accuracy
h1 = go.Scatter(y=history4.history['accuracy'],
                    mode="lines",
                    line=dict(
                      width=2,
                      color='blue'),
                      name="loss"
                   )
h2 = go.Scatter(y=history4.history['val_accuracy'],
                    mode="lines",
                    line=dict(
                      width=2,
                      color='red'),
                      name="val_loss"
                   )

data = [h1, h2]
layout1 = go.Layout(title='Accuracy',
                   xaxis=dict(title='epochs'),
                   yaxis=dict(title=''))
fig1 = go.Figure(data = data, layout=layout1)
fig1.show()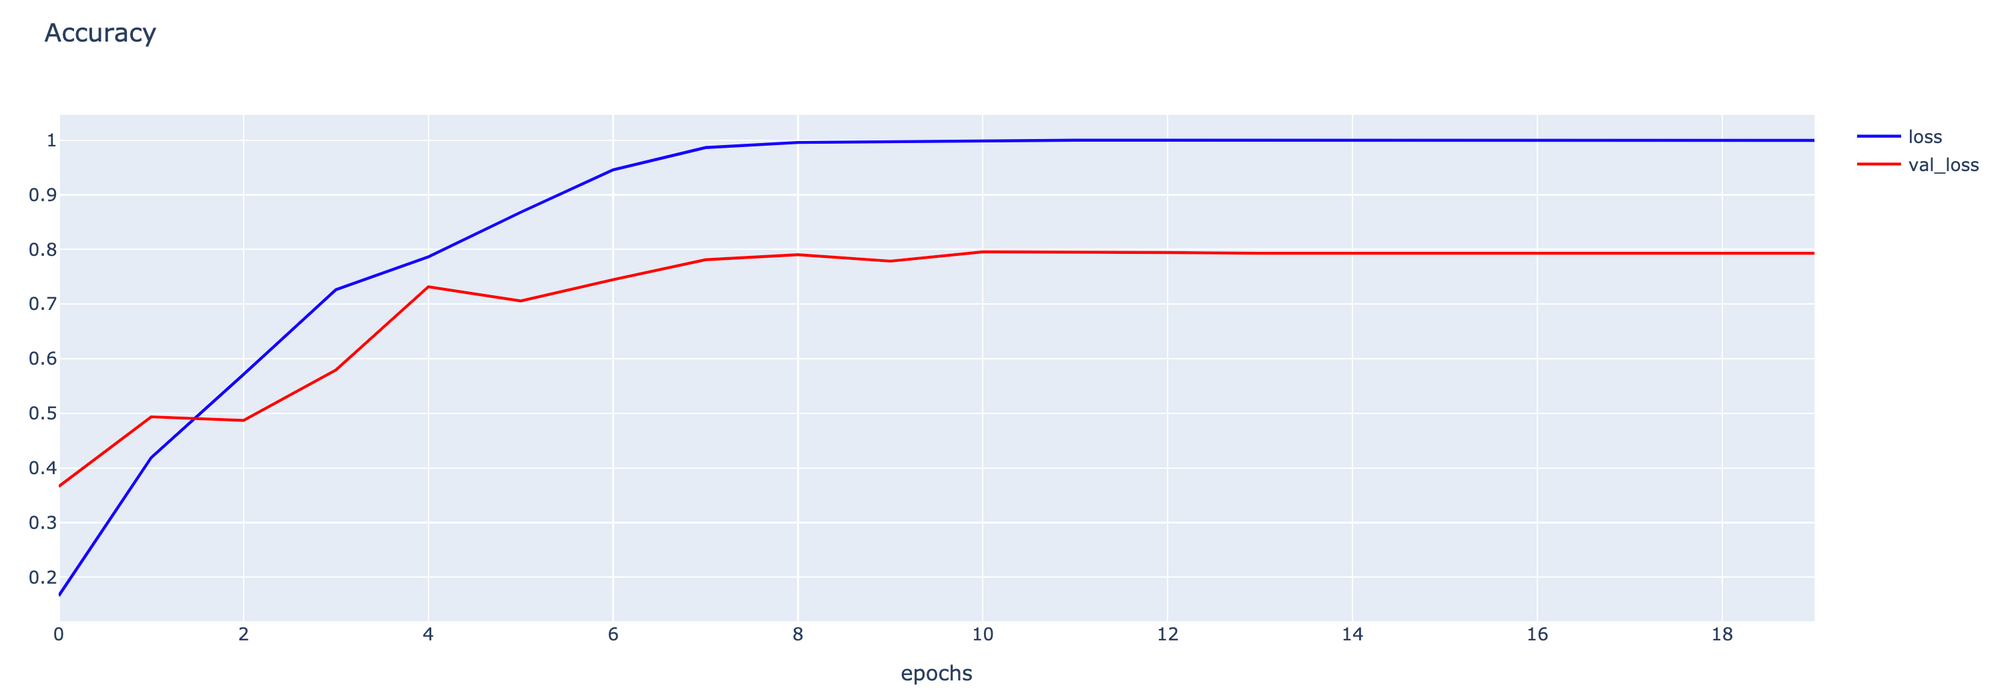
- Evaluate Model
model = load_model(filepath)
score = model.evaluate(validate_artworks, verbose=1)
13/13 [==============================] - 12s 860ms/step - loss: 0.7198 - accuracy: 0.7835
โดยแต่ละ Strategy ตั้งแต่ S3-S6 มี Validation Loss และ Validation Accuracy ดังกราฟต่อไปนี้
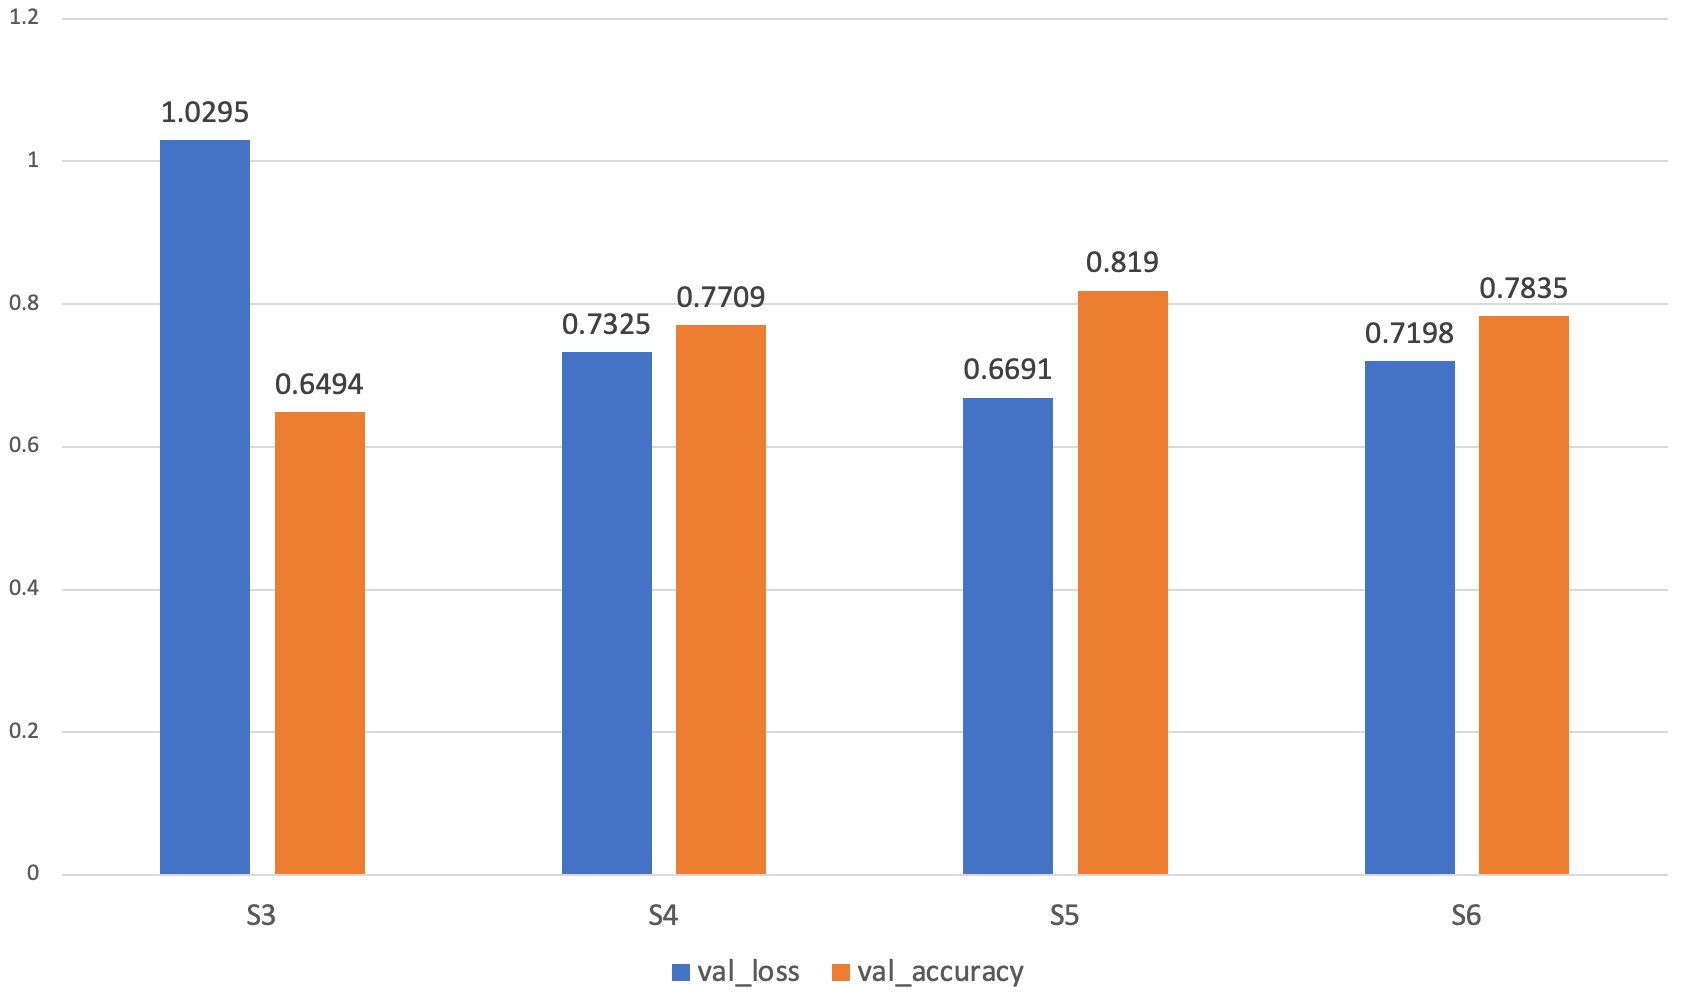

พบว่าเมื่อปรับจูนโดยใช้ Strategy S5, Model ของเราจะมีประสิทธิภาพสูงที่สุด อย่างไรก็ตาม เพื่อจะให้ได้ Model ที่มีประสิทธิภาพมากยิ่งขึ้น เราอาจต้องมีการปรับจูน Parameter ต่างๆ อย่างละเอียด รวมทั้งมีการเพิ่มจำนวน Epoch ให้มากขึ้น และอาจเลือกใช้ Pre-trained Model ตัวอื่นๆ แทน VGG16 ครับ
