Introduction to Stochastic Gradient Descent with Tensorflow and Keras Framework
บทความโดย ผศ.ดร.ณัฐโชติ พรหมฤทธิ์
ภาควิชาคอมพิวเตอร์
คณะวิทยาศาสตร์
มหาวิทยาลัยศิลปากร
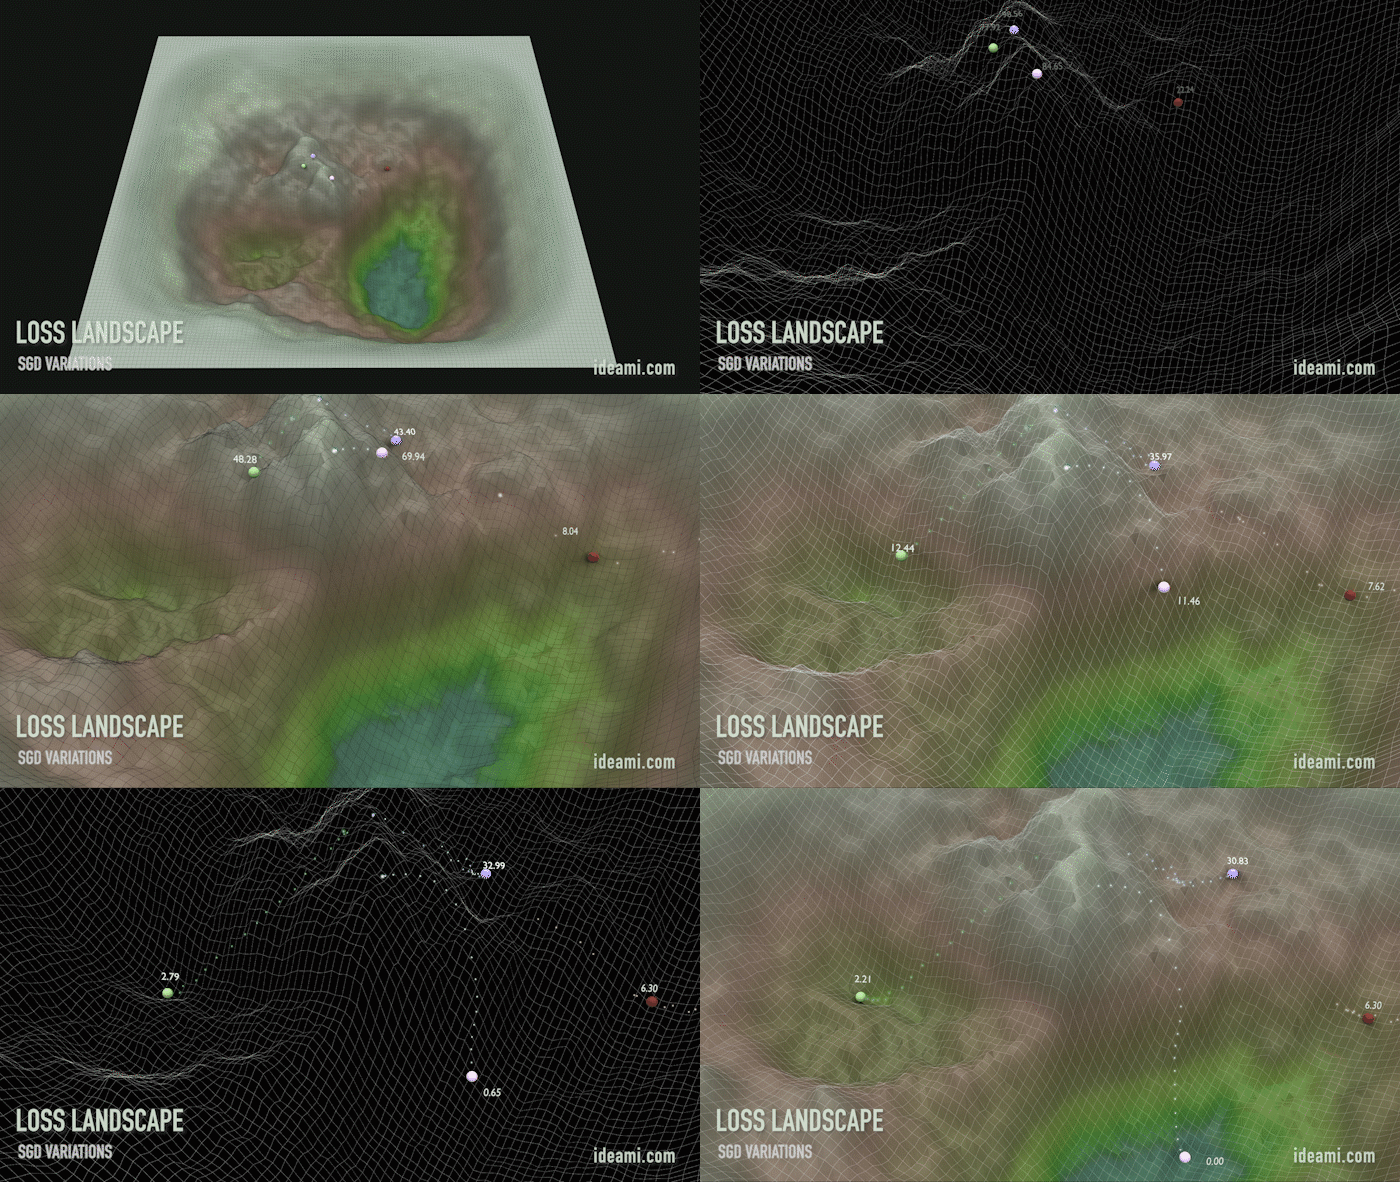
Stochastic Gradient Descent (SGD) เป็นวิธีการหลักในการ Train Neural Network Model โดยใช้ Gradient หรือ ความชัน เป็นตัวบอกขนาดและทิศทางในการปรับ Parameters ที่จะทำให้ Loss Value เคลื่อนที่ไปยัง จุดต่ำสุดของพื้นผิว (Minima) การทำความเข้าใจแนวคิดของ SGD จึงเป็นสิ่งสำคัญในการที่จะทำให้สามารถปรับจูน Neural Network โดยเฉพาะ Deep Learning Model ให้มีประสิทธิภาพมากยิ่งขึ้น
โดยในบทนี้เราจะได้ทำความเข้าใจพฤติกรรมการเคลื่อนที่ของ Loss Value ในแต่ละรอบของการ Train Model แบบ Linear Regression โดยใช้ Tensorflow และ Keras Framework ซึ่งจะมีวิธีการ 2 แบบ ได้แก่ 1) Gradient Descent และ 2) Stochastic Gradient Descent ตามลำดับ
Gradient Descent Method
Two Dimensional Parabola Graph
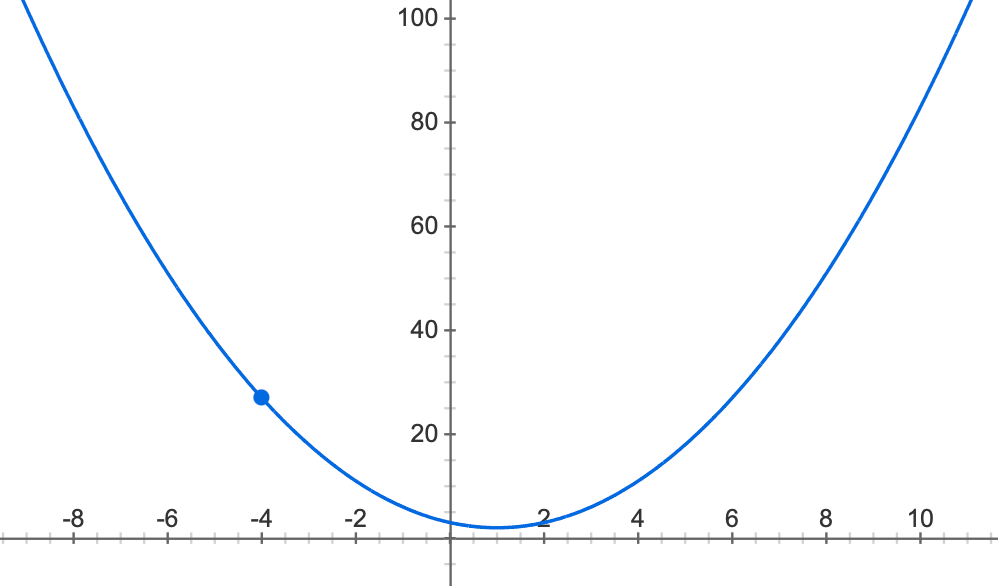
เพื่อให้ผู้อ่านเห็นภาพมากยิ่งขึ้น ผมจะขอยกตัวอย่างกราฟพาราโบลา l=w^2-2w+3 ซึ่งมีจุดต่ำสุดที่จุด w เท่ากับ 1 ดังภาพด้านบน จุดมุ่งหมายของ Gradient Descent Method คือการหาค่าของ w ที่ทำให้ l มีค่าต่ำสุด โดยการปรับค่า w ให้ค่อยๆ เคลื่อนที่ไปตามทางลาด (Descending) ของพื้นผิวนั้นๆ
สมมติว่าเราผูกผ้าปิดตาแล้วถูกนำไปวางไว้ที่จุด w เท่ากับ -4 การที่จะเดินไปยังจุดต่ำสุดได้ เราจะต้องอาศัยสัมผัสของเท้าทั้ง 2 ข้างเพื่อประเมินว่าจะเดินไปทางซ้ายหรือทางขวา โดยในการประเมิน เราจะหาอนุพันธ์ของฟังก์ชัน l เทียบกับ w (หา Gradient)
ดังนั้นที่จุด w เท่ากับ -4 ความชันของกราฟพาราโบลาจะมีค่าเท่ากับ -10
Gradient = 2w-2
         = (2)(-4)-(2)
         = -10
ซึ่งเมื่อความชันเป็นลบ เราจึงรู้ได้ว่าพื้นผิวที่ยืนอยู่นั้น มีการลาดเอียงมาทางขวามือ เราจึงเดินไป 10 ก้าว ยังจุดที่ w เท่ากับ 6
Update w = w-(-10)
         = (-4)-(-10)
         = 6
อย่างไรก็ตามการเดินถึง 10 ก้าว ทำให้เราเคลื่อนที่ไปยังอีกฝั่งของหลุมที่ความชันเป็นบวก แทนที่จะค่อยๆ เดินลงหลุมไปยังจุดต่ำสุด ดังนั้นในการ Train Model จริง จึงต้องมีการ Update ค่า w ด้วยจำนวนก้าวที่ไม่มากนัก โดยการทำให้ Gradient มีขนาดเล็กลง ด้วยการคูณด้วย Learning Rate ที่มีค่าอยู่ระหว่าง 0 - 1 ตามสมการด้านล่าง
Learning_Rate = 0.01
Update w = w - Learning_Rate*Gradient
         = (-4)-(0.01)(-10)
         = -3.9
Linear Regression with Tensorflow

เราจะเริ่มต้นด้วยการ Implement Neural Network Model แบบ Linear Regression ด้วย Tensorflow Framework เพื่อศึกษาการเคลื่อนที่ของ Loss Value โดยใช้ Gradient Descent Method จาก Weather Dataset ดังตัวอย่างตามขั้นตอนต่อไปนี้
- Import tensorflow.compat.v1 เพื่อให้สามารถเขียน Code ที่ทำงานได้ทั้ง TensorFlow 1.x and 2.x. รวมทั้ง Import Library อื่นๆ ท่ีจะใช้งาน
import tensorflow.compat.v1 as tf
from tensorflow.python.framework.ops import disable_eager_execution

import pandas as pd
import numpy as np
import matplotlib.pyplot as plt
import seaborn as seabornInstance
from sklearn.model_selection import train_test_split
from sklearn import metrics

import plotly
import plotly.graph_objs as go
import plotly.express as px

K = tf.keras.backend- Disable TensorFlow ในโหมด Eager Execution ที่ทำให้รันทีละคำสั่งได้เหมือนการรันโปรแกรมปกติ
disable_eager_execution()
tf.executing_eagerly()
False
- กำหนด Random Seed และจำนวน Epoch ที่จะ Train
np.random.seed(seed=13)

EPOCH = 500- Load ไฟล์ Weather.csv ซึ่งพบว่ามีทั้งหมด 119,040 Row โดยเราจะนำข้อมูลใน Column MinTemp มาทำเป็น Input Data หรือตัวแปรอิสระ (Predictor) และ MaxTemp มาทำเป็นผลเฉลย หรือตัวแปรตาม (Response)
dataset = pd.read_csv('Weather.csv')
dataset.shape
(119040, 31)
dataset.describe()
- Plot MinTemp และ MaxTemp เพื่อดูลักษณะของข้อมูล
dataset.plot(x='MinTemp', y='MaxTemp', style='o')
plt.title('MinTemp vs MaxTemp')
plt.xlabel('MinTemp')
plt.ylabel('MaxTemp')
plt.savefig('min_max_temp.jpeg', dpi=300)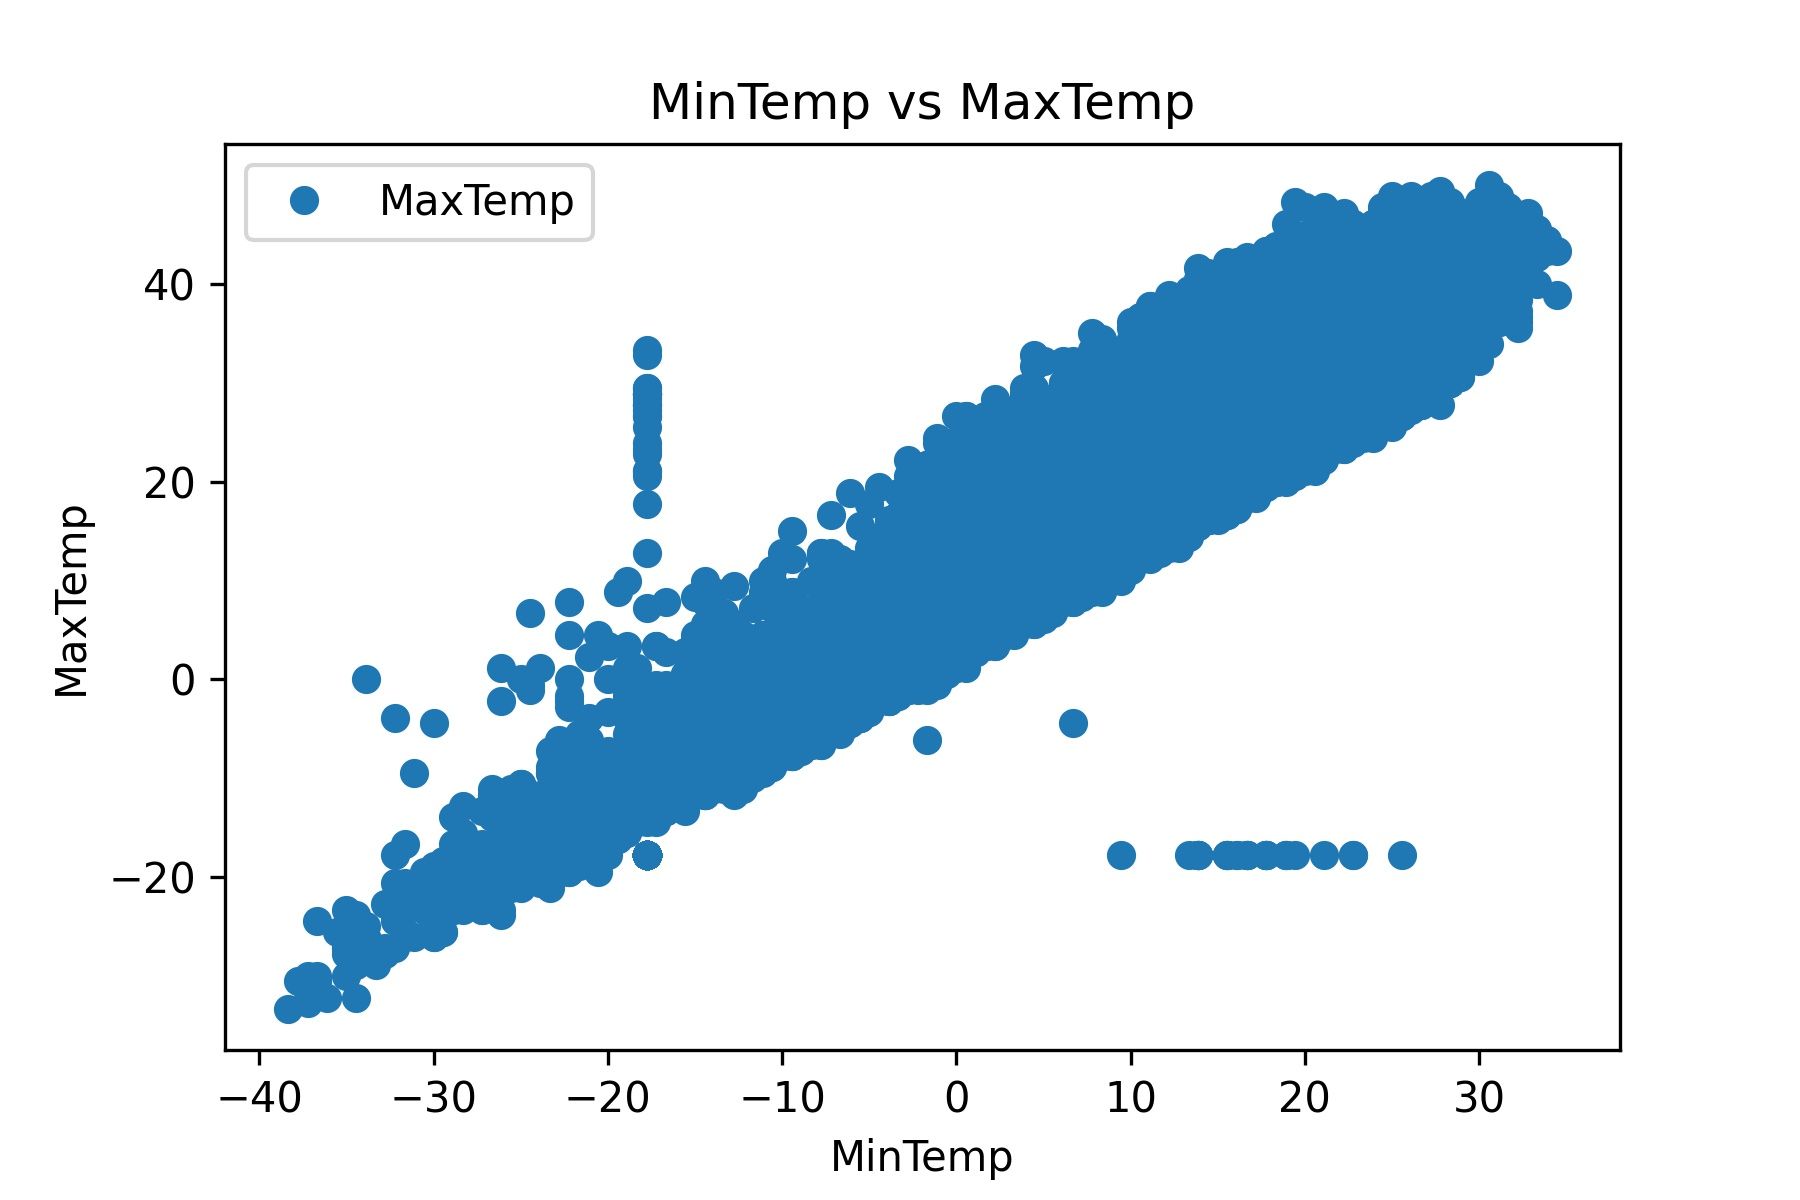
- ดูการกระจายตัวของ MaxTemp
plt.figure(figsize=(15,10))
plt.tight_layout()
seabornInstance.distplot(dataset['MaxTemp'])
plt.savefig('dis_max_temp.jpeg', dpi=300)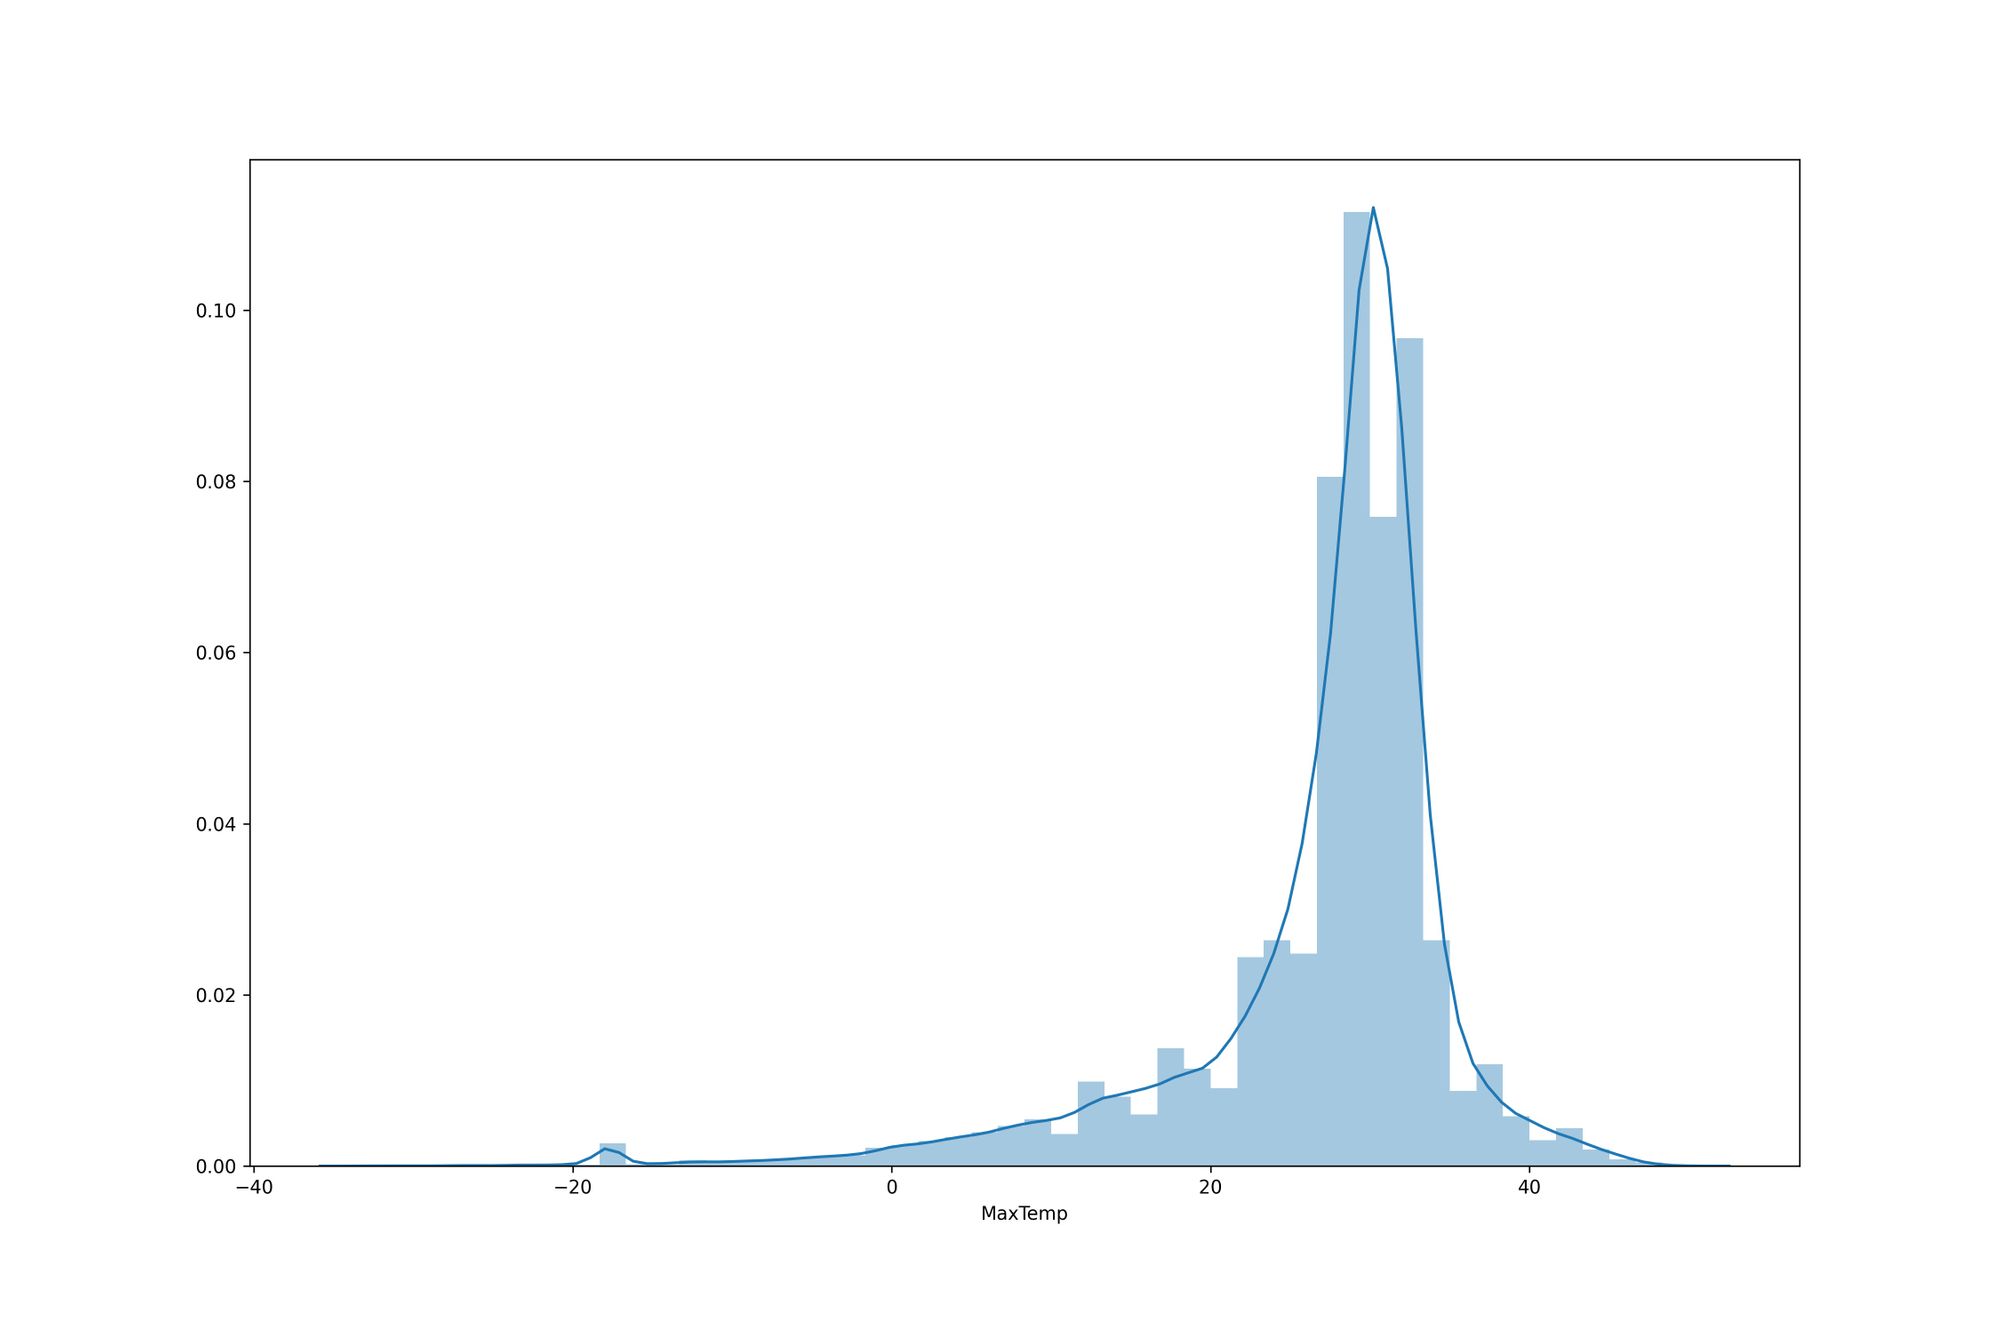
- แยก Dataset เป็น Input Data (x) และผลเฉลย (y)
x = dataset['MinTemp'].values.reshape(-1,1)
y = dataset['MaxTemp'].values.reshape(-1,1)

x.shape
(119040, 1)
- สุ่มแบ่งข้อมูลเป็น 2 ชุด สำหรับ Train 80% และ Test 20%
x_train, x_test, y_train, y_test = train_test_split(x, y, test_size=0.2, shuffle= True)

x_train.shape, x_test.shape, y_train.shape, y_test.shape
((95232, 1), (23808, 1), (95232, 1), (23808, 1))
- นิยาม Model ด้วย Tensorflow โดยจะมีการนำ X_train เข้า Model ทั้งก้อนขนาด 95,232 Row
W = tf.Variable(tf.random.uniform([1], -1.0, 1.0))
b = tf.Variable(tf.random.uniform([1], -1.0, 1.0))

y = W * x_train + b- นิยาม Loss Function แบบ Mean Squared Error (MSE)


loss = tf.reduce_mean(tf.square(y - y_train))- กำหนด Optimizer และ Learning Rate
optimizer = tf.train.GradientDescentOptimizer(0.0001)

train = optimizer.minimize(loss)
โดย Optimizer จะมีการทำ Back-propagation Algorithm เพื่อปรับค่า Weight (W) และ Bias (b) ให้เราอัตโนมัติ โดยไม่ต้องมีการหาอนุพันธ์ด้วยตัวเองเหมือนที่เคยทำในตัวอย่างของบทความตอนที่แล้ว
- เคลียร์ Tensorflow Variable
init = tf.global_variables_initializer()- สร้าง session และรัน init เพื่อเคลียร์ค่า Variable จริง
sess = tf.Session()
sess.run(init)- Train Model (sess.run(train))
history = []
wb = []

for step in range(EPOCH):
    sess.run(train)
    history.append(sess.run(loss))
    print(step, sess.run(W), sess.run(b), sess.run(loss))
    wb.append([sess.run(W)[0], sess.run(b)[0], sess.run(loss)])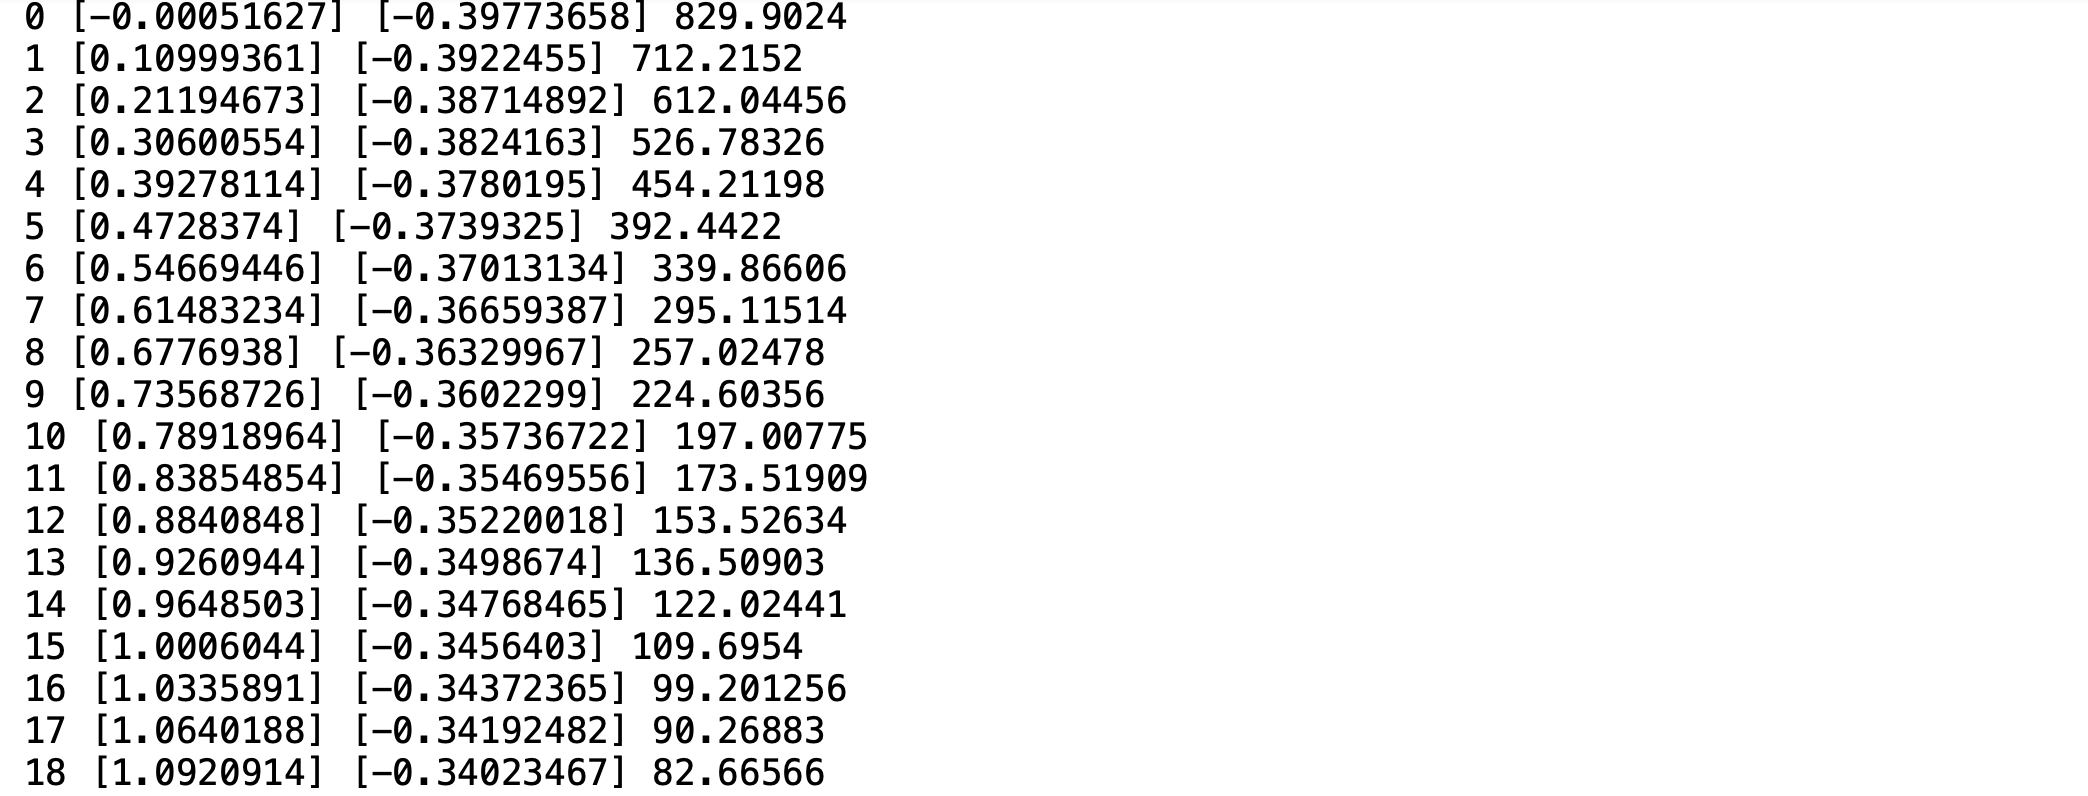
ท่านจะเห็นว่าการใช้ Tensorflow โดยตรง จะใช้เวลา Train น้อยมากๆ
- ดึง Weight (W) และ Bias (b) มาสร้าง Linear Regression Model
M = sess.run(W)
C = sess.run(b)- นิยาม Function Predict
def predict(X, M, C):
    y = M*X+C
return y[0]- แปลง Loss Value List เป็น DataFrame
df = pd.DataFrame(history, columns=['loss'])- Plot Loss
h1 = go.Scatter(y=df['loss'],
                    mode="lines",
                    line=dict(
                    	width=2,
                    	color='blue'),
                    name="loss")

data = [h1]

layout1 = go.Layout(title='Loss',
                   xaxis=dict(title='Epochs'),
                   yaxis=dict(title=''))
fig1 = go.Figure(data, layout=layout1)
plotly.offline.iplot(fig1)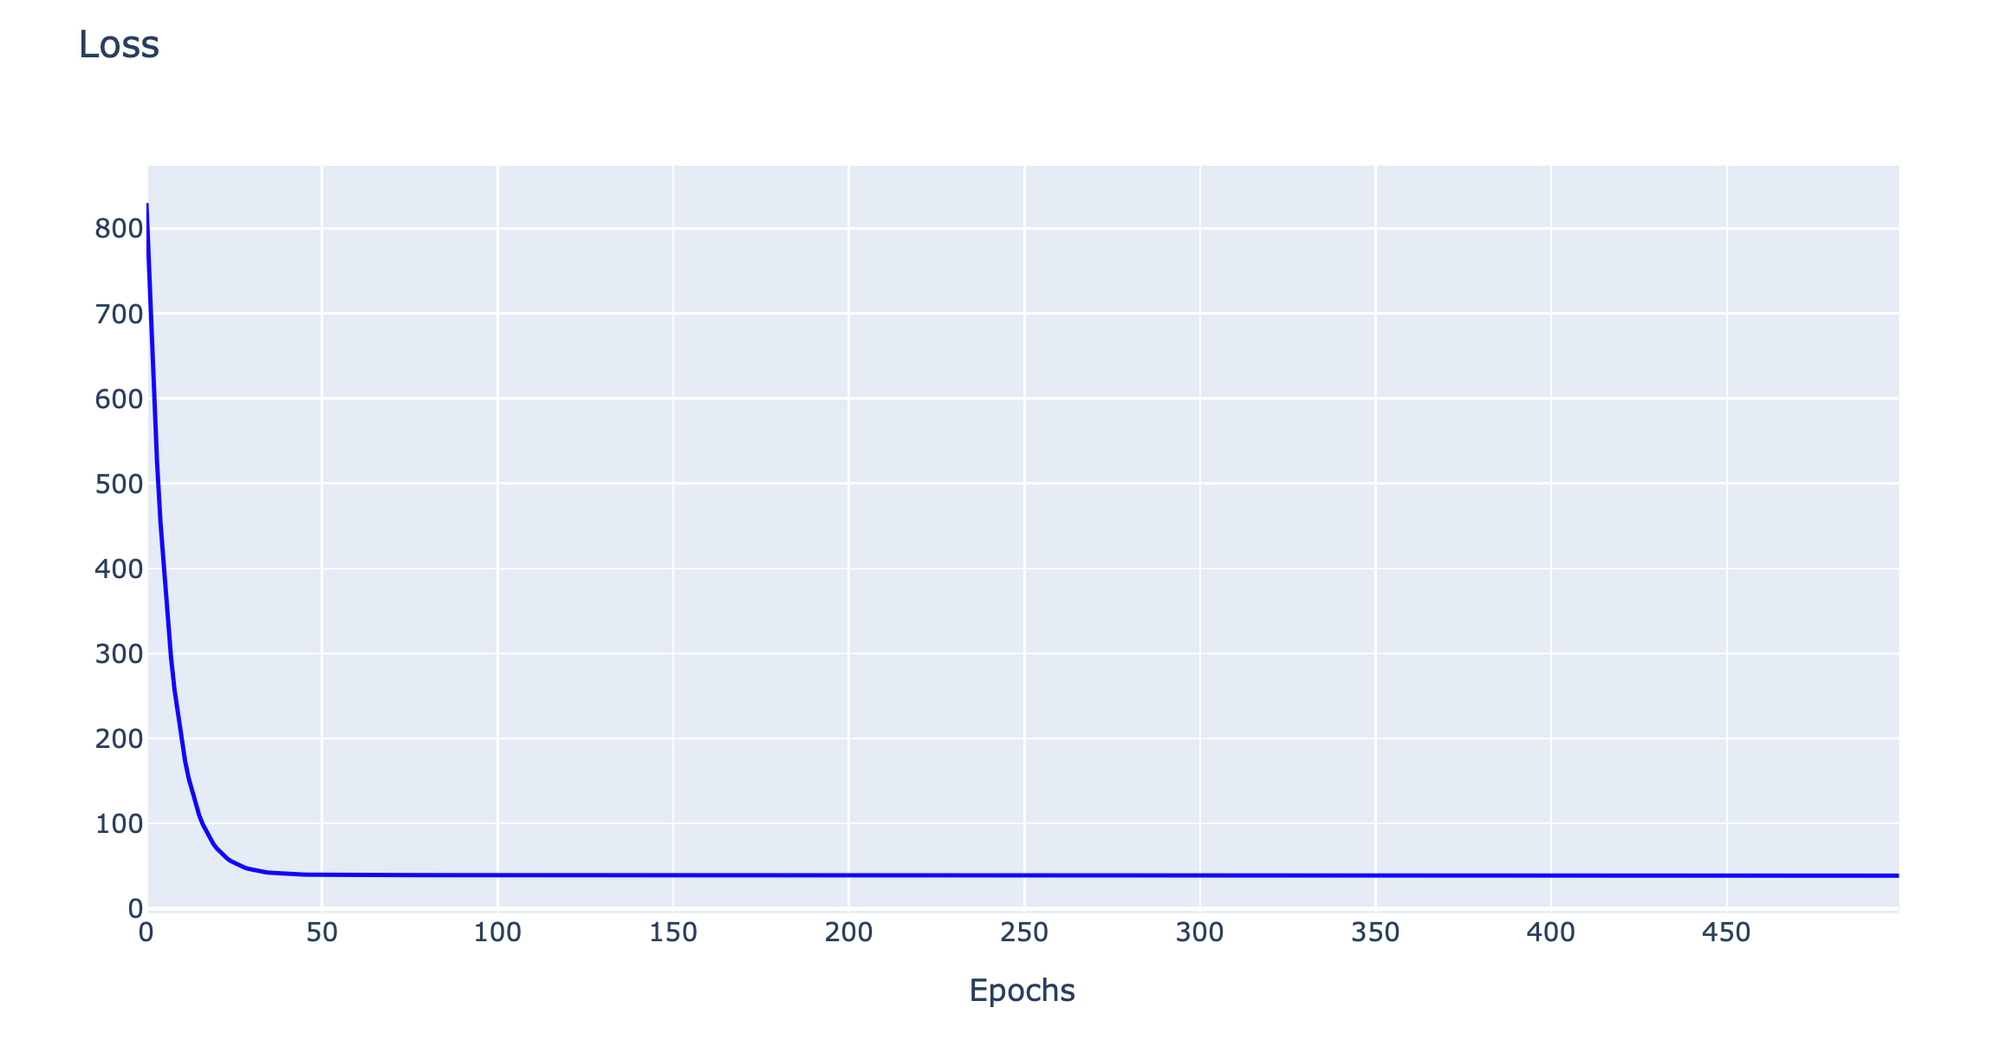
- Predict MaxTemp
y_pred = [predict(i, M, C) for i in x_test]

y_test.shape
(23808, 1)
y_test = y_test.reshape(-1)
y_test.shape
(23808,)
- แสดงผลการ Predict 10 แถวแรก
df = pd.DataFrame({'Actual': y_test, 'Predicted': y_pred})
df.head(10)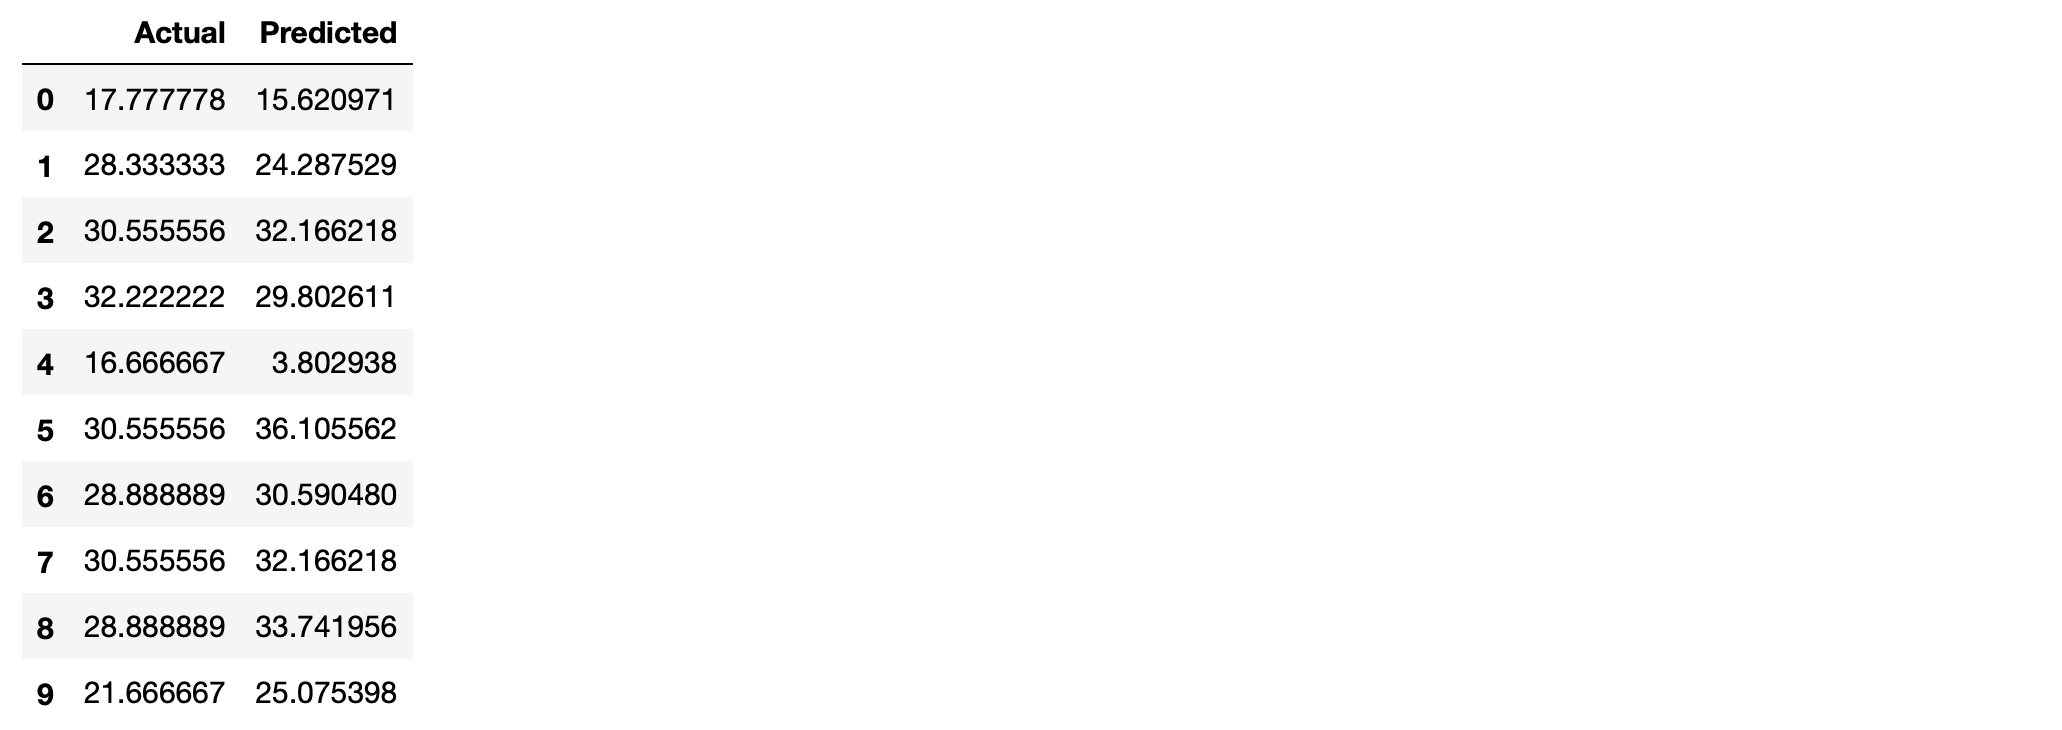
- Plot กราฟเปรียบเทียบผลการทำนายกับค่าจริง
df1 = df.head(10)
df1.plot(kind='bar',figsize=(15,10))
plt.grid(which='major', linestyle='-', linewidth='0.5', color='green')
plt.grid(which='minor', linestyle=':', linewidth='0.5', color='black')
plt.savefig('actual-predict.jpeg', dpi=300)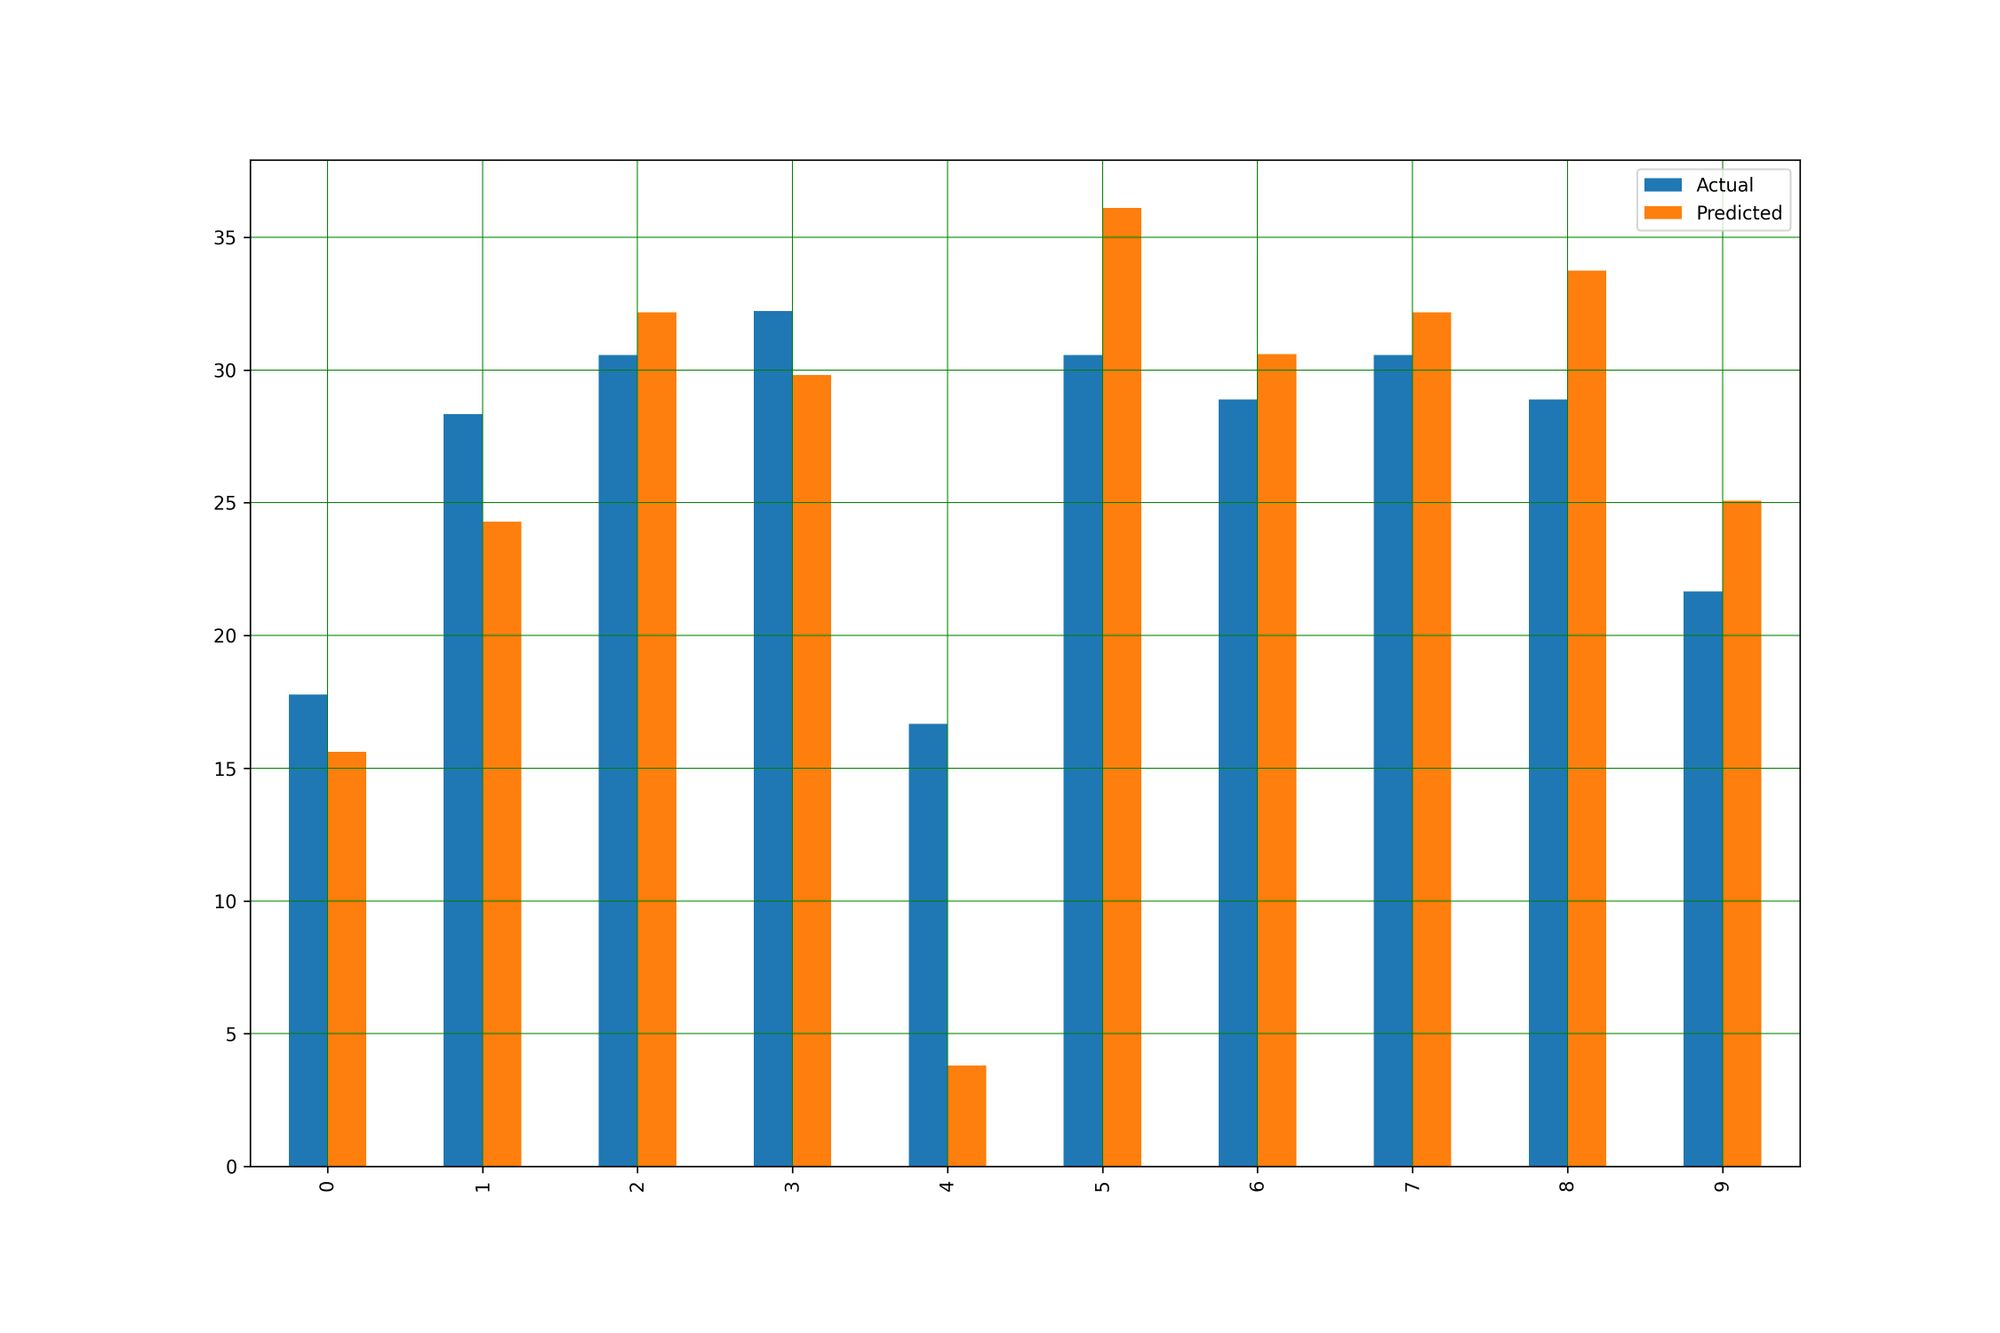
- แสดง Model ที่สร้างจากการ Train ใน Epoch ที่ 1
M = [i[0] for i in wb]
L = [i[2] for i in wb]
C = [i[1] for i in wb]
y_pred = [predict(i, M[0], C[0]) for i in x_test]
plt.scatter(x_test, y_test, color='gray')
plt.plot(x_test, y_pred, color='red', linewidth=2)
plt.savefig('min_max_temp1.jpeg', dpi=300)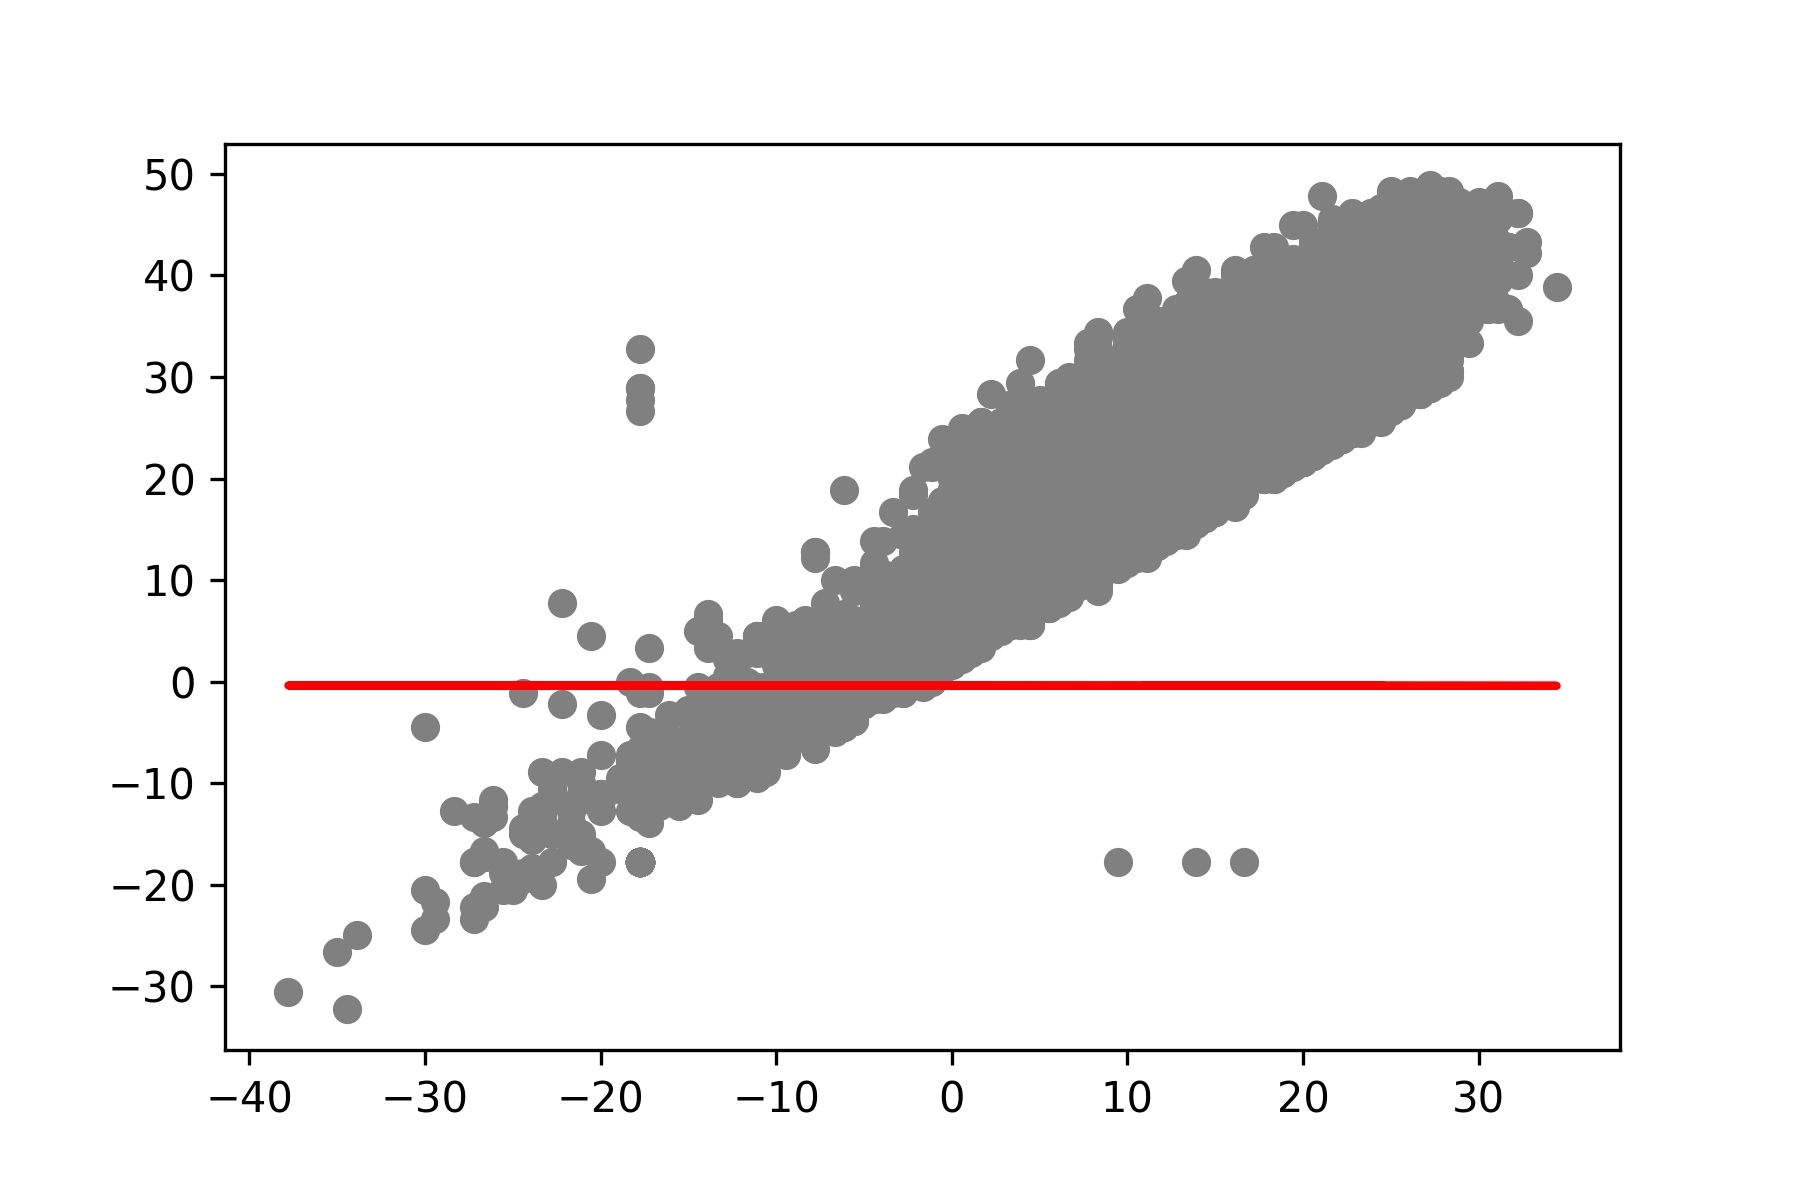
- แสดง Model ที่สร้างจากการ Train ใน Epoch ที่ 5
y_pred = [predict(i, M[4], C[4]) for i in x_test]

plt.scatter(x_test, y_test,  color='gray')
plt.plot(x_test, y_pred, color='red', linewidth=2)
plt.savefig('min_max_temp5.jpeg', dpi=300)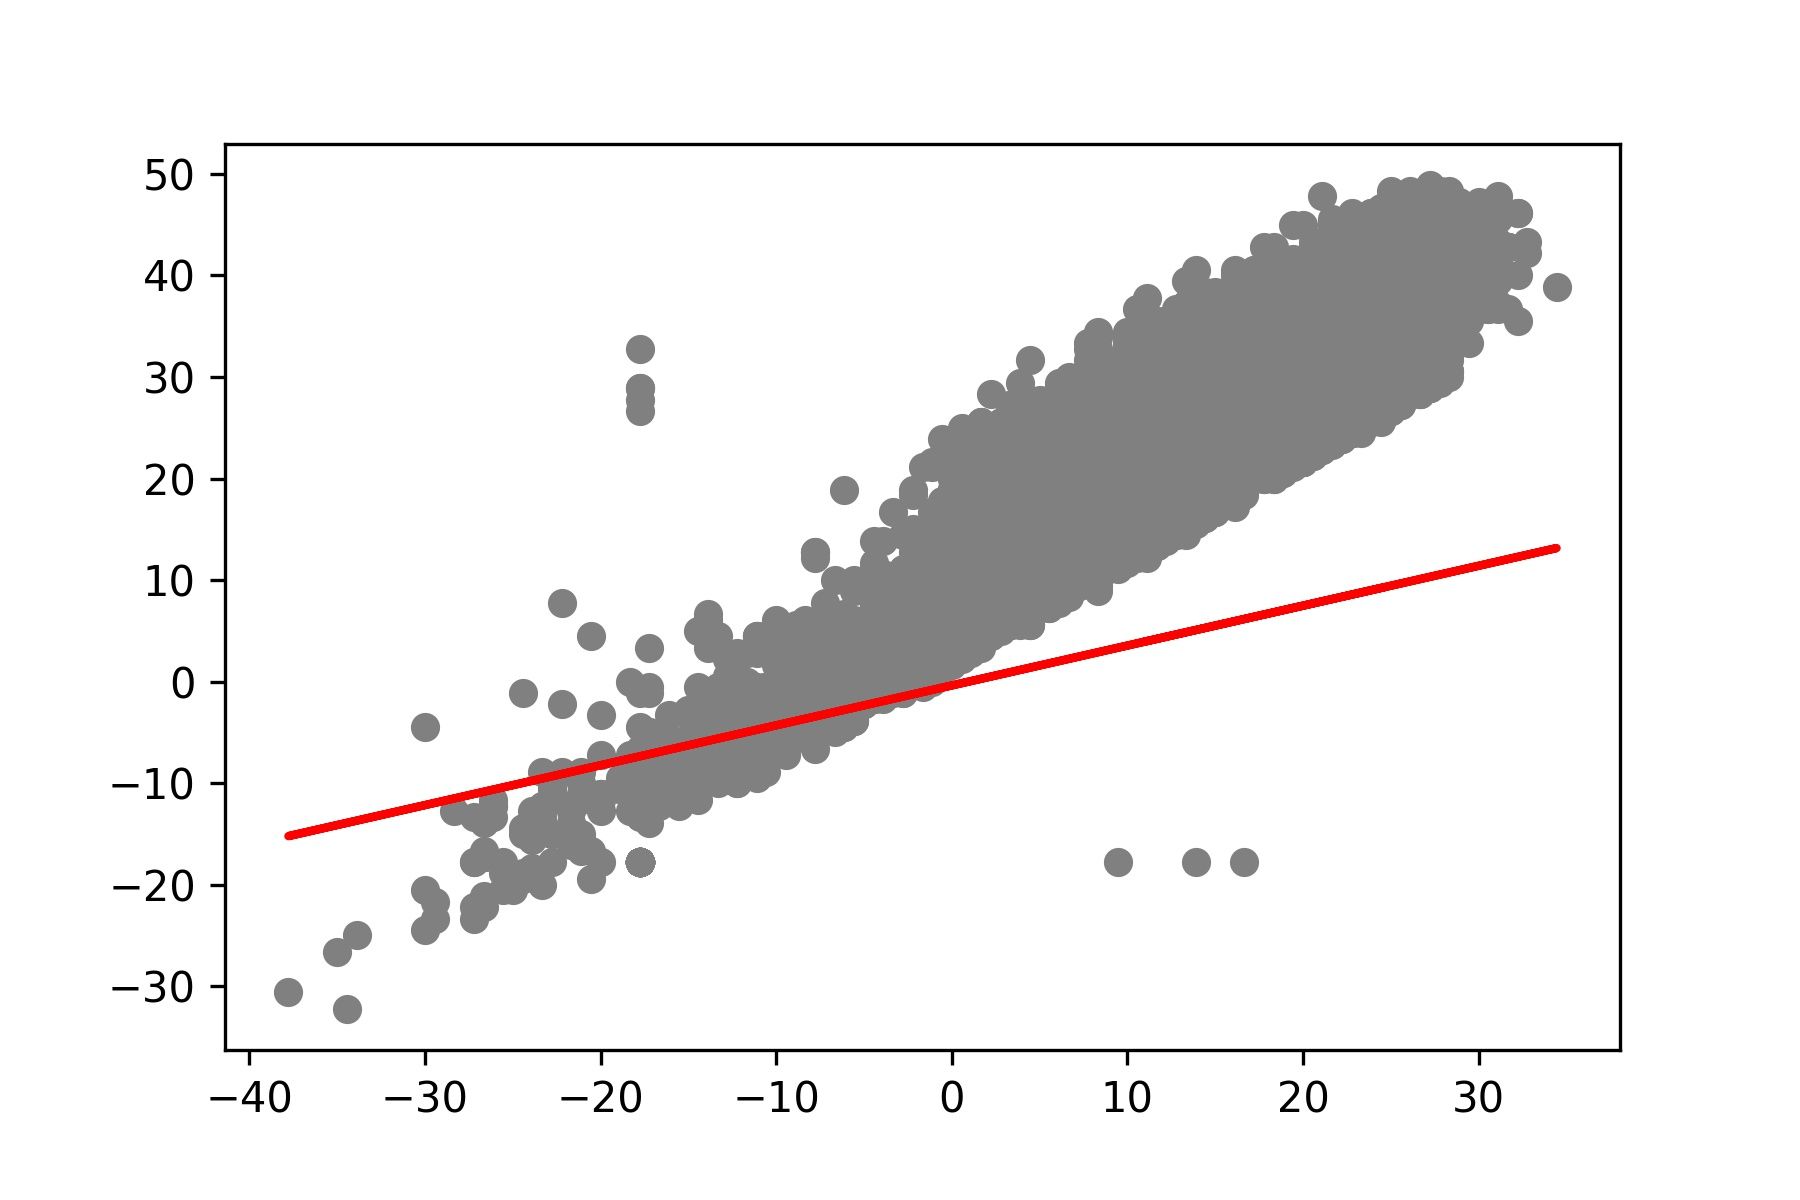
- แสดง Model ที่สร้างจากการ Train ใน Epoch ที่ 10
y_pred = [predict(i, M[9], C[9]) for i in x_test]

plt.scatter(x_test, y_test,  color='gray')
plt.plot(x_test, y_pred, color='red', linewidth=2)
plt.savefig('min_max_temp10.jpeg', dpi=300)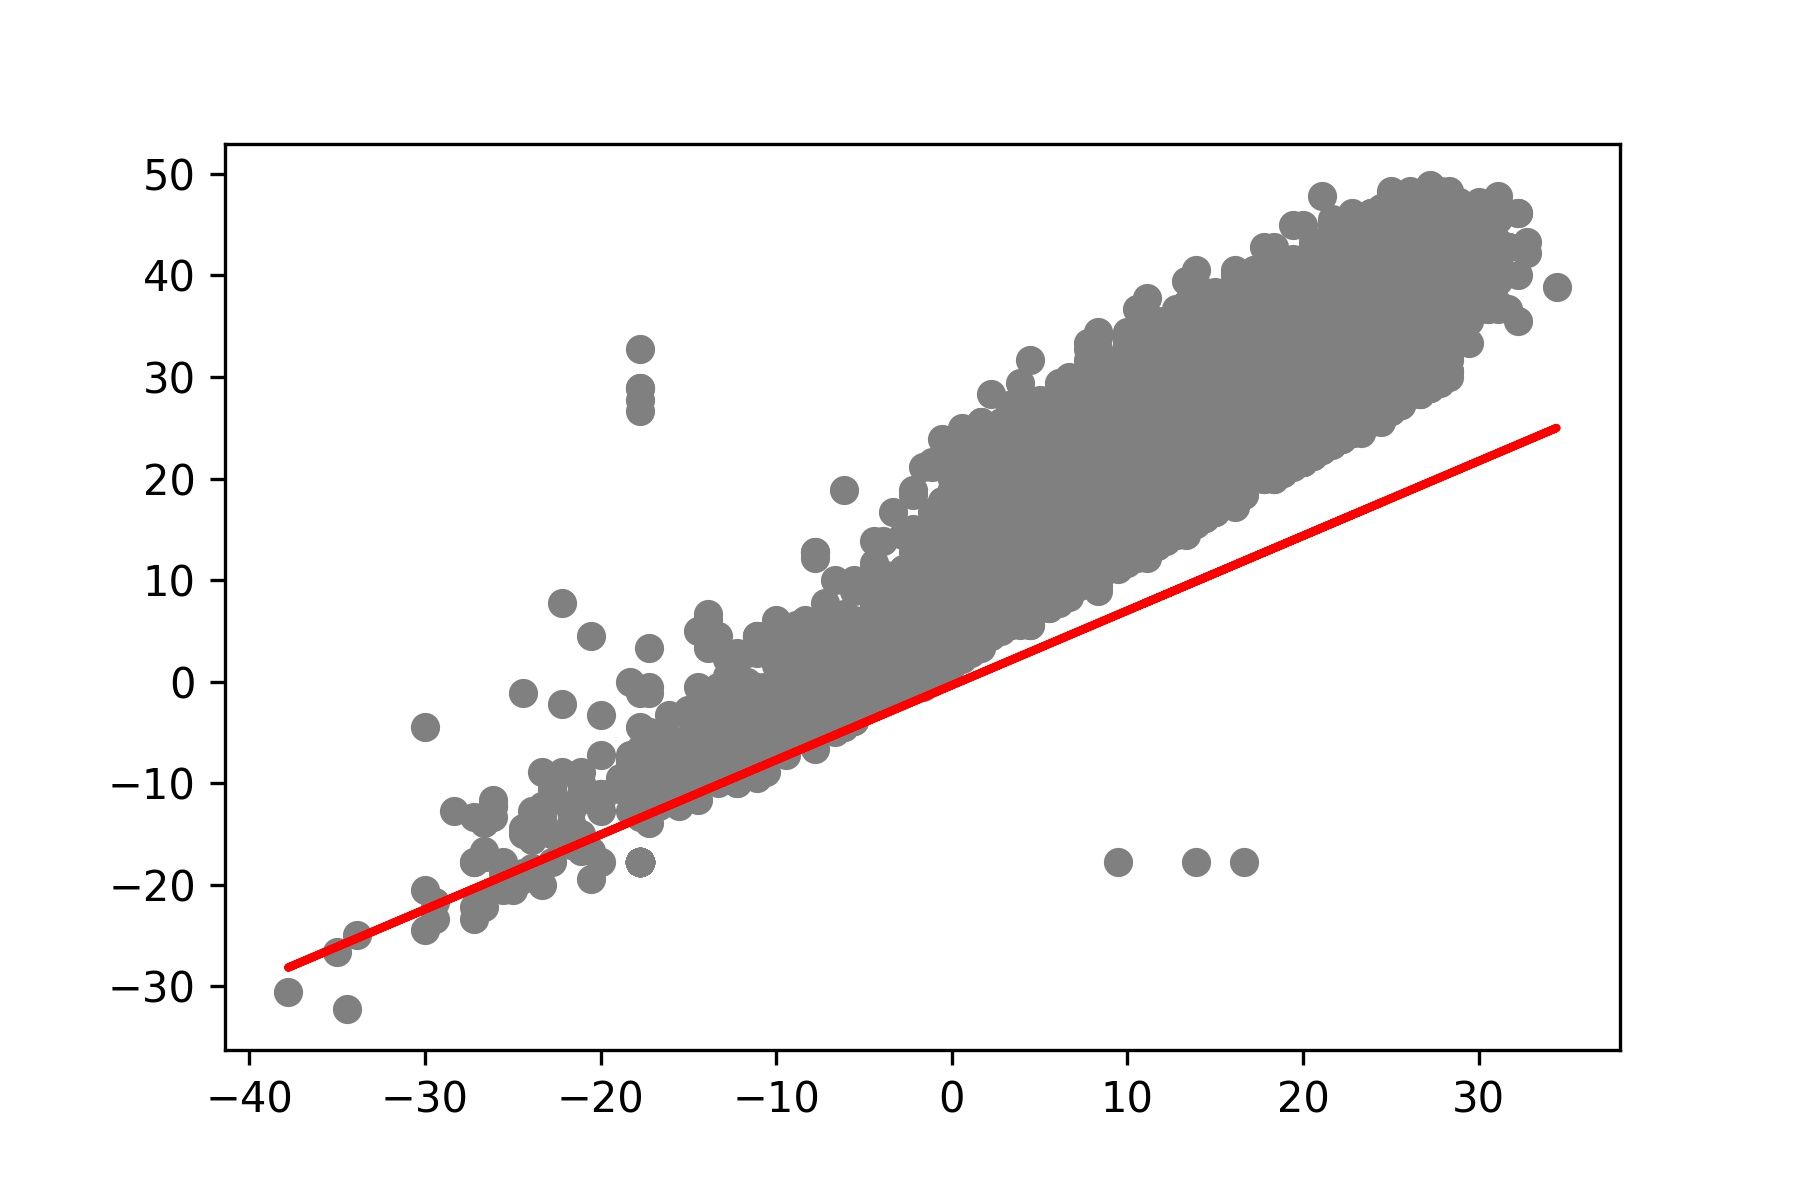
- แสดง Model ที่สร้างจากการ Train 500 Epoch
y_pred = [predict(i, M[499], C[499]) for i in x_test]

plt.scatter(x_test, y_test,  color='gray')
plt.plot(x_test, y_pred, color='red', linewidth=2)
plt.savefig('min_max_temp500.jpeg', dpi=300)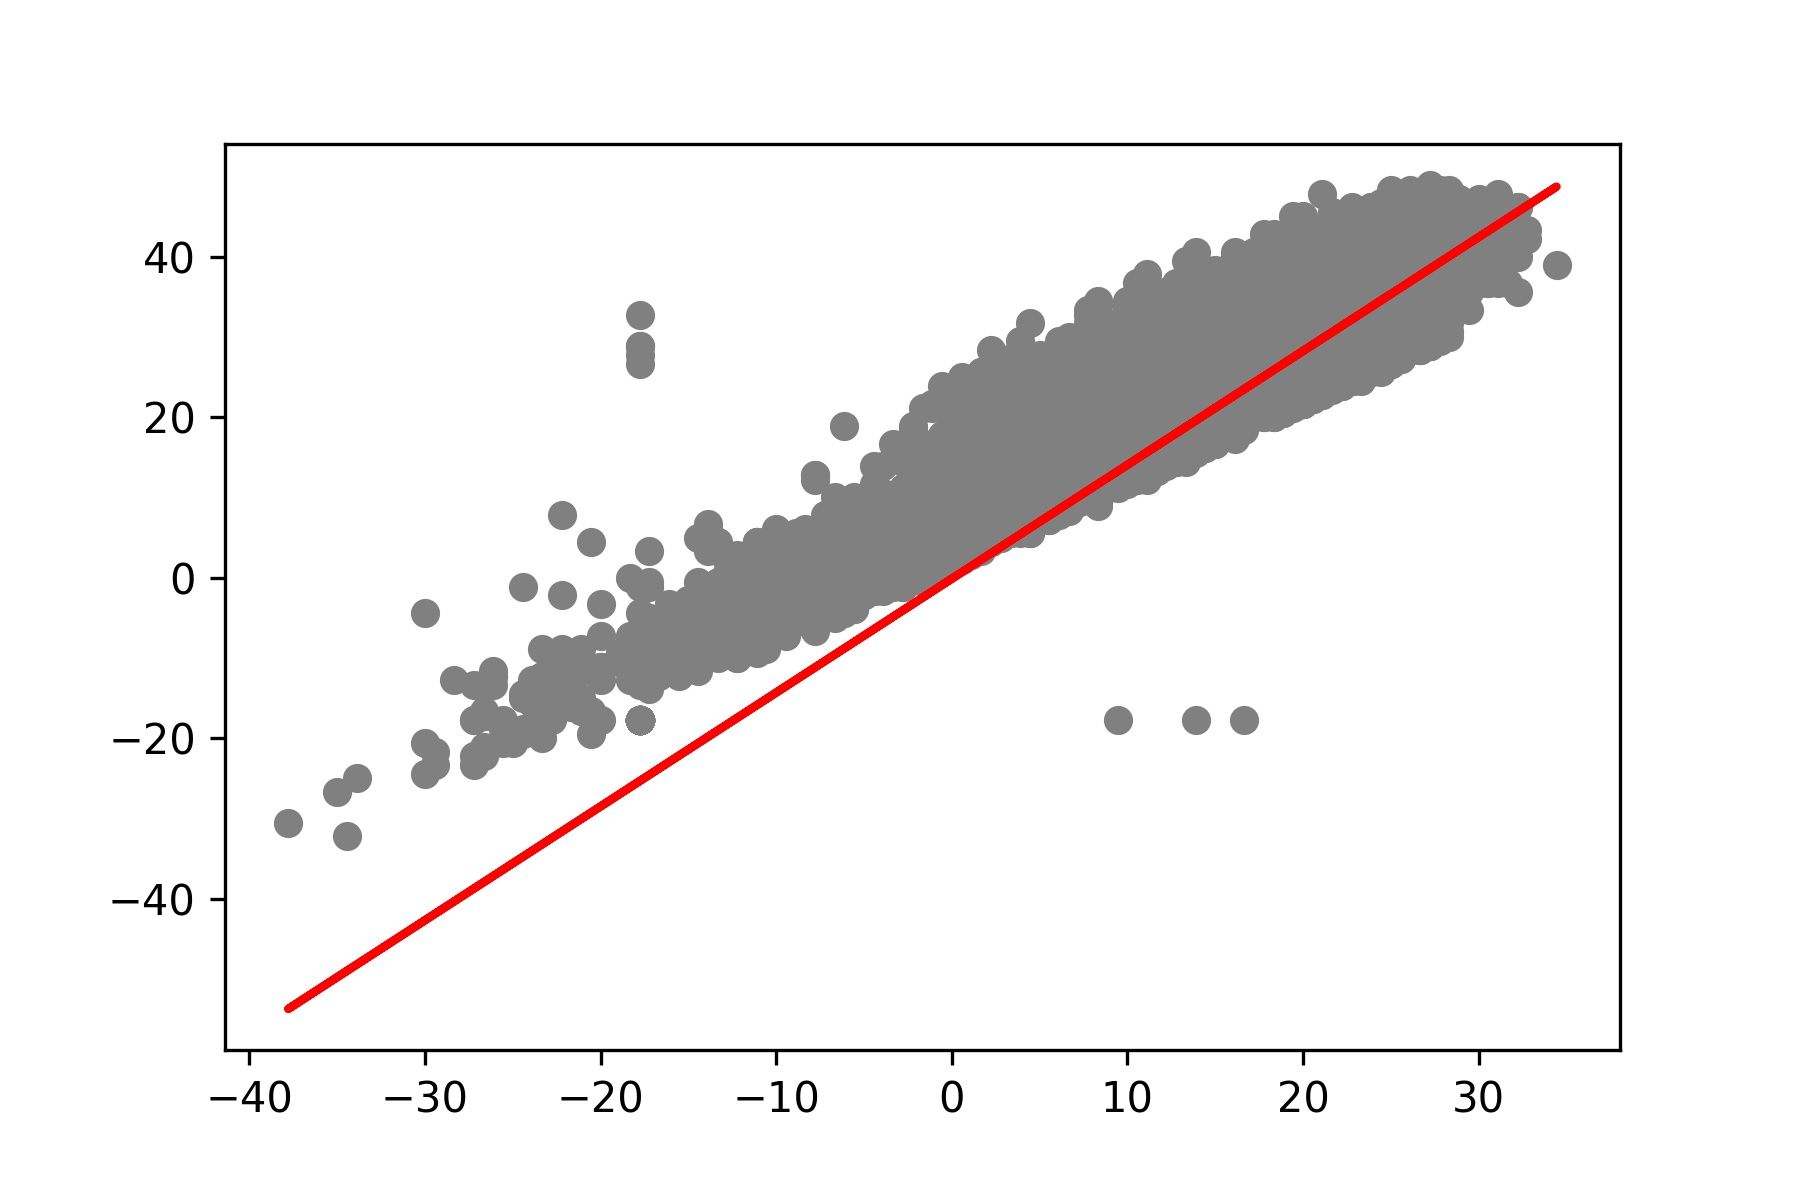
- ดู Loss Value เทียบกับค่า Weight
plt.scatter(M, L,  color='gray')
plt.savefig('weight.jpeg', dpi=300)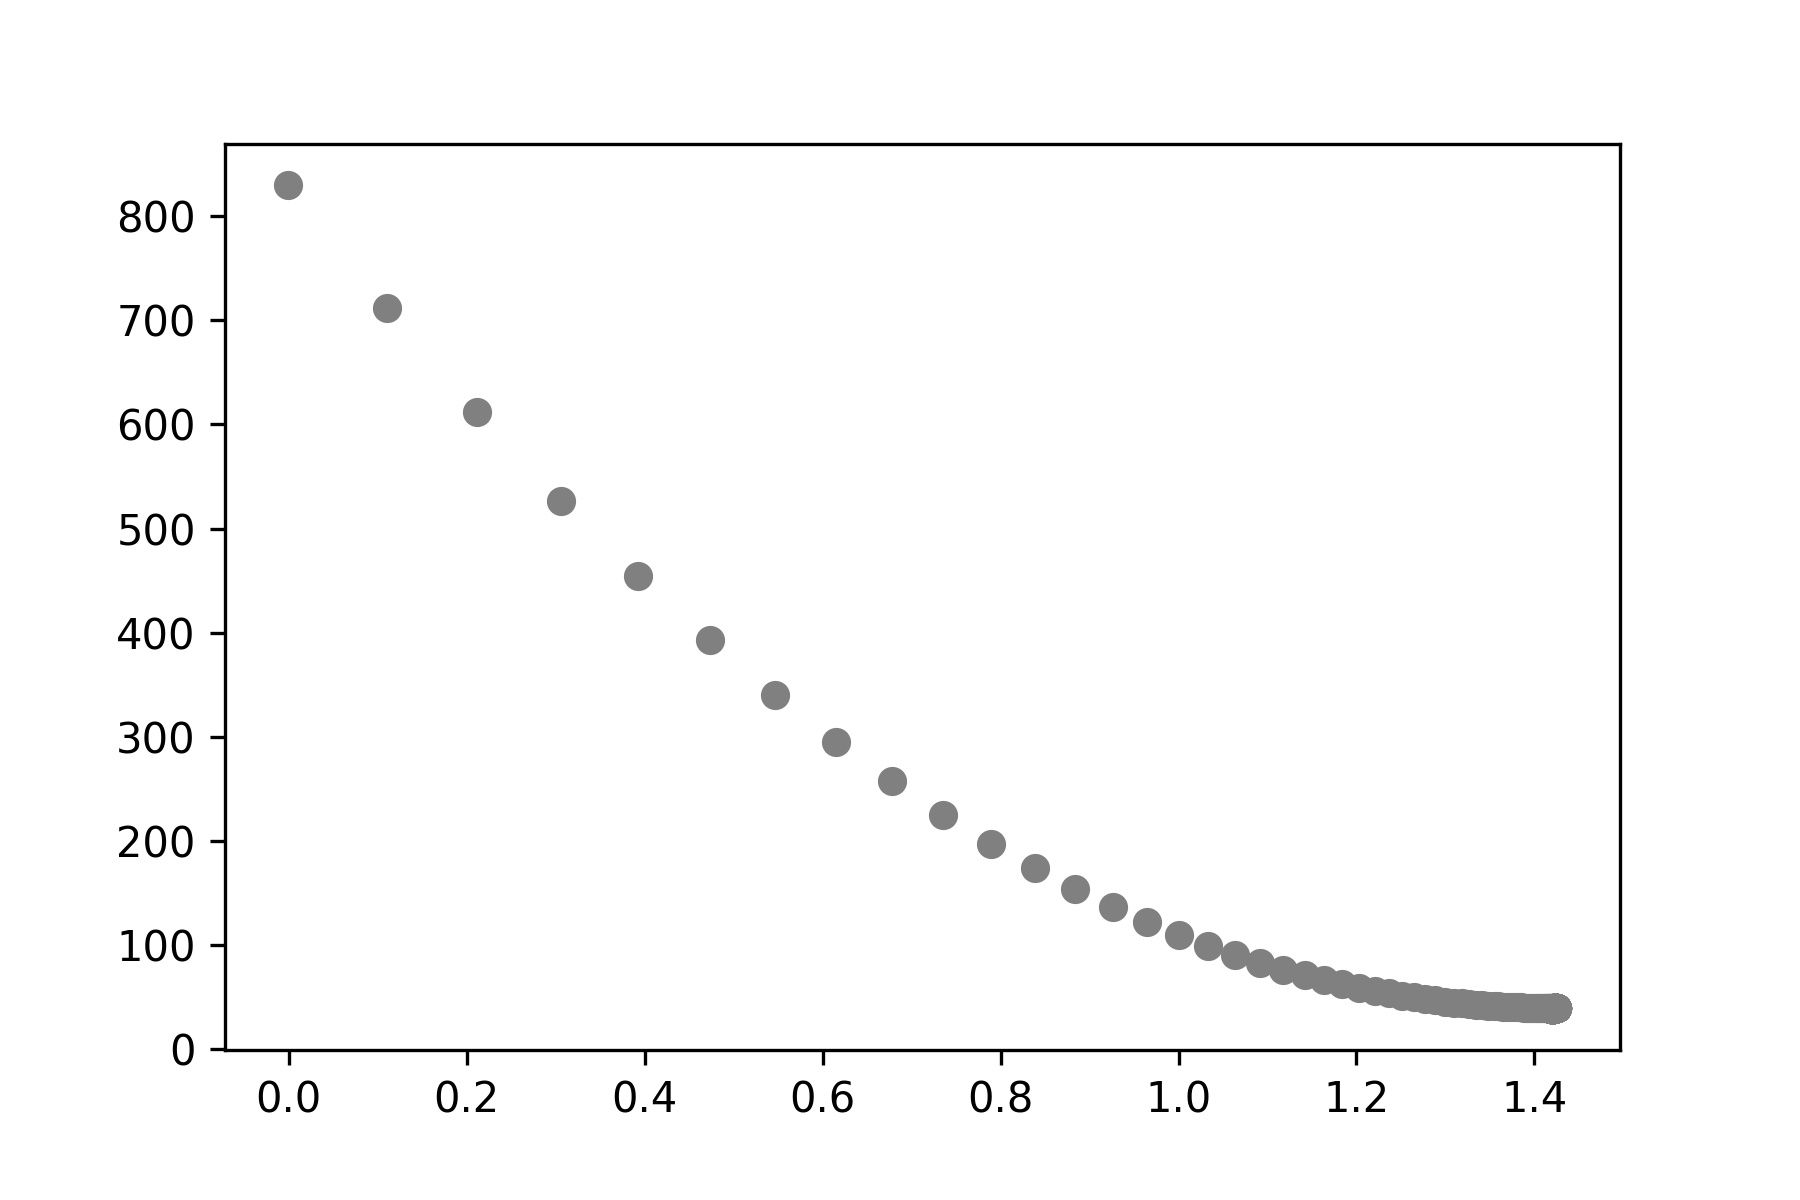
- ดู Loss Value เทียบกับค่า Bias
plt.scatter(C, L, color='gray')
plt.savefig('bias.jpeg', dpi=300)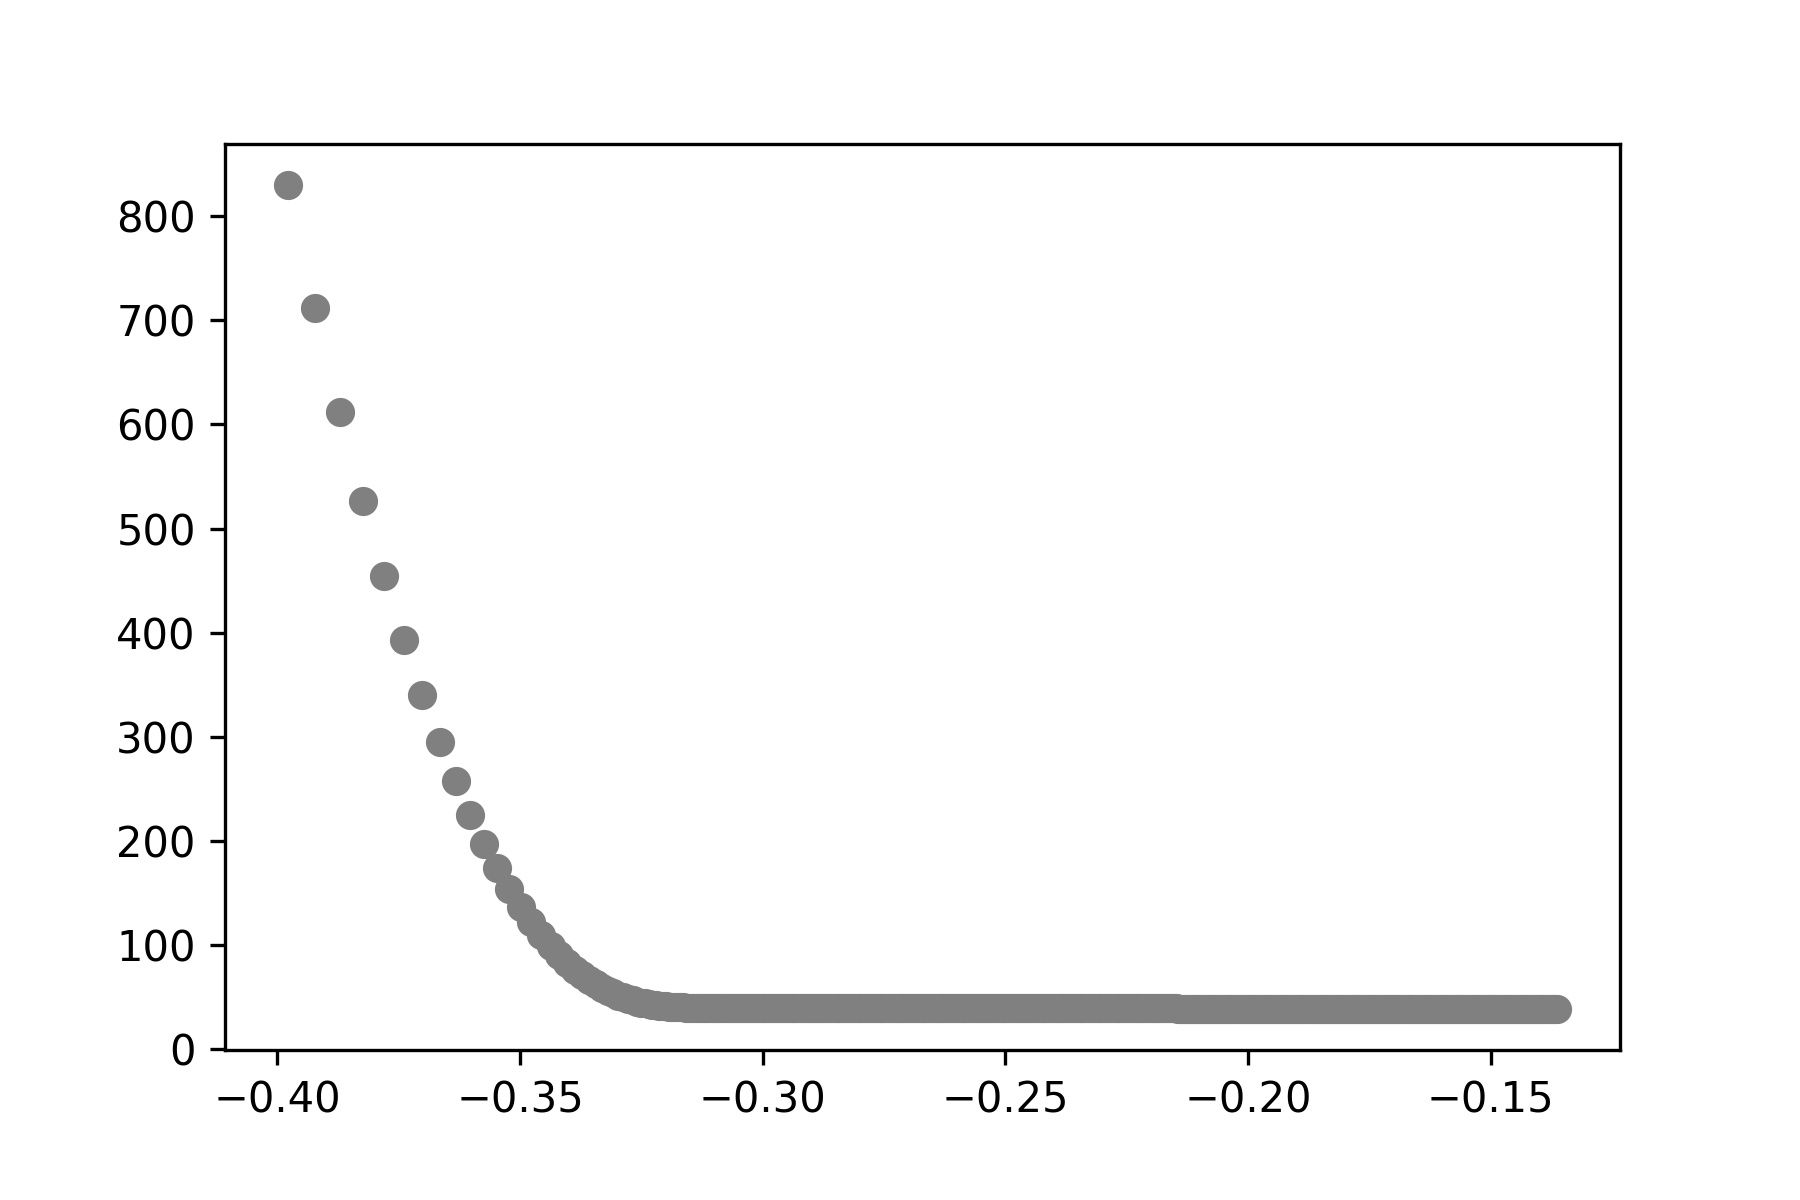
- ดู Loss Value เทียบกับค่า Weight และ Bias
import plotly.express as px

df = pd.DataFrame({'W' : M, 'Bias' : C, 'Loss' : L})
fig = px.scatter_3d(df, x='W', y='Bias', z='Loss')
fig.show()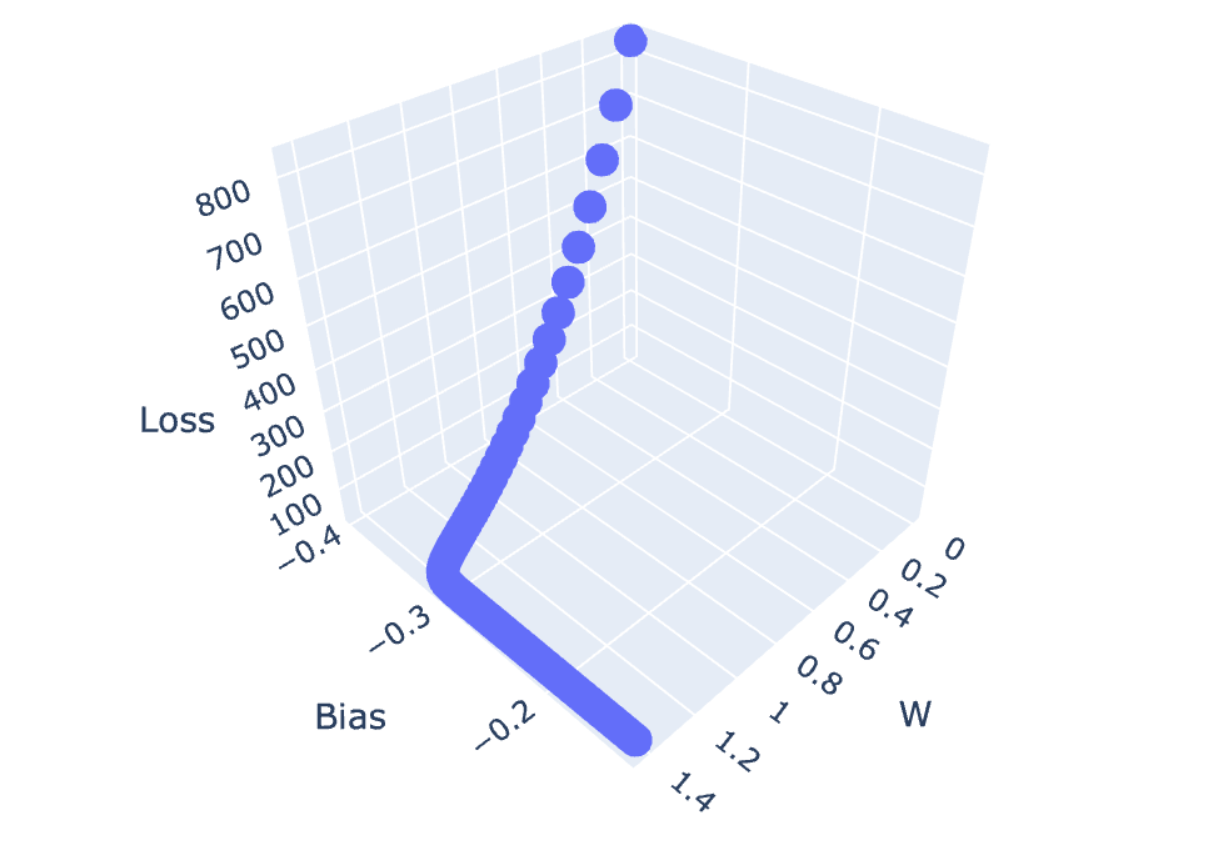
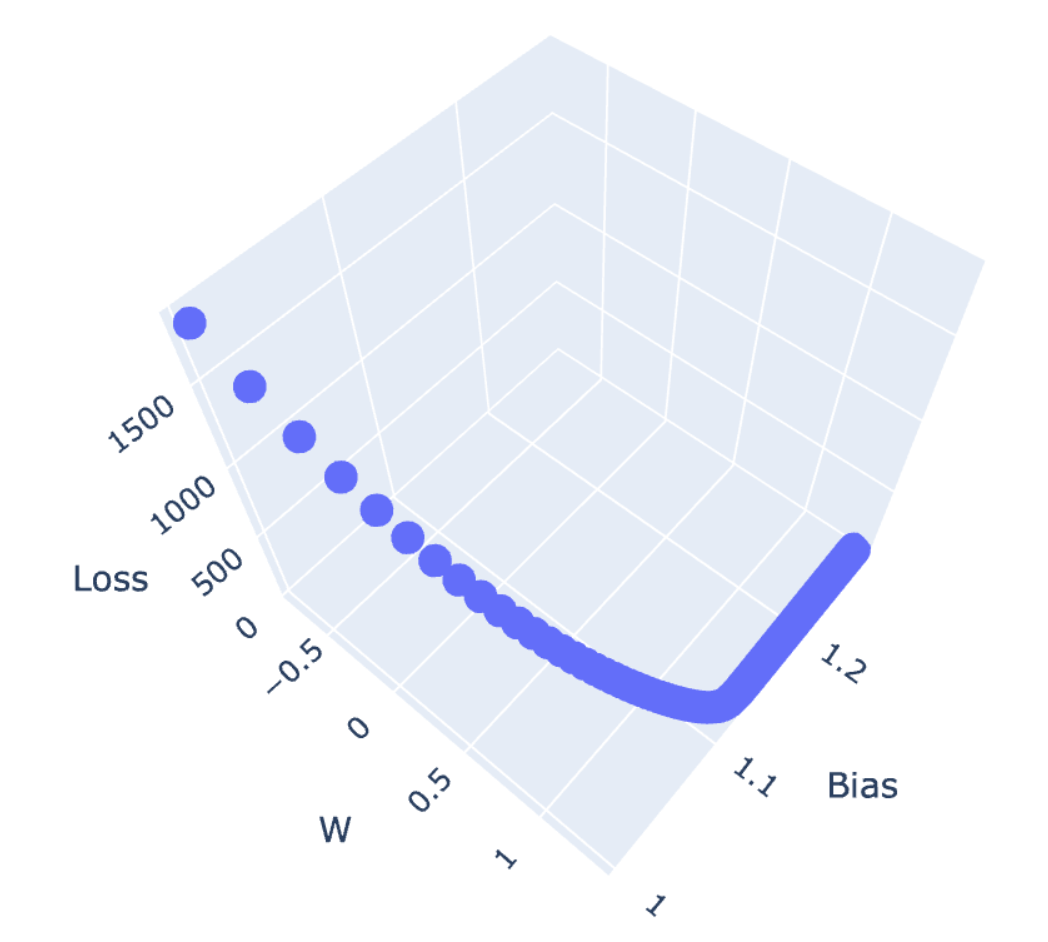
ผู้อ่านจะเห็นว่า Loss Value จะค่อยๆ เคลื่อนที่ไปยังจุดต่ำสุดของพื้นผิว (Minima) แบบ 3 มิติ ด้วย Learning Rate เท่ากับ 0.0001 ครับ
- วัดประสิทธิภาพของ Model ด้วย Mean Absolute Error, Mean Squared Error และ Root Mean Squared Error
print('Mean Absolute Error:', metrics.mean_absolute_error(y_test, y_pred))
print('Mean Squared Error:', metrics.mean_squared_error(y_test, y_pred))
print('Root Mean Squared Error:', np.sqrt(metrics.mean_squared_error(y_test, y_pred)))
Stochastic Gradient Descent Method
Linear Regression with Keras
ลำดับต่อไปเราจะทดลอง Train Neural Network Model แบบ Linear Regression โดยใช้ tensorflow.keras Framework โดยการสุ่มแบ่ง Dataset เป็นก้อนเล็กๆ ขนาด 64 Row (Batch Size เท่ากับ 64) เพื่อนำไป Train Model ซึ่งเราจะเรียก Gradient Descent แบบที่มีการสุ่มแบ่ง Dataset เป็นก้อนขนาดเล็กว่า Stochastic Gradient Descent ซึ่งด้วยวิธีการนี้จะทำให้เราสามารถหลีกเลี่ยงปัญหา Local Minima ขณะที่มีการ Train Model และลด Mean Squared Error รวมทั้ง Mean Absolute Error และ Root Mean Squared Error ได้ครับ
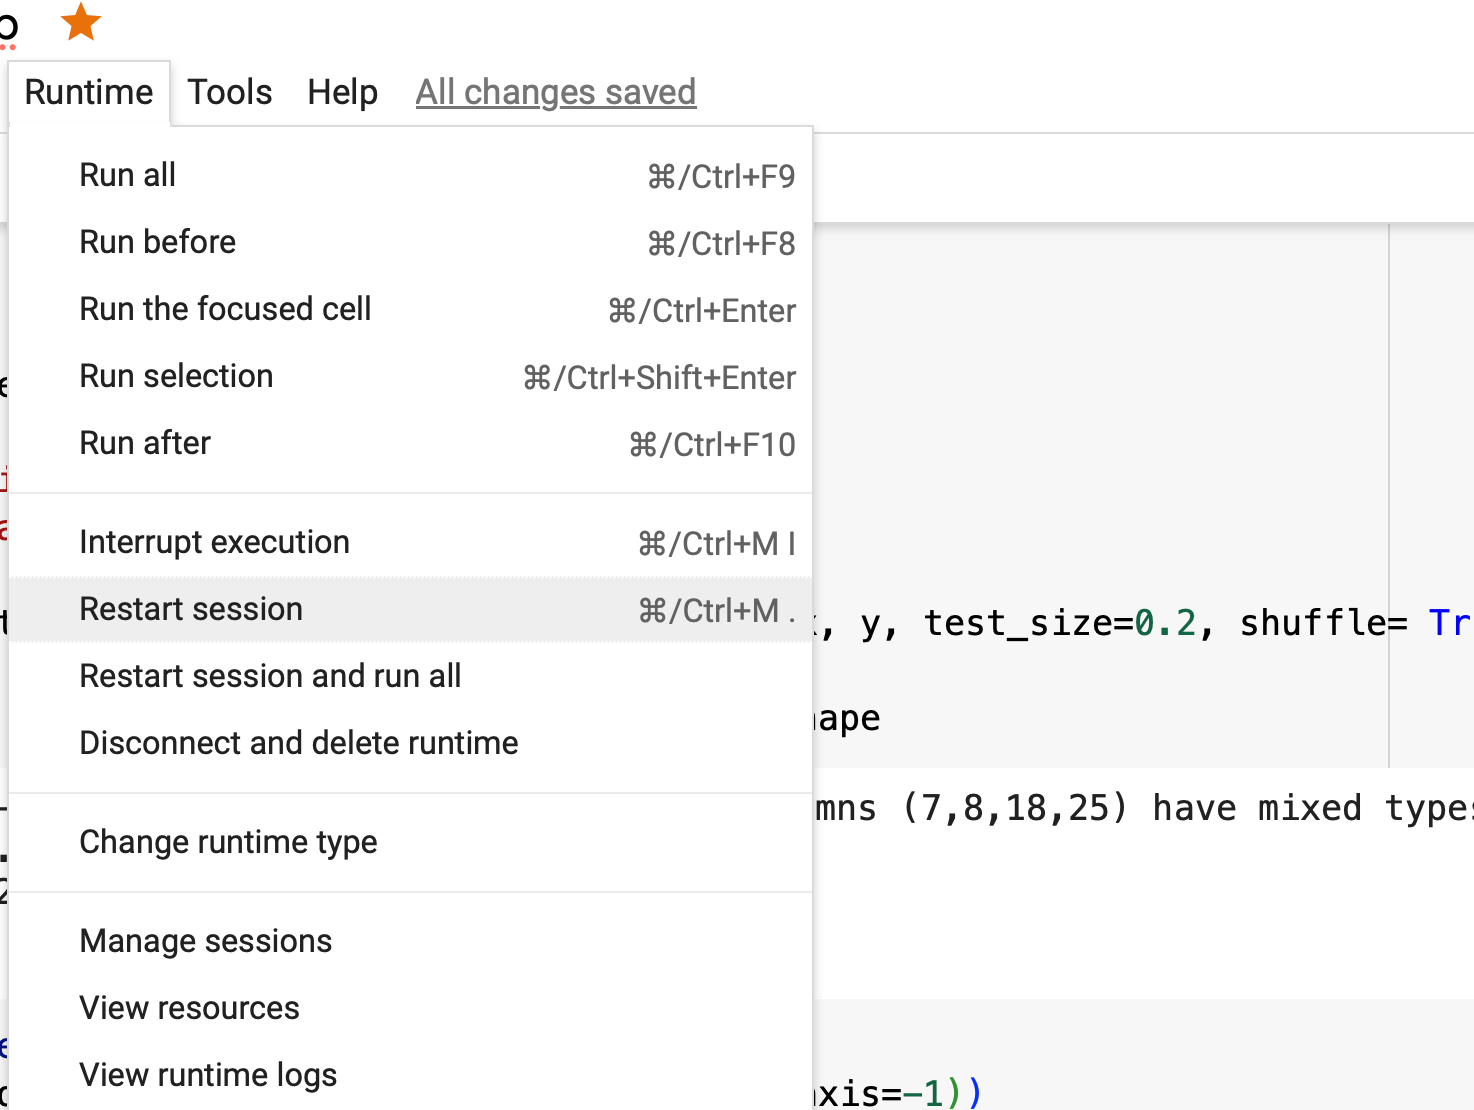
- Restart session บน Colab
import tensorflow.compat.v1 as tf
from tensorflow.python.framework.ops import disable_eager_execution

import pandas as pd
import numpy as np
import matplotlib.pyplot as plt
import seaborn as seabornInstance
from sklearn.model_selection import train_test_split
from sklearn import metrics

import plotly
import plotly.graph_objs as go
import plotly.express as px

K = tf.keras.backend

np.random.seed(seed=13)
EPOCH = 500


dataset = pd.read_csv('Weather.csv')

x = dataset['MinTemp'].values.reshape(-1,1)
y = dataset['MaxTemp'].values.reshape(-1,1)

x_train, x_test, y_train, y_test = train_test_split(x, y, test_size=0.2, shuffle= True)

x_train.shape, x_test.shape, y_train.shape, y_test.shape

y_test = y_test.reshape(-1)- นิยาม Root Mean Squared Error
def rmse(y_true, y_pred):
return K.sqrt(K.mean(K.square(y_pred - y_true), axis=-1)) - นิยาม Model
model = tf.keras.Sequential()
model.add(tf.keras.layers.Dense(1, input_dim=1, kernel_initializer='random_uniform', activation='linear'))
model.summary()
- Compile Model
SGD = tf.keras.optimizers.SGD
sgd = SGD(learning_rate=0.0001)

model.compile(loss='mse', optimizer=sgd, metrics=['mae', 'mse', rmse])- Train Model โดยการสุ่มแบ่งข้อมูลสำหรับ Train 80% และ Validate อีก 20% โดยกำหนด Batch Size เท่ากับ 64
history = model.fit(x_train, y_train, epochs=EPOCH, batch_size=64, verbose=1, validation_split=0.2, shuffle=True)
- Plot Loss และ Validate Loss
h1 = go.Scatter(y=history.history['loss'],
                    mode="lines",
                    line=dict(
                    	width=2,
                    	color='blue'),
                    name="loss")

h2 = go.Scatter(y=history.history['val_loss'],
                    mode="lines",
                    line=dict(
                    	width=2,
                    	color='green'),
                    name="val_loss")

data = [h1, h2]

layout1 = go.Layout(title='Loss',
                   xaxis=dict(title='epochs'),
                   yaxis=dict(title=''))
fig1 = go.Figure(data, layout=layout1)
plotly.offline.iplot(fig1)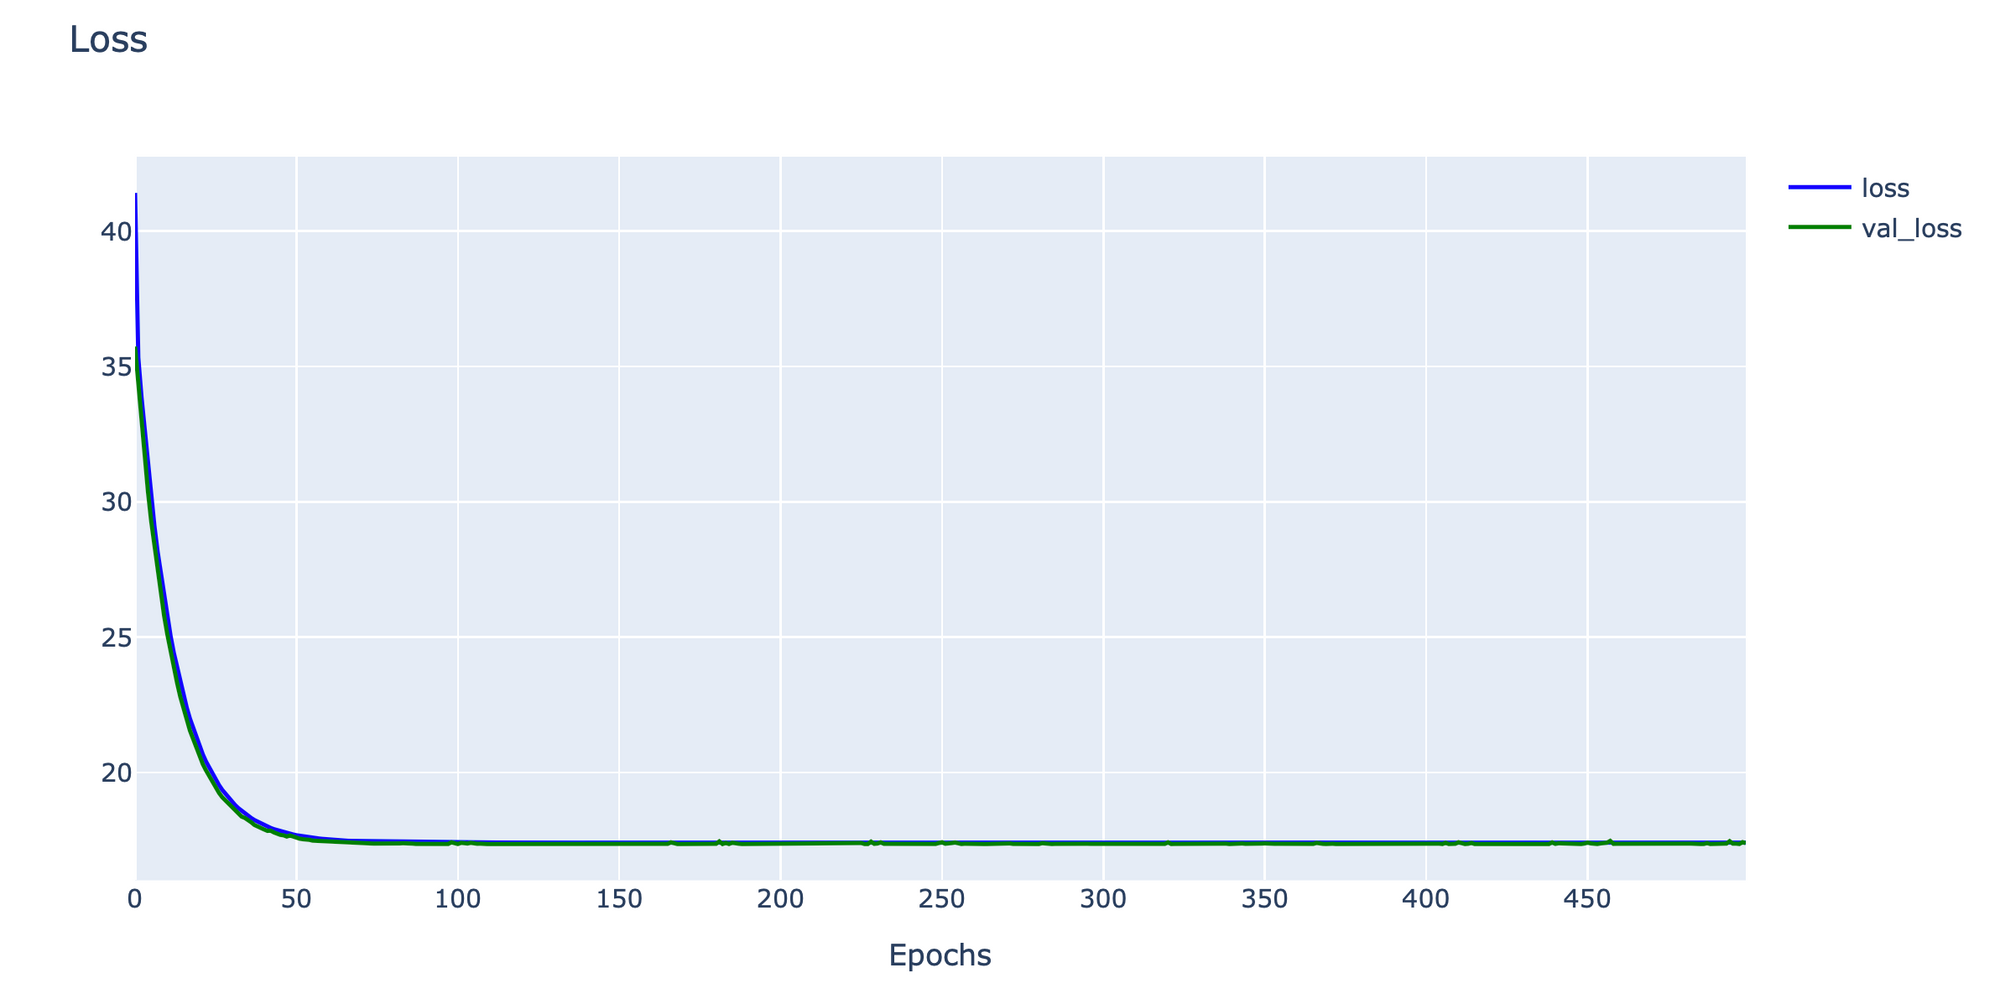
- Predict
y_pred = model.predict(x_test)- แปลงเป็น DataFrame
y_pred = y_pred.flatten()

df = pd.DataFrame({'Actual': y_test, 'Predicted': y_pred})
df.head(10)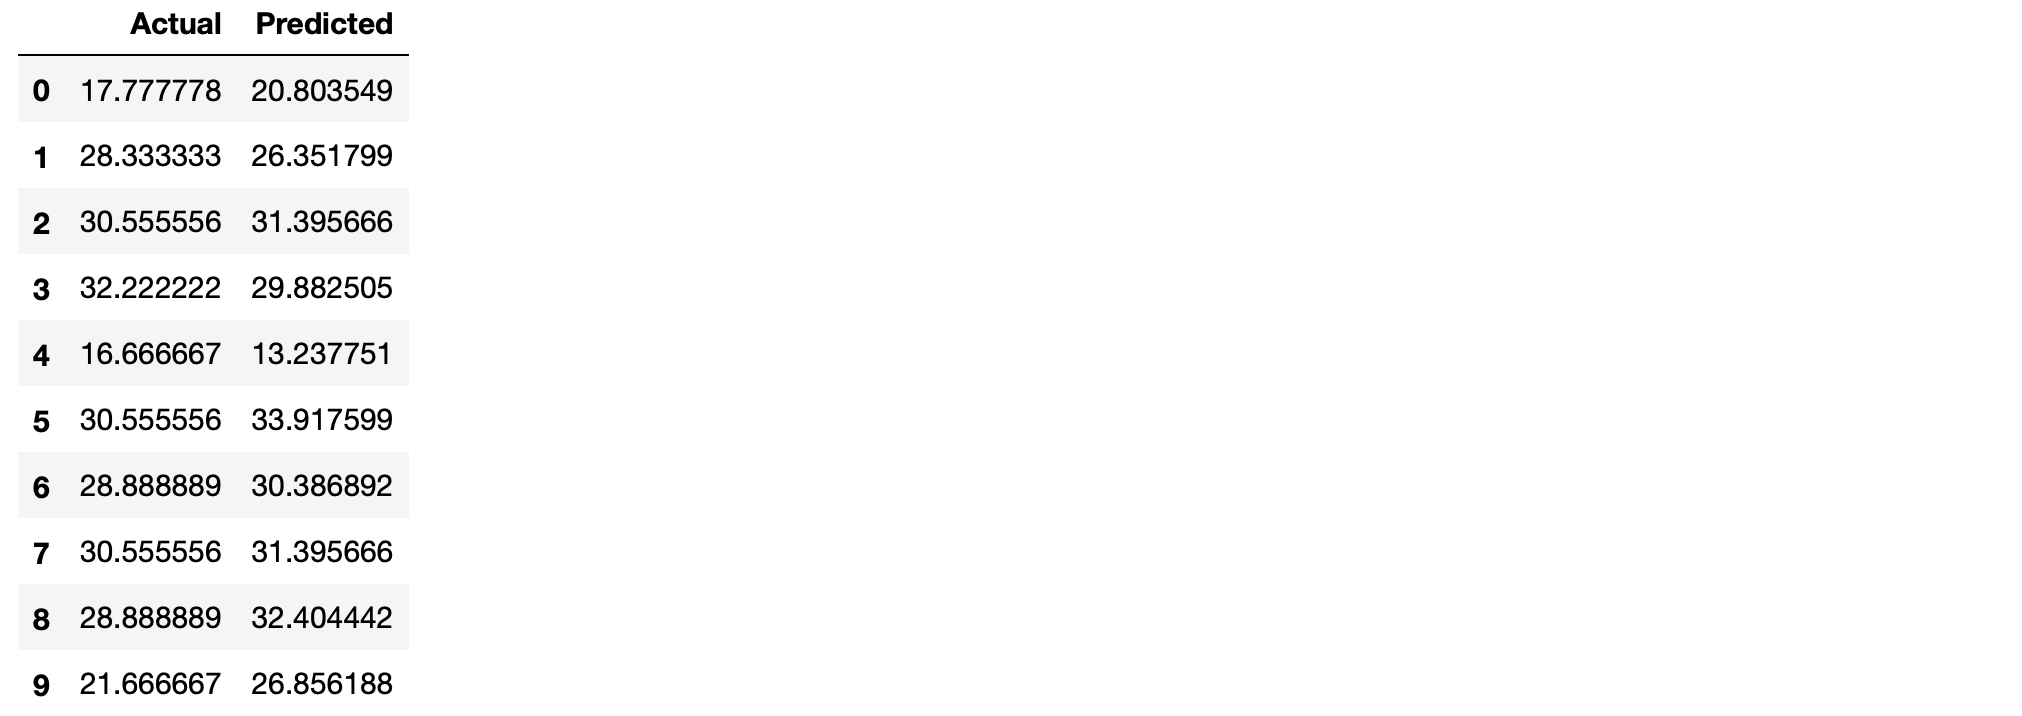
- Plot กราฟเปรียบเทียบผลการทำนายกับค่าจริง
df1 = df.head(10)
df1.plot(kind='bar',figsize=(15,10))
plt.grid(which='major', linestyle='-', linewidth='0.5', color='green')
plt.grid(which='minor', linestyle=':', linewidth='0.5', color='black')
plt.savefig('actual-predict2.jpeg', dpi=300)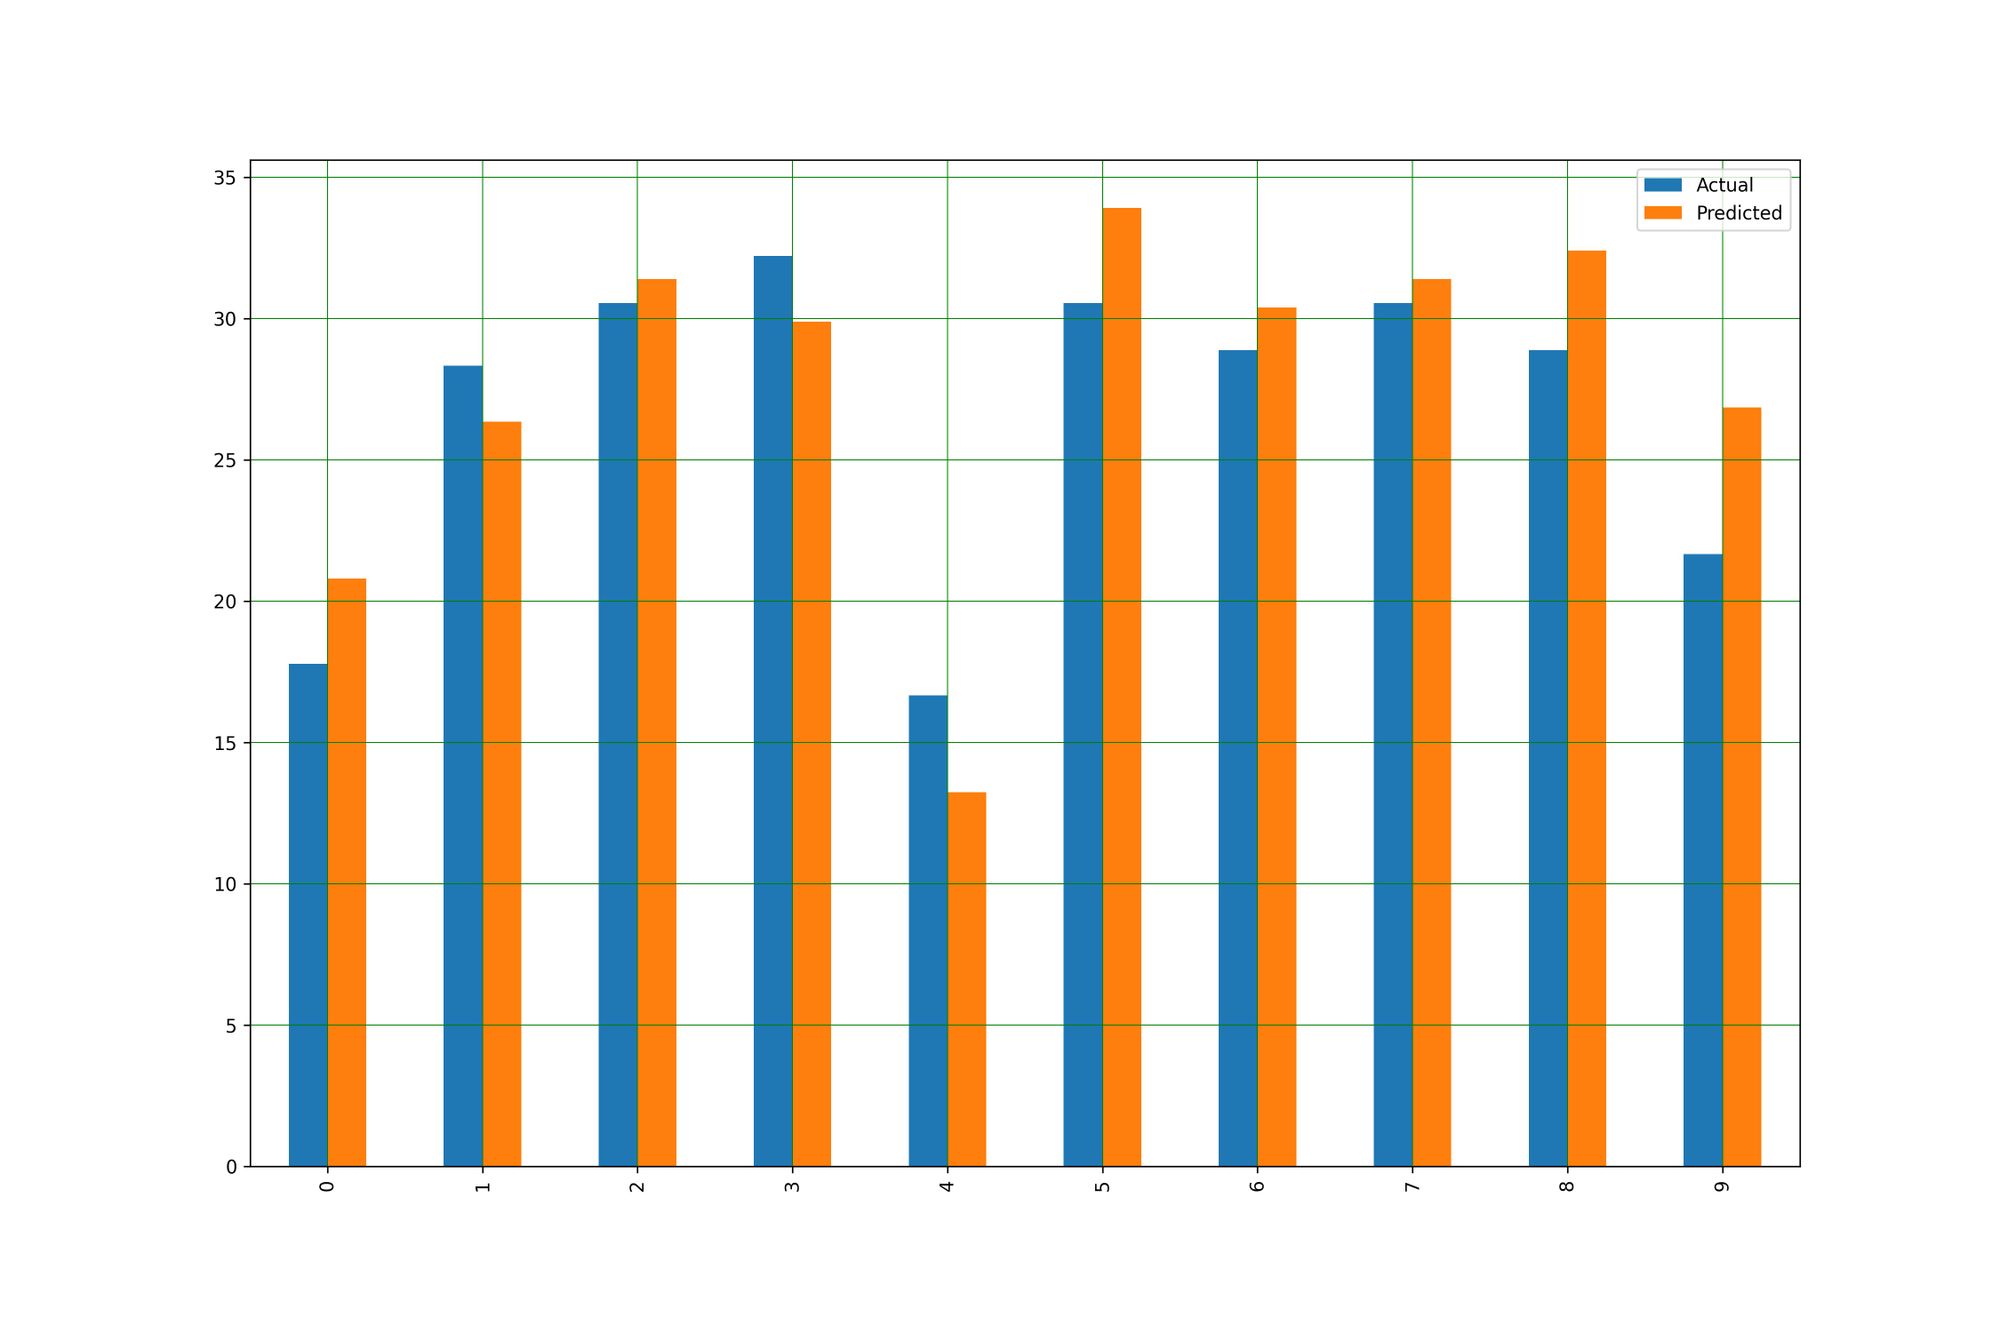
- แสดง Model ที่สร้างจากการ Train 500 Epoch
plt.scatter(x_test, y_test,  color='gray')
plt.plot(x_test, y_pred, color='red', linewidth=2)
plt.savefig('keras_500_model.jpeg', dpi=300)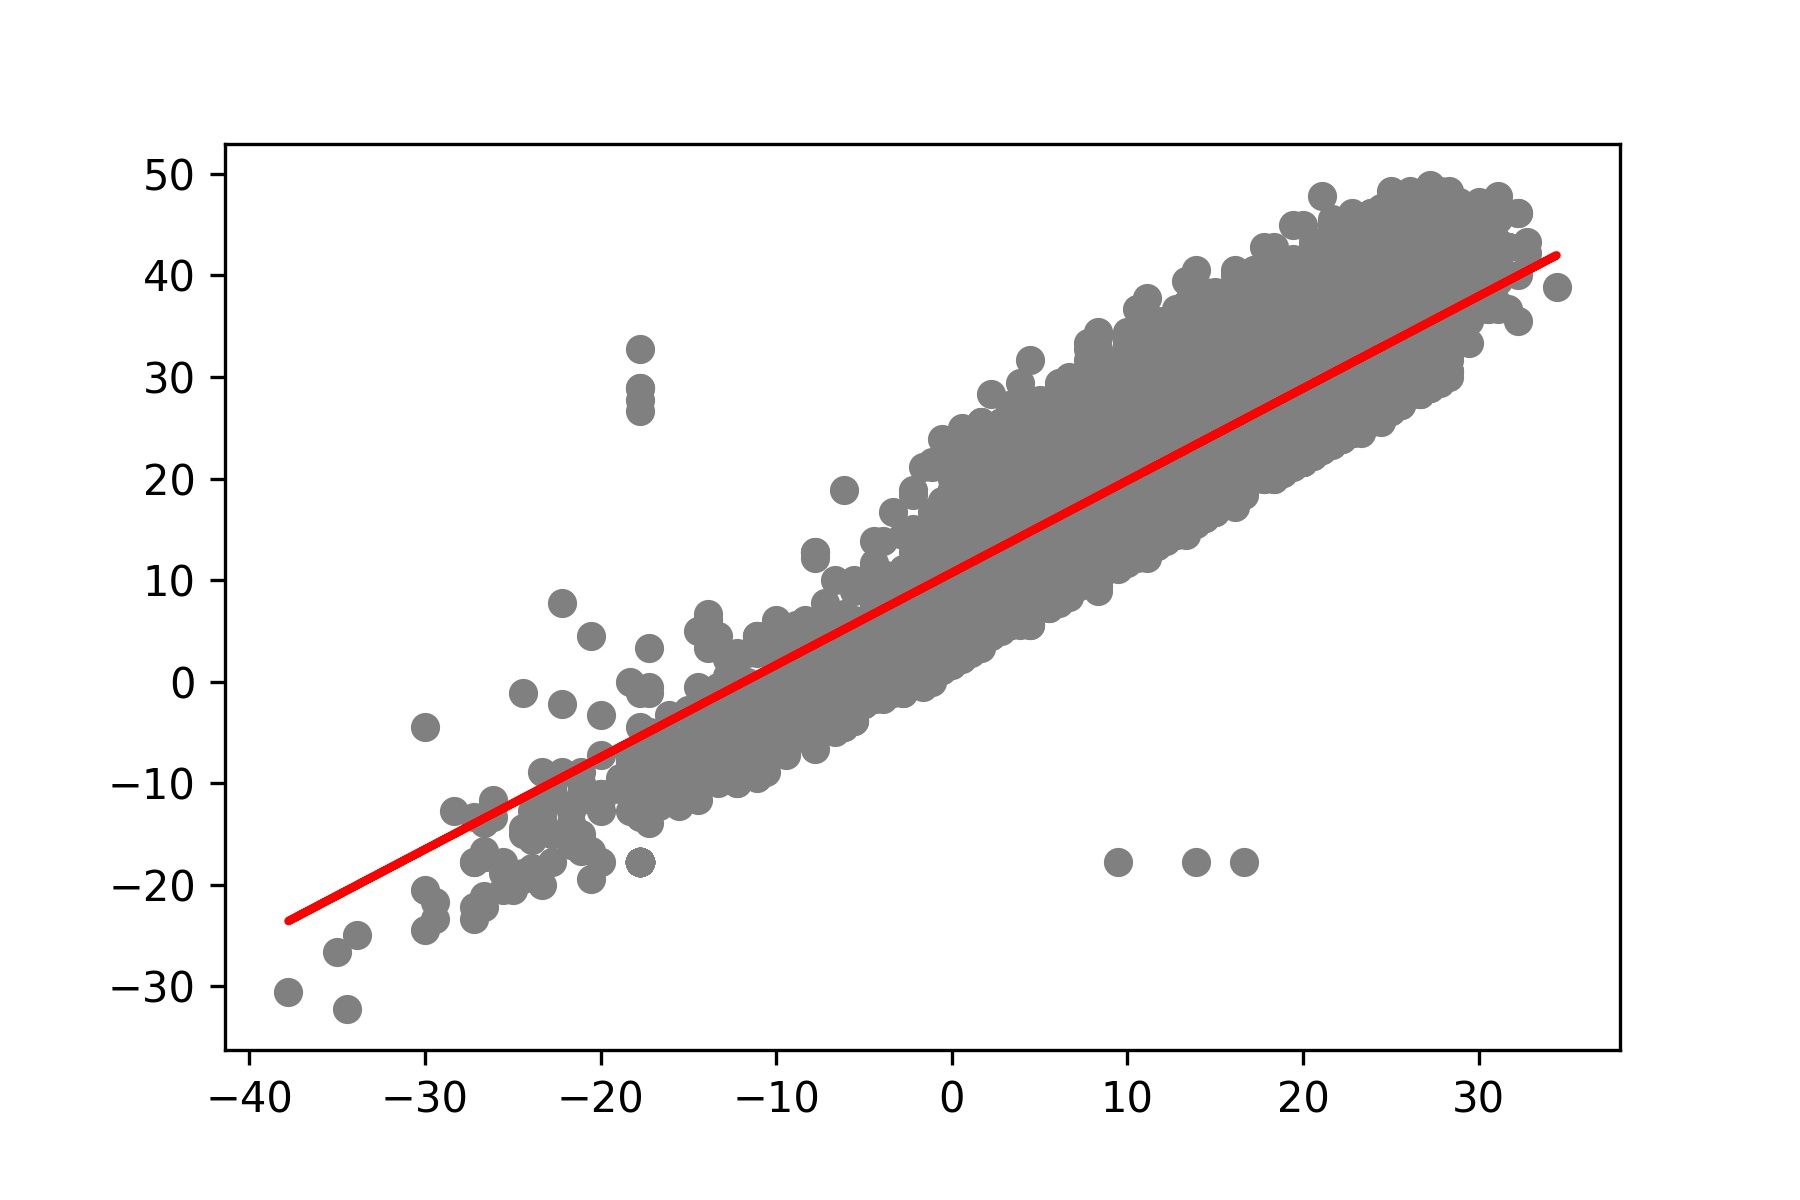
- วัดประสิทธิภาพของ Model ด้วย Mean Absolute Error, Mean Squared Error และ Root Mean Squared Error
print('Mean Absolute Error:', metrics.mean_absolute_error(y_test, y_pred))
print('Mean Squared Error:', metrics.mean_squared_error(y_test, y_pred))
print('Root Mean Squared Error:', np.sqrt(metrics.mean_squared_error(y_test, y_pred)))
หมายเหตุ ท่านสามารถศึกษา Gradient Descent Method เพิ่มเติมได้จากหนังสือ Convex Optimization
ลองทำดู
- ทดลอง Train Neural Network Model แบบ Linear Regression ด้วย Keras Framework โดยกำหนดค่า batch_size เท่ากับขนาดของ Train Dataset แล้วอภิปรายผลการทดลอง
